
Welcoming a furry friend into your home often means finding them a comfortable and secure space that blends seamlessly with your interior design. While many options exist, building a custom Wooden Dog Crate cabinet offers unparalleled benefits, combining functionality with aesthetic appeal. This comprehensive guide will walk you through creating a stylish and sturdy dog crate cabinet, ensuring your canine companion has their own cozy retreat while enhancing your home’s decor. Whether you’re an experienced woodworker or a passionate DIY enthusiast, this project is designed to be customizable to fit your specific needs and your dog’s size, providing a truly unique solution for pet housing. Creating such a dedicated space is a significant part of responsible pet ownership, akin to choosing the right tactipup collar for their daily adventures – it’s all about comfort and security.
Why Choose a DIY Wooden Dog Crate?
Opting for a DIY approach to a wooden dog crate provides several advantages over store-bought alternatives. Firstly, it allows for complete customization of dimensions, ensuring a perfect fit for both your dog and your available space, whether it’s an unused corner, under a countertop, or as a standalone piece of furniture. Secondly, you have full control over the materials and finishes, enabling you to match your home’s existing decor and choose pet-safe, durable wood types. Finally, the satisfaction of creating something functional and beautiful with your own hands is immensely rewarding. A custom-built crate can transform a simple dog bed into an integrated piece of furniture, elevating the look and feel of your living space while providing a secure and comfortable den for your beloved pet.
Essential Tools and Materials for Your Wooden Dog Crate Project
Before diving into the build, gather all necessary tools and materials to ensure a smooth and efficient process. This list is based on the methods described, but feel free to substitute or adapt based on your preference and what you have on hand.
Tools:
- Circular Saw (with Kreg cutting guides for accuracy)
- Pocket Hole Jig (e.g., Kreg Jig)
- Drill/Driver
- ⅜″ Forstner Bit
- Rubber Mallet
- Brad Nailer (optional, but helpful)
- Staple Gun (optional, for back panel)
- Sander (orbital or block)
- Measuring Tape
- Pencil
Materials:
- (1) sheet ¾″ plywood (cabinet grade maple, birch, or oak are recommended for smooth, splinter-free surfaces)
- (1) sheet ¼″ plywood (for the back panel)
- (3) 1x3x8 boards (primed pine is excellent for painting face frames and doors)
- (8) ⅜″ dowel rods (for crate rails)
- ⅜″ dowels (for joinery, if not using all pocket holes)
- 1 ¼″ pocket hole screws
- Pair of butt hinges
- Surface Bolt Latch
- Wood Glue
- Wood Putty
- Edge Banding (optional, for a clean finish on plywood edges)
- Spray Paint (for dowel rails – e.g., satin black)
- Paint (for the cabinet and frame – e.g., custom white, SW Tricorn Black for top panel)
- Clear Polyurethane Sealer (optional, to finish the inside of the crate for easy cleaning)
- Small Magnetic Catch (optional, to help hold the door closed)
Design Considerations for Your Custom Wooden Dog Crate
The beauty of a DIY project lies in its adaptability. When planning your wooden dog crate, consider these key aspects to ensure it perfectly suits your needs:
Sizing for Your Dog: The most critical dimension is the interior space for your dog. A good rule of thumb is to build the crate around a comfortable plastic tray liner or dog bed. Your dog should be able to stand up, turn around, and lie down comfortably without feeling cramped.
Fitting into Your Space: Whether it’s integrated under a laundry room counter or stands alone, measure your designated space precisely. Account for any existing features, like trim or baseboards, that might affect the overall fit.
Material Choices: Cabinet-grade plywood like birch, oak, or maple offers a smooth surface that’s easy to finish and prevents splinters, ensuring your dog’s safety and comfort. For face frames and doors, primed 1×3 pine boards are easy to work with and paint.
Paint and Finish: Get creative with colors! The original project used a custom white for the cabinet and frames, with a contrasting black top and rails. A clear polyurethane sealer on the inside will make cleanup a breeze, especially for puppies or older dogs.
Crucial Safety Note on Rail Spacing: When spacing out the dowel rails for the front panels, it is absolutely vital to ensure they are close enough together that your dog cannot get their head through and get stuck. Always err on the side of too close rather than too far apart to prevent injury. Safety is paramount, just as it is when selecting a custom made dog collars uk to ensure a perfect and safe fit.
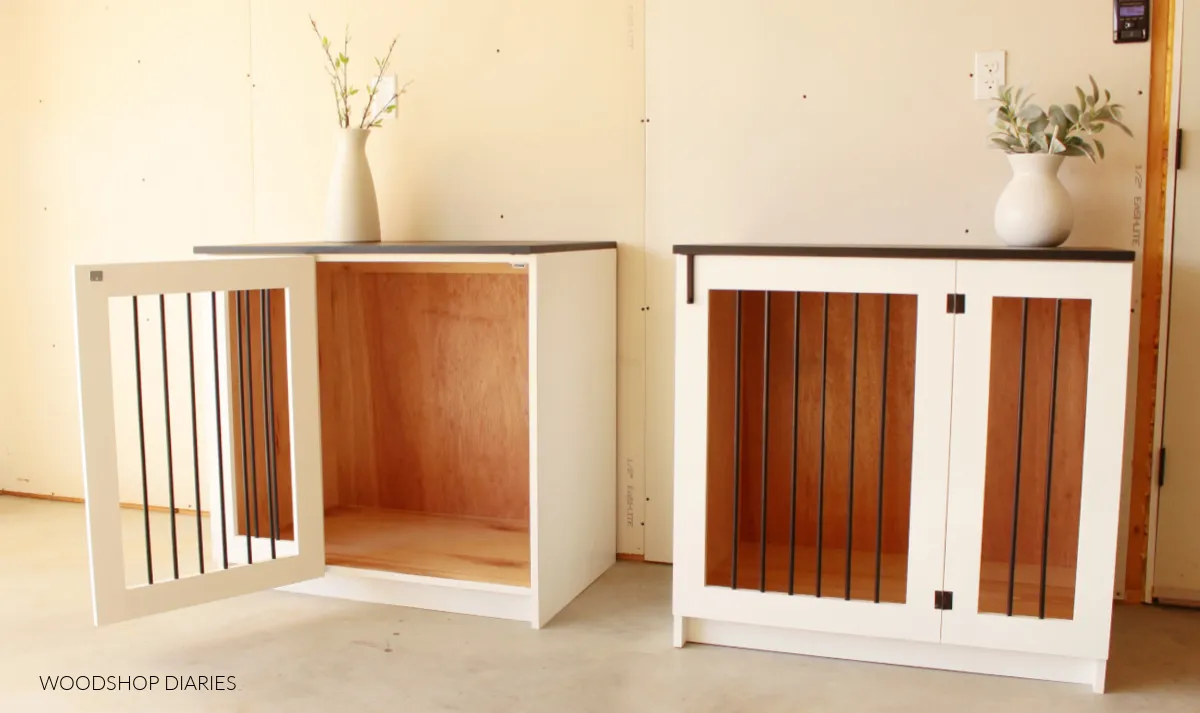 Black and White DIY wooden dog crates sitting side by side with one door open
Step-by-Step Guide: Building Your Wooden Dog Crate Cabinet
This project is essentially building a cabinet box with a specially designed door. Follow these steps for a successful build.
Step 1: Constructing the Cabinet Carcass
Begin by creating the main structure of your wooden dog crate cabinet. This involves cutting and assembling the plywood panels to form the basic box.
First, determine your exact dimensions based on your dog and space requirements. Cut down your ¾″ plywood sheet using a circular saw and cutting guides for straight, accurate cuts. You’ll need two side panels, a bottom panel, two thin support strips for the top front and back, and a strip for the toe kick. The widths of the support strips aren’t critical, but a 3-inch wide toe kick is a good starting point to raise the bottom panel off the floor.
For assembly, pocket holes offer a strong and straightforward method. Drill ¾″ pocket holes into the ends of the thin support strips and across the ends of the bottom panel. Assemble the cabinet by attaching the bottom panel exactly 3 inches up from the bottom edge of the side panels, using the toe kick strip as a guide. Continue by attaching the top support strips. Applying iron-on edge banding to the front edges of all exposed plywood pieces will provide a cleaner, finished look, though this is optional. These top support strips will later be used to secure the top panel and to fasten the cabinet to wall studs if it’s a built-in unit. Finally, add the toe kick piece a couple of inches back from the front edge of the cabinet.
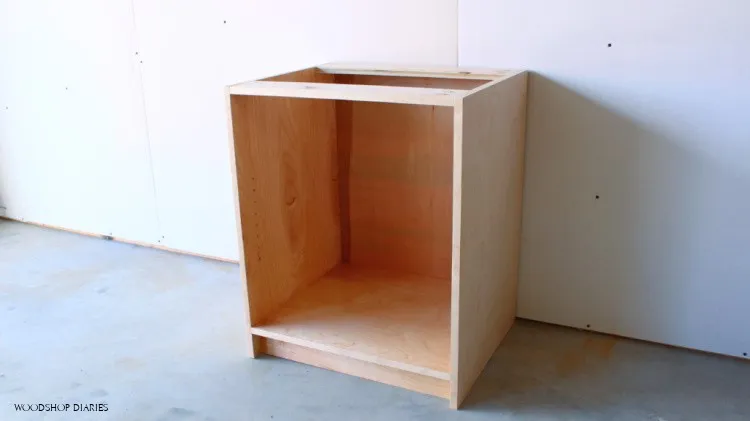 Basic unfinished DIY cabinet box
Step 2: Preparing the Face Frame and Door Panels
With the main cabinet carcass assembled, it’s time to prepare the front face frame and the door for your wooden dog crate. For a painted finish, primed 1×3 pine boards are an excellent choice.
Measure and cut the pieces for both a stationary face frame panel and the mobile door panel. The overall height of these panels should be approximately ⅛″ shorter than the distance from the top of the cabinet to the bottom of the bottom panel, allowing for proper clearance. The widths can be customized, but ensure that the combined width of both panels is slightly narrower (⅛″ to ¼″) than the cabinet’s overall width, providing a small amount of wiggle room for installation. Lay out your cut pieces on your workbench to visualize the fit and make any necessary adjustments before proceeding. This careful preparation ensures a professional-looking result, similar to how one would meticulously select a best car seat belt for large dogs to guarantee safety and a perfect fit.
Step 3: Drilling and Prepping for Rails and Assembly
This crucial step involves drilling all necessary holes for both assembly and the insertion of the dowel rails. Since the rails and frames will likely be different colors, preparing and painting these components separately before final assembly is essential.
For the stationary panel, use pocket holes for assembly, as they will be hidden on the back side. For the door, dowel joinery is often preferred to keep the joinery invisible when the door is open, although pocket holes can also work for both. Mark and drill the dowel holes for the rails. For example, two dowels in the smaller stationary panel and six in the door panel can create an aesthetically pleasing and safe spacing. Using a ⅜” forstner bit for ⅜” diameter dowels, drill holes to a consistent depth where the cutter head is flush with the wood surface. After all holes are drilled, sand everything thoroughly to prepare for painting. Apply your chosen paint colors to the individual frame pieces and the cabinet boxes, allowing them to dry completely.
 Drilling dowel holes for rails in door panels
Step 4: Cutting and Painting the Dowel Rails
While your painted frame pieces and cabinet dry, prepare the dowel rails that will form the bars of your wooden dog crate door and stationary panel.
Cut your ⅜″ dowel rods to a length sufficient to span the frames and securely fit into the pre-drilled dowel holes from the previous step. Once cut, apply your desired color of spray paint (e.g., black) to all the dowel rails. Ensure they are painted evenly and allowed to dry completely to prevent any stickiness or smudging during assembly. This separate painting process ensures crisp, clean lines and colors in your final design, enhancing the overall appearance of your custom crate.
Step 5: Assembling the Door and Face Frames
With all components painted and dried, it’s time to bring the door and face frames together, integrating the dowel rails into their respective panels.
For the small stationary frame, assemble it using pocket hole screws, ensuring the dowels for the rails are securely inserted into their drilled holes with the help of a rubber mallet. For the door frame, using dowel joinery, it’s often easiest to attach the rails between the top and bottom pieces first. Then, add the side pieces, securing everything with wood glue and additional dowels where applicable. A rubber mallet will be invaluable here to gently tap all pieces into their precise positions. Once assembled, clamp the door together until the wood glue fully cures. After drying, fill any visible joints or imperfections with wood putty, sand smooth, and touch up the paint as needed for a flawless finish. The precision and care taken here contribute to the overall strength and longevity of the wooden dog crate, just as a carefully chosen dog neck belt is durable and secure for everyday use.
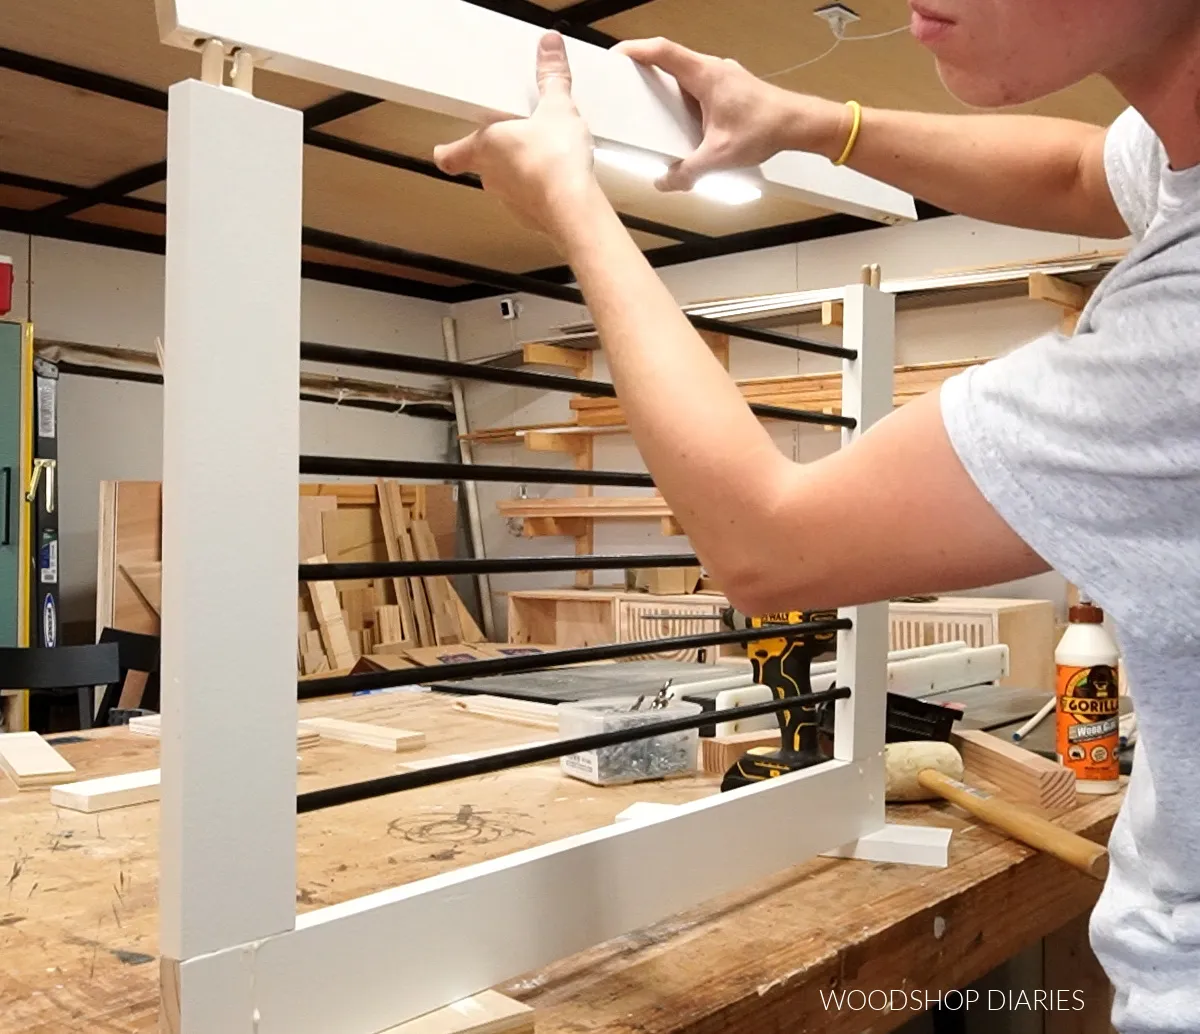 Assembling door frame panel of dog crate using dowels and glue
Step 6: Attaching the Face Frame and Door to the Crate
Now, integrate the completed face frame and door onto the cabinet carcass, bringing your wooden dog crate closer to completion.
Install the stationary panel onto the front of the cabinet using wood glue and brad nails. While brad nails are sufficient when combined with strong wood glue, screws can be used for added security if preferred. Ensure there’s about an ⅛” space between the top of the stationary frame and the top of the cabinet; this intentional gap matches the door’s clearance for smooth operation and creates an even visual line. After securing, putty over the nail holes, sand smooth, and touch up the paint.
Next, install the door frame using simple black butt hinges. Position the hinges to allow for fluid opening and closing of the door. The seamless integration of the door makes your wooden dog crate a functional and stylish piece.
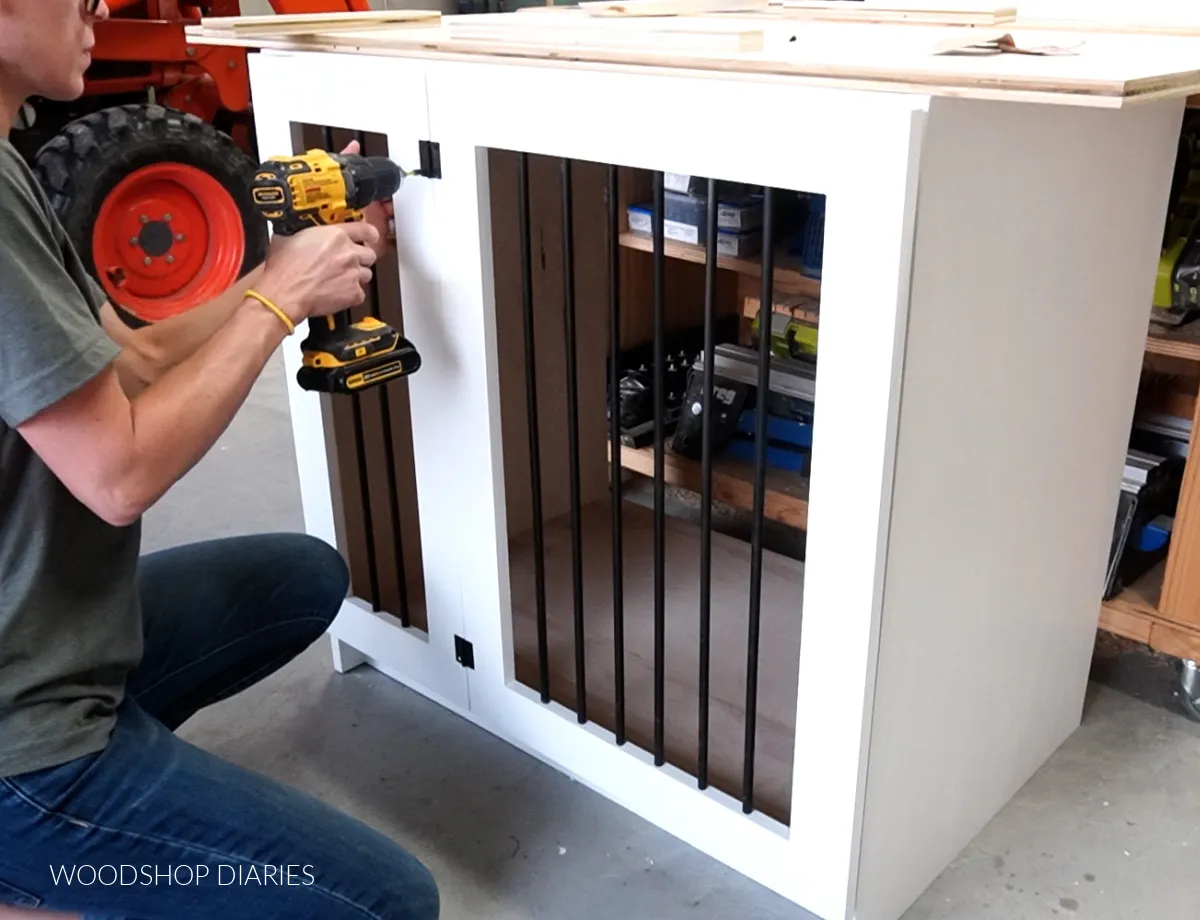 Attaching door frame with butt hinges onto dog crate cabinet
Step 7: Installing the Back Panel on Dog Crate
With the front panels in place, it’s time to secure the back of your wooden dog crate cabinet.
Cut a piece of ¼” plywood to fit the exact dimensions of the cabinet’s back opening. This thinner plywood is ideal for a back panel. Secure it in place using a staple gun for quick and easy attachment. If you don’t have a staple gun, wood glue combined with brad nails or screws will also work effectively to firmly attach the back panel. This step adds rigidity to the cabinet structure and encloses the space, making it a true den for your dog.
Step 8: Finishing Touches: Top Panel and Latch Installation
The final steps involve installing the top panel, adding the latch mechanism, and applying protective finishes to complete your wooden dog crate.
Retrieve the ¾″ plywood piece that was set aside at the very beginning for the top. Trim it to fit precisely over the cabinet, then apply edge banding if desired for a cleaner look. Paint the top panel in your chosen contrasting color (e.g., black) to match the rails and other accents. Once painted and thoroughly dry, secure the top panel in place by screwing it down from the inside of the cabinet through the top support strips.
Install your chosen latch mechanism. A simple surface bolt is both functional and aesthetically pleasing. To install, position the surface bolt where desired, trace the hole for the bolt to slide into, and drill a shallow hole (about ¼” deep) in that spot. Screw the bracket in place, then attach the surface bolt to the door, ensuring it aligns perfectly with the bracket. For an added touch, consider installing a small magnetic catch on the door to help pull it securely into place when shut.
Finally, apply a few coats of a clear sealer (such as a water-based polyurethane) to the inside of the cabinet. This protective layer will seal the wood, making it easier to clean up any spills or accidents, ensuring your wooden dog crate remains hygienic and durable for years to come. This attention to detail is what makes a custom piece truly shine, much like finding the best website for dog accessories ensures you get quality products for your pet.
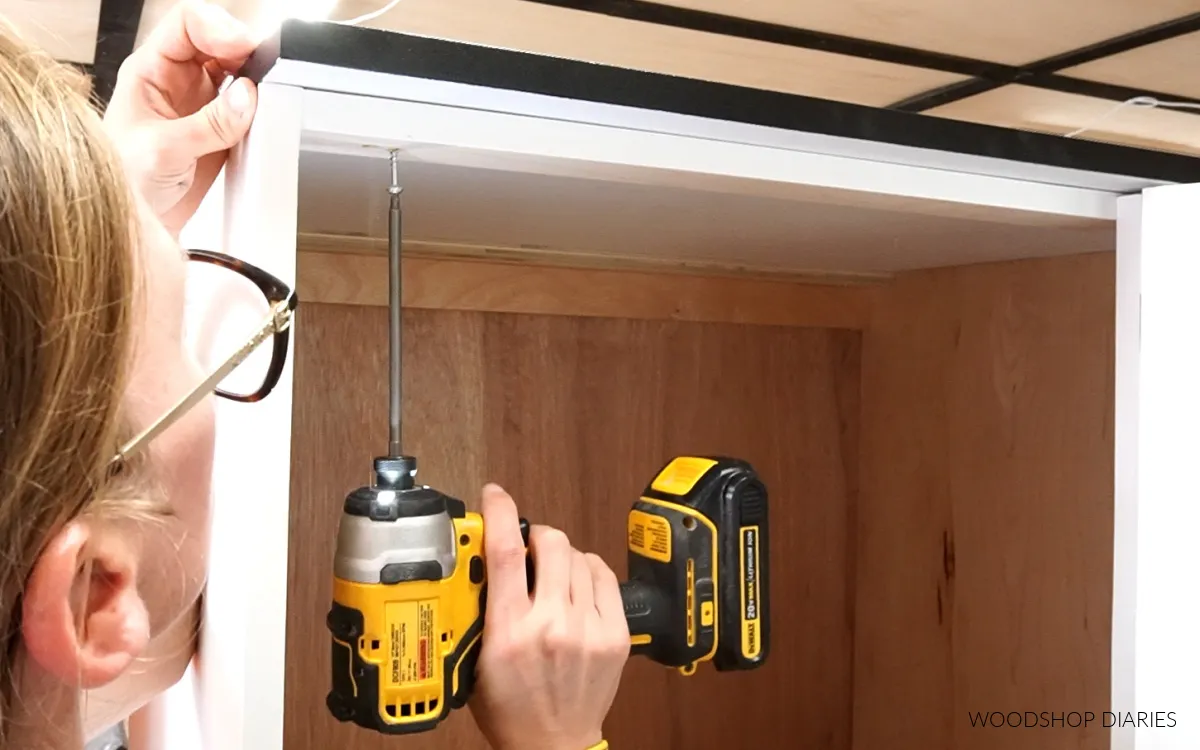 Shara Woodshop Diaries attaching top panel using wood screws through top supports
Tips for a Successful Wooden Dog Crate Build
Building your own wooden dog crate cabinet is a rewarding endeavor, and a few additional tips can help ensure your project’s success:
- Double-Check Measurements: Always measure twice, cut once. This adage is particularly true in woodworking, where small inaccuracies can lead to larger problems later.
- Safety First: When working with power tools, always wear appropriate safety gear, including eye protection and hearing protection. Pay close attention to the rail spacing to ensure your dog’s safety.
- Take Your Time: Rushing through steps can lead to mistakes. Enjoy the process of creating something unique for your pet.
- Embrace Customization: Don’t be afraid to experiment with different paint colors, wood stains, or hardware to truly make the crate your own.
- Patience with Painting: Painting and finishing can be a time-consuming part of the project, often requiring multiple coats and touch-ups. Allow ample drying time between coats for the best results.
Conclusion
A DIY wooden dog crate cabinet offers a stylish, comfortable, and secure solution for your canine companion, seamlessly integrating into your home decor while providing a dedicated den. By following these detailed steps, you can create a custom piece that perfectly meets your pet’s needs and your aesthetic preferences. This project not only provides a safe haven for your dog but also enhances your woodworking skills and adds a touch of personalized craftsmanship to your living space.
We hope this guide inspires you to take on this fulfilling project. Share your custom builds with us and continue exploring other helpful articles on our site for more tips and projects dedicated to the well-being and happiness of your pets!