
Embarking on the journey of teaching a young horse to jump is an exciting and rewarding endeavor that requires patience, understanding, and a systematic approach. This process not only builds the horse’s physical capabilities but also strengthens the bond and trust between horse and rider. We’ll explore the foundational steps, essential techniques, and crucial considerations for successfully training a young horse to navigate fences with confidence and skill.
Understanding the Young Horse’s Development
Before introducing jumping, it’s vital to understand that a young horse’s physical and mental development is ongoing. Their bones, joints, and muscles are still maturing, making it essential to avoid overexertion and ensure proper conditioning. A solid foundation in basic flatwork is paramount; a horse that is responsive, balanced, and confident on the flat will transition to jumping much more readily. This includes establishing a reliable walk, trot, and canter, as well as developing smooth transitions between gaits and effective steering.
Building a Solid Flatwork Foundation
- Rhythm and Responsiveness: Ensure your young horse maintains a consistent rhythm in all gaits and responds promptly to your aids (seat, legs, and reins). This responsiveness is the bedrock of any ridden discipline.
- Balance and Suppleness: Work on exercises that encourage your horse to engage their hindquarters, carry themselves in a balanced frame, and become supple through their body. Circles, leg-yields, and serpentines are excellent for this.
- Confidence and Trust: Create positive experiences. Keep early flatwork sessions short, engaging, and always end on a positive note. Building trust is a continuous process.
Introducing Poles: The First Steps
Ground poles are the perfect introduction to jumping exercises. They teach the horse to assess distances, lift their feet, and develop a sense of rhythm over an obstacle without the intimidating height of a fence.
Setting Up Ground Poles
Start with a single ground pole placed on a straight line. Ensure it’s at a comfortable distance for your horse to trot over. The ideal distance for a trot pole is approximately 8-10 feet between the center of the poles.
Riding Over Ground Poles
- Walk and Trot: Begin by walking your horse over the pole. Focus on maintaining a steady rhythm and allowing your horse to figure it out. Once comfortable, progress to trotting over the pole. Keep your upper body tall and quiet, allowing the horse to use their own balance.
- Adding More Poles: Gradually increase the number of poles to two or three, laid out in a straight line, still at trot pole distance. This encourages the horse to maintain their rhythm and stride between the poles.
- Cantering Poles: Once your horse is confident and rhythmic at the trot, introduce cantering poles. The distance between cantering poles should be approximately 10-12 feet. This is a more advanced exercise, so ensure your horse has a solid canter before attempting it.
Progressing to Small Jumps
After mastering ground poles, you can gradually introduce small jumping efforts. The key is to keep everything very low and non-threatening.
The “Cavaletti” Approach
Cavaletti are poles raised slightly off the ground, typically only a few inches. They serve as a stepping stone between ground poles and actual fences.
- Single Cavaletti: Start with a single cavaletti at the trot. Ensure the horse is approaching it straight and at a steady pace. Keep your eyes up and allow the horse to clear it easily.
- Gridwork Introduction: Small grid systems using cavaletti can be highly effective. A simple grid might consist of a trot pole, followed by a small cavaletti, and then another trot pole. This teaches the horse to think and adjust its stride between obstacles. For instance, understanding the mechanics of pole training for horses can significantly inform how you set up these early grids.
Building Tiny Fences
Once your horse is comfortable with cavaletti, you can build a very small cross-rail or a single vertical jump, no more than a foot or 18 inches high.
- Approach and Rider Position: Approach the jump in a balanced trot. Keep your hands steady and allow your horse to lengthen their stride. As the horse jumps, allow your upper body to move forward with their motion, coming back to a balanced position on landing.
- Focus on Smoothness: The goal at this stage is not height or difficulty, but a smooth, confident jump. Celebrate small successes and ensure the horse feels good about the experience.
Developing Jumping Technique
As the horse gains confidence and strength, you can gradually increase the height and introduce different types of jumping efforts.
Gridwork for Technique
Gridwork is invaluable for developing a young horse’s jumping technique. It allows the horse to learn to assess distances and use their body effectively over successive obstacles.
- Stride Manipulation: Grids can be set up to encourage the horse to add or take a stride. For example, a grid with a slightly shorter distance between the first two elements might encourage the horse to add an extra stride before the third, larger element. This is where understanding concepts like those in slow horses episode 1 training exercise can offer insights into training progression.
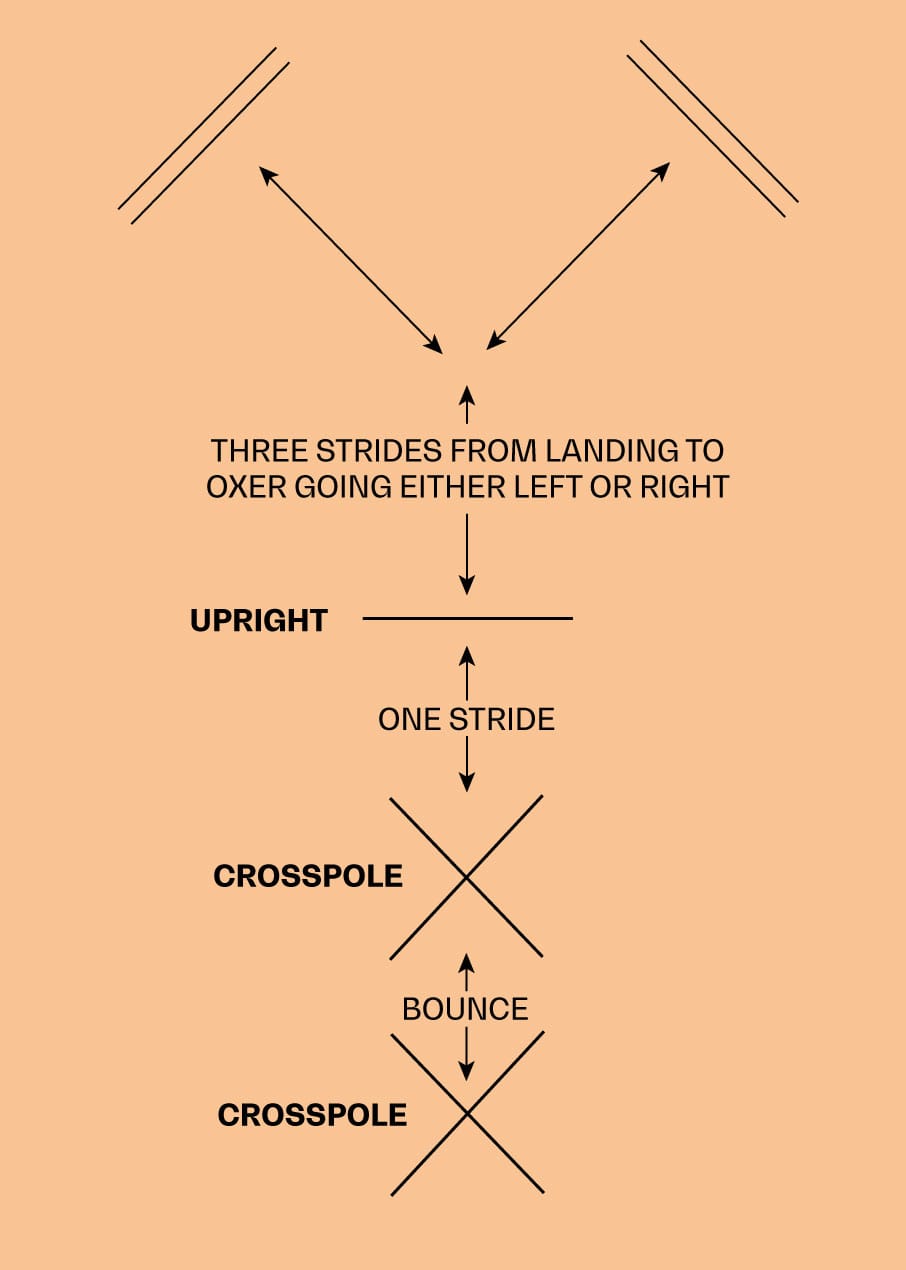
- Variety is Key: Incorporate different types of grids, including lines of verticals, grids with bounces, and grids that lead to an oxer. This keeps the horse engaged and challenges them in various ways.
Introducing Oxers and Related Courses
- Gentle Introduction to Oxers: When introducing oxers (spread jumps), start with a very narrow one. Ensure the horse understands the concept of jumping width before gradually increasing it.
- Simple Courses: Once the horse is confident over individual fences and simple lines, begin introducing very short, simple courses. This helps the horse learn to navigate between different fences and maintain rhythm and focus. Consider the principles of horse feathers training and riding academy for inspiration on structured learning.
Important Considerations for Young Horse Jumping
- Frequency and Duration: Young horses should not jump frequently. Limit jumping sessions to once or twice a week, and keep them relatively short (e.g., 15-20 minutes of actual jumping effort). Over-jumping can lead to physical injury and mental burnout.
- Listen to Your Horse: Pay close attention to your horse’s body language. Signs of stress, fatigue, or confusion (e.g., pinning ears, swishing tail excessively, refusing jumps) should be heeded. If your horse is struggling, reassess the exercise, lower the height, or go back a step.
- Rider Position and Balance: The rider’s position is crucial. A balanced, quiet rider allows the horse to jump freely and efficiently. Avoid leaning forward excessively or interfering with the horse’s mouth. Practicing your position on the flat and over poles is essential.
- Veterinary Checks: Regular veterinary check-ups are vital for young horses in training. Your vet can assess their skeletal maturity, identify any potential issues, and offer guidance on appropriate training loads. Understanding the horse training cost per month can help in budgeting for professional care.
- Patience and Consistency: Training a young horse takes time. There will be good days and challenging days. Consistency in your approach, coupled with immense patience, will yield the best results. If you are considering starting a horse training business, remember that ethical and patient training practices are the foundation of success.
Conclusion
Teaching a young horse to jump is a journey that builds athleticism, confidence, and partnership. By focusing on a strong flatwork foundation, gradually introducing obstacles starting with ground poles, and employing careful progression, you can help your young horse develop into a capable and willing jumping partner. Always prioritize the horse’s well-being, listen to their needs, and celebrate every step of progress. The reward is a horse that not only jumps well but trusts and enjoys the experience with you.