
Teaching a horse to bow on command is an impressive trick that can be achieved with patience and consistent training. This guide breaks down the process into manageable steps, focusing on a common variation where the horse kneels on one knee and tucks its nose towards the ground. While variations in head and leg position exist, the core principle involves guiding the horse through a series of movements that culminate in the bow. This can be achieved through various training methods, including luring with food or using a target stick, and is best taught incrementally to ensure the horse’s comfort and confidence.
Understanding the Bowing Behavior
The bow, in this context, refers to a specific maneuver where the horse lowers its body by bending one foreleg and bringing its knee to the ground, often tucking its nose behind the bent knee. Some horses may naturally adopt a slight variation, such as kneeling on both knees or extending their front legs further to lower their forequarters. The described method focuses on the one-knee bow, which requires the horse to coordinate several movements:
- Stance Adjustment: The horse may widen its stance by slightly extending its front and hind legs. This is an optional but often helpful preparatory step.
- Foreleg Elevation: The horse must lift one foreleg and hold it up, typically the left foreleg.
- Shoulder Lowering: The horse needs to shift its weight backward, lowering its shoulders. This may involve stepping the hind legs back to create space.
- Leg Placement: The horse brings the lifted foreleg to rest on or near the ground. For safety, the cannon bone of the bent leg should be parallel to the ground to prevent knee injury.
Breaking Down the Training Process
Teaching the bow can be divided into distinct stages, allowing for focused practice and reinforcement. It’s crucial to work at the horse’s pace, celebrating small improvements and addressing any hesitation or discomfort.
Step 1: Preparation and Soft Footing
Begin by having your horse stand square in a quiet area with soft footing, such as deep shavings. You may consider wrapping the foreleg that will be used for the bow (typically the left) with a polo bandage for added cushioning.
Step 2: Encouraging a Wider Stance (Optional)
This step, teaching the horse to “stretch,” can make the bowing action easier. One method involves placing the horse’s front feet on one mat and hind feet on another, gradually increasing the distance between them. Once the horse understands the “stretch” cue, you can use it as a precursor to the bow. If your horse struggles with the subsequent steps, revisit teaching this stretch.
Step 3: Lifting and Holding the Foreleg
Using your established “pick up your foot” cue, encourage the horse to lift its left foreleg. A target stick can be helpful here; hold it so the horse’s knee touches it when the leg is raised. Click and reward when the knee makes contact. Gradually increase the duration the horse holds its leg up. For detailed guidance on this targeting technique, refer to resources on body part targeting.
Step 4: Initiating the Rock Back and Lowering
Once the horse can hold its leg up, cue it to shift its weight back. This can be done by gently guiding the bent leg backward, rewarding any shift in weight. Alternatively, use a target stick or a piece of carrot placed between the front legs to encourage the horse to reach down. This stage requires patience, as the horse may find the movement physically challenging. Remember, the horse cannot see where to place its leg, so guidance is essential.
Step 5: Deepening the Bow
Continue to encourage the horse to lower its shoulders. Ensure the horse is truly lowering its front end, not just straightening its elbow. If the horse is holding its leg up independently, monitor to prevent it from unfolding as it lowers. Horses may naturally step back with their hind legs to accommodate the lower position. If using a target or lure, focus on reinforcing moments when the horse lowers its shoulders. Be mindful that some horses may excessively arch their necks; adjust your positioning of the target or lure as needed.
Step 6: Achieving Ground Contact
As the horse becomes more comfortable, work towards getting the cannon bone close to or parallel with the ground. This is a gradual process. To provide extra support and reduce the distance, you can create a small pile of shavings or a padded pillow where the leg is intended to rest. Reward contact with this padding. It is not always necessary for the horse to bear weight directly on its folded leg; many will maintain it slightly above the ground, supporting their weight on the extended foreleg.
Step 7: Refining Head Position
Once the horse’s general body position is established, you can refine the head position. Common goals include tucking the nose between the legs or alongside the bent leg. This can be achieved through shaping or by using a target stick to guide the horse’s nose.
Considerations for a Successful Bow
Every horse has a unique way of performing a bow. The final position should be comfortable for the horse to enter and exit. If a horse struggles to rise from the bow, the maneuver might need to be made shallower.
Some horses may naturally adopt a kneeling posture, which can be a more comfortable alternative. If kneeling is not the desired outcome, simply ask the horse to stand and repeat the steps focusing on the folded foreleg and backward rock. Alternatively, you can embrace the kneel as the desired behavior.
Always prioritize the horse’s well-being. Rushing the process can lead to fear or injury, requiring significant effort to rebuild confidence. Bowing can be physically demanding, particularly for horses with existing back or shoulder issues. In such cases, a modified, shallower bow may be appropriate, with careful observation for any signs of discomfort.
Here is Willy demonstrating the finished bow.
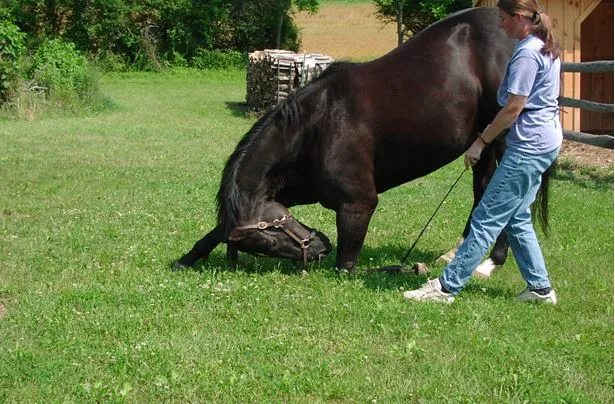 Willy performing a bow on one knee.
Share this:
- Share on X (Opens in new window) X
- Share on Facebook (Opens in new window) Facebook
Like Loading…