
Understanding how to properly use a dog training collar is crucial for effective and humane training. This guide provides a comprehensive overview of the Slopehill Dog Training Collar Manual, covering everything from initial setup to advanced training techniques. Whether you’re a new dog owner or looking to refine your training methods, this manual will equip you with the knowledge to ensure a positive and successful training experience for you and your canine companion.
Getting Started with Your Slopehill Training Collar
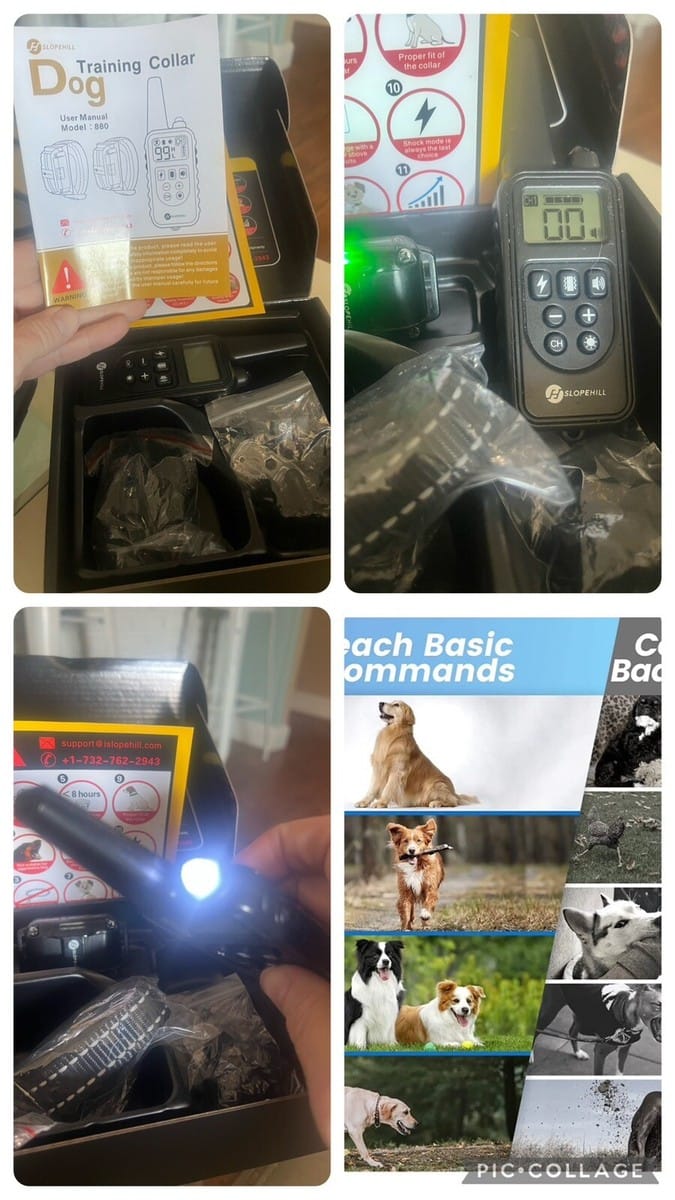
Before diving into training, it’s essential to familiarize yourself with the components and setup of your Slopehill training collar. The system typically includes a collar, a remote transmitter, and a receiver.
What’s in the Box?
- Collar: This houses the receiver and contact points that deliver stimulation. It should be adjustable to fit your dog’s neck snugly but comfortably.
- Remote Transmitter: This is your control unit. It allows you to select the stimulation level, mode, and send signals to the receiver.
- Charging Cables: For powering up both the transmitter and receiver.
- Contact Points: Different lengths may be provided to suit various coat thicknesses.
- Test Light: A tool to verify the collar is functioning correctly without over-stimulating your dog.
- User Manual: The detailed document you’re currently referencing.
Initial Setup and Charging
- Charge Both Devices: Before the first use, fully charge both the remote transmitter and the collar receiver. The charging indicators will typically change color or turn off when fully charged. This usually takes a couple of hours.
- Assemble the Collar: Attach the receiver to the collar strap. Ensure the contact points are facing inwards, towards your dog’s skin.
- Select Contact Points: Choose the contact point length that best suits your dog’s coat. For dogs with thick fur, longer contact points are necessary to ensure good skin contact. For dogs with short hair, shorter points are usually sufficient. Screw them into the receiver securely.
Fitting the Collar Correctly
A proper fit is paramount for the collar to work effectively and to prevent discomfort or injury.
- Snug Fit: The collar should fit snugly enough that the contact points make good contact with your dog’s skin. You should be able to fit one or two fingers between the collar and your dog’s neck.
- Not Too Tight: It should not be so tight that it restricts breathing or causes chafing.
- Positioning: The collar should ideally be positioned on the dog’s neck, below the ears and away from the larynx (windpipe).
Understanding the Features and Functions
Slopehill training collars come with a variety of features designed to offer flexibility and control during training sessions. Understanding these functions is key to using the collar effectively.
Remote Transmitter Buttons and Controls
- Power Button: To turn the transmitter on and off.
- Level Adjustment Dial/Buttons: Allows you to precisely control the intensity of the stimulation. It’s crucial to start at the lowest effective level.
- Mode Buttons: These typically control the type of correction:
- Static Stimulation: The most common mode, delivering a mild electric pulse. Levels can usually be adjusted from 0 to 100.
- Vibration: A vibration alert without any electric stimulation. This can be a good alternative for dogs sensitive to static or as a warning.
- Tone/Beep: An audible alert. This is often used as a positive reinforcement cue or a warning before stimulation.
- Momentary/Instant Button: Delivers a short burst of the selected stimulation.
- Continuous Button: Delivers stimulation for as long as the button is held down, up to a maximum of 8-10 seconds (this is a safety feature).
- Boost Button (on some models): Delivers a higher level of stimulation for more challenging situations.
Receiver Functions
- Status Light: Indicates when the receiver is powered on, receiving a signal, and the battery level.
- Contact Points: Transmit the stimulation to the dog’s neck.
- Antenna: Receives signals from the transmitter.
Effective Training Techniques with Your Slopehill Collar
The Slopehill training collar is a tool to aid in training, not a replacement for consistent and positive reinforcement methods. It’s most effective when used to communicate boundaries and correct unwanted behaviors, rather than as a primary reward system.
Finding the Right Stimulation Level
This is arguably the most critical aspect of using an e-collar.
- Start Low: Begin with the lowest stimulation level (Level 1).
- Gradual Increase: If your dog doesn’t respond, gradually increase the level by one increment at a time while observing your dog’s reaction.
- Identify the “Working Level”: The “working level” is the lowest setting at which your dog consistently notices the stimulation and changes their behavior (e.g., cocks their head, paws, or stops an unwanted action). This level should not cause yelping, distress, or panic.
- Test Light: Use the test light to confirm the collar is functioning at different settings.
Basic Commands and Correction
- “Sit”: When your dog is standing, press the momentary button at their working level and say “Sit.” As soon as they sit, release the button and offer praise or a treat.
- “Come”: If your dog is not responding to a verbal “Come,” you can use a tap of the vibration or a low-level static stimulation while giving the command. Immediately reward them when they come to you.
- Leash Reactivity/Pulling: If your dog pulls ahead on the leash, use a short burst of vibration or low-level static stimulation to get their attention and encourage them to heel. Release the stimulation as soon as they stop pulling.
Addressing Unwanted Behaviors
- Jumping Up: When your dog jumps, use a brief, low-level static stimulation. Release it the moment their paws return to the ground.
- Barking: For nuisance barking, you can use the tone feature first as a warning. If the barking continues, use a mild static stimulation. The goal is to interrupt the barking, not to punish the dog.
- Chewing: If you catch your dog chewing inappropriately, use a vibration or static stimulation. Immediately redirect them to an appropriate chew toy.
Important Considerations for Successful Training
- Consistency is Key: Use the collar consistently for the behaviors you are addressing. Inconsistency will confuse your dog.
- Timing: The correction must be delivered immediately as the unwanted behavior occurs. Poor timing renders the correction ineffective and can be unfair to your dog.
- Positive Reinforcement: Always pair corrections with positive reinforcement (praise, treats, play) when your dog performs the desired behavior. The e-collar is a communication tool, not a sole training method.
- Short Training Sessions: Keep training sessions short (10-15 minutes) and positive to maintain your dog’s engagement and prevent frustration.
- Professional Guidance: If you encounter persistent behavioral issues or are unsure about using the collar, consult a professional dog trainer or behaviorist.
Safety and Maintenance
Proper care and responsible use of your Slopehill training collar will ensure its longevity and your dog’s safety.
When NOT to Use the Training Collar
- Aggression: Never use an e-collar on an aggressive dog, as it can potentially escalate their aggression.
- Fearful or Anxious Dogs: Highly fearful or anxious dogs may react unpredictably to stimulation. Consult a professional before using it.
- Young Puppies: Puppies under 6 months of age typically have not fully developed their physical and mental capabilities for this type of training. Wait until they are mature enough.
- Dogs with Health Conditions: If your dog has a heart condition, epilepsy, or other serious health issues, consult your veterinarian before using any training collar.
Maintenance and Care
- Cleaning: Regularly clean the contact points with a damp cloth and ensure they are dry. Wipe down the transmitter and receiver as needed.
- Battery Care: Follow the charging instructions in the manual. Avoid overcharging or letting the batteries completely deplete if possible.
- Storage: Store the collar and transmitter in a cool, dry place, away from direct sunlight and extreme temperatures.
- Regular Checks: Periodically check the collar strap for wear and tear, and ensure the contact points are securely attached.
Troubleshooting Common Issues
Even with careful use, you might encounter minor issues. Here are some common problems and their solutions:
- Dog Not Responding:
- Check battery levels on both devices.
- Ensure the collar is fitted correctly and contact points are making skin contact.
- Try increasing the stimulation level gradually.
- Verify the correct mode and channel are selected on the transmitter.
- Collar Not Working:
- Check batteries.
- Ensure the collar and transmitter are paired correctly (refer to pairing instructions in the full manual).
- Use the test light to see if the receiver is outputting stimulation.
- Check for any physical damage.
- Dog Shows Excessive Distress:
- Immediately release stimulation.
- Lower the stimulation level.
- Re-evaluate the dog’s sensitivity and adjust training approach. Consider using vibration or tone more.
- Consult a professional trainer if distress persists.
Frequently Asked Questions (FAQ)
Q1: How long should I use the Slopehill training collar each day?
A: Training sessions should be short and focused, typically 10-15 minutes, 1-2 times a day. Avoid prolonged use that could lead to fatigue or over-stimulation.
Q2: Can I use the training collar in wet conditions?
A: Most Slopehill collars are designed to be water-resistant, but not fully waterproof. Check your specific model’s rating. Avoid submerging the transmitter in water. It’s generally safe for use in light rain, but it’s best to remove it during heavy downpours or swimming.
Q3: Will the stimulation hurt my dog?
A: When used correctly and at the appropriate working level, the stimulation is designed to be a mild sensation, not painful. It should be noticeable enough to get your dog’s attention and guide their behavior. Always start at the lowest level and find the minimum effective stimulus.
Q4: How do I transition my dog off the training collar?
A: The goal of a training collar is to help establish good habits. Once your dog reliably performs the desired behaviors, you can gradually phase out the collar. Start by using it less frequently, relying more on verbal cues and praise, and eventually transition to a standard collar or harness for walks.
Q5: Is it ethical to use a shock collar?
A: The ethical use of e-collars is a debated topic. Responsible use emphasizes finding the lowest effective level, using it as a communication tool in conjunction with positive reinforcement, and never for punishment or to inflict pain. Consulting with experienced, positive trainers can provide further insight into ethical application.
By carefully following this guide and understanding the nuances of your Slopehill dog training collar, you can build a stronger bond with your dog and achieve your training goals effectively and humanely. Remember, patience, consistency, and a focus on positive reinforcement are the cornerstones of successful dog training.