
For many dog owners, the bond with their canine companion is strengthened through shared moments, including delicious treats. While commercial options abound, there’s a unique satisfaction in creating wholesome, homemade Peanut Butter Dog Treats right in your own kitchen. These DIY delights not only offer controlled ingredients and a personal touch but also allow for creative use of common household items, even spent grains from homebrewing. If you’re looking for a rewarding way to spoil your loyal friend, this guide will walk you through crafting tasty and safe peanut butter banana dog treats that your dog will adore.
The Benefits of Crafting Homemade Dog Treats
Making your dog’s treats offers numerous advantages over store-bought alternatives. Firstly, you gain complete control over the ingredients, ensuring that only fresh, wholesome components make it into your furry friend’s snack. This is especially beneficial for dogs with sensitivities or allergies, as you can easily avoid common triggers found in many commercial treats. Homemade treats typically contain no artificial preservatives, colors, or fillers, contributing to a healthier diet for your pet. Furthermore, creating treats at home can be a cost-effective alternative to premium commercial options, and it’s a wonderful way to deepen your bond with your dog through a labor of love. Choosing high-quality ingredients for your dog’s overall diet, whether in treats or their main meals, is crucial for their well-being. For those considering various options, exploring comprehensive assessments like Fromm wet dog food reviews can offer insights into different dietary choices available.
Understanding Spent Grains: A Sustainable and Nutritious Base
The idea of repurposing spent grains for dog treats emerged from a common homebrewing dilemma: what to do with the byproduct of beer making? These grains, primarily barley, are what’s left after the mashing process extracts the sugars for fermentation. Far from being waste, spent grains are rich in fiber, protein, and some residual nutrients, making them an excellent, sustainable ingredient for dog treats. Using spent grains not only reduces food waste but also adds a beneficial boost of dietary fiber to your dog’s diet, which can aid digestion.
Sourcing spent grains is straightforward. If you’re a homebrewer, you have them readily available. Many local craft breweries are also happy to donate their spent grains; just bring a large, clean container and ask!
Critical Safety Warning: Never use spent grains that have been in contact with hops. Hops are highly toxic to dogs and can cause a rapid and dangerous increase in body temperature, leading to severe health complications or even death. Always ensure your spent grains are hop-free. Store any unused grains in the refrigerator to prevent mold growth if you plan to use them later.
Why Peanut Butter for Dogs? The Good, The Bad, and The Essential
Peanut butter is a beloved ingredient for many dogs, and for good reason. It’s incredibly palatable, making it an excellent motivator for training or a tasty addition to treats. Nutritionally, peanut butter provides healthy fats, protein, and vitamins B and E. However, not all peanut butter is created equal when it comes to canine consumption, and understanding the risks is essential for preparing safe peanut butter dog treats.
The Bad: Xylitol Warning! The most crucial concern when feeding peanut butter to dogs is the presence of xylitol. Xylitol is an artificial sweetener found in some “sugar-free” or “reduced sugar” peanut butter brands. It is extremely toxic to dogs, causing a rapid release of insulin which can lead to hypoglycemia (low blood sugar), liver failure, and even death. Always check the ingredient label carefully for xylitol before giving any peanut butter to your dog.
The Good & The Essential: Opt for natural, unsweetened peanut butter that contains only peanuts (and maybe a little salt, though unsalted is preferred). While peanut butter is nutritious, it is also calorie-dense, so moderation is key. A little goes a long way in treats. Understanding the nutritional content of all ingredients, including main meals, helps in balancing your dog’s diet. For instance, reviewing detailed analyses of various commercial foods, such as a Kirkland salmon dog food review, can provide insight into how different ingredients contribute to a balanced diet.
Wholesome Peanut Butter-Banana Dog Treats Recipe
This recipe, inspired by Amber DeGrace, transforms spent grains, peanut butter, and banana into delicious, wholesome treats your dog will cherish. The addition of banana not only adds natural sweetness but also provides extra vitamins and fiber.
Ingredients:
- 6 cups spent grains (hop-free)
- 6 cups whole wheat flour (or a gluten-free alternative like oat flour)
- 1 ½ cups natural, xylitol-free peanut butter
- 3 large eggs
- 1 ripe banana, mashed or cut into small pieces
Directions:
- Preparation: Preheat your oven to 350°F (176°C). Lightly spray one or two large cookie sheets with baking spray or line them with parchment paper. This will prevent sticking and make removal easier.
- Mixing: In a large bowl (or a stock kettle, as the quantity is substantial), combine all the ingredients: spent grains, flour, peanut butter, eggs, and mashed banana. Mix thoroughly until a thick, sticky dough forms. The dough will be quite dense, so a sturdy spoon or even your hands (wear gloves!) might be necessary.
- Shaping: Press the dough evenly onto the prepared cookie sheets. Aim for a thickness of about ¼ to ½ inch. For easy breaking after baking, score the dough into desired treat sizes (e.g., small squares, rectangles, or bone shapes) using a knife or pizza cutter. You can also use fun cookie cutters if you prefer a fancier look for your homemade peanut butter dog treats.
- Initial Bake: Bake at 350°F (176°C) for 30 minutes, or until the treats begin to harden and the edges turn slightly golden. This initial bake sets the shape and starts the drying process.
- Cutting & Drying: Remove the trays from the oven. While still warm, carefully cut through the scored lines to separate the individual treats. This step is crucial before the treats fully harden, making them easier to break apart.
- Long Drying Process: Reduce the oven temperature to 200°F (93°C). Return the trays with the separated treats to the oven and bake for an additional 5 to 10 hours. This low-temperature, extended baking time is vital for completely drying out the treats, which prevents mold and extends their shelf life. The goal is for the treats to be entirely dry in the center. If you’re curious about different ingredient profiles in commercial options, comparing ingredients lists, like in a Nature’s Domain salmon and sweet potato review, can highlight various approaches to pet nutrition.
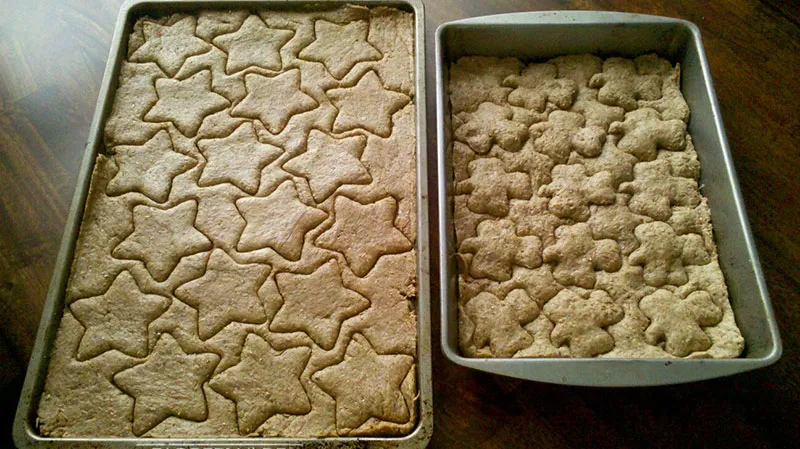 Homemade dog treats after scoring and baking
Baking & Drying for Perfect Chewy or Crunchy Treats
Achieving the right consistency is key for homemade dog treats. The two-stage baking process ensures these peanut butter dog treats are both safe and enjoyable. The initial higher-temperature bake helps them hold their shape, while the long, slow drying at a lower temperature is critical for removing moisture. This dehydration process is what makes the treats shelf-stable and prevents rapid spoilage due to mold.
How to Check for Dryness: To ensure your treats are ready, break one in half once it has cooled slightly. The center should be completely dry and firm, with no gooey or soft spots. If it’s still soft, return the treats to the oven for more drying time. This meticulous drying is what transforms them from simple baked goods into durable, long-lasting snacks that can be stored for weeks. Ensuring high standards in your dog’s diet, whether homemade or commercial, is paramount. For example, considering a general Kirkland Nature’s Domain dog food rating can help you evaluate various aspects of commercial dog food quality.
Storage and Serving Homemade Treats
Once fully dry and cooled, proper storage is essential to maintain the freshness and safety of your homemade peanut butter dog treats. Store them in an airtight container or a sealed bag in the refrigerator. This will significantly extend their shelf life, typically up to 2-3 weeks. For even longer storage, you can freeze the treats for up to 2-3 months. Just thaw them in the refrigerator before serving.
Always remember that even healthy homemade treats should be given in moderation as part of a balanced diet. Consult your veterinarian for guidance on appropriate treat quantities based on your dog’s size, age, and activity level. These treats are a fantastic way to reward your canine companions for their loyalty and hard work, whether it’s during a training session or just for being the best furry friend. Much like choosing between various commercial options, such as those covered in Natural Balance wet dog food reviews, understanding the specific needs and preferences of your dog is vital for their overall health and happiness.
Conclusion
Crafting homemade peanut butter dog treats using spent grains and bananas is a wonderfully rewarding way to provide your dog with wholesome, delicious, and eco-friendly snacks. By carefully selecting ingredients, particularly ensuring xylitol-free peanut butter and hop-free spent grains, you ensure the safety and nutritional value of these delightful bites. The process not only enriches your dog’s diet with fiber and natural flavors but also offers a satisfying culinary experience for you, the pet parent. So, next time you’re looking for a special way to show your appreciation, roll up your sleeves and bake a batch of these irresistible treats – your dog will thank you with wagging tails and happy licks!
References
- DeGrace, Amber. “New Life For Spent Grains.” Zymurgy, May/June 2011.
- American Society for the Prevention of Cruelty to Animals (ASPCA). “People Foods to Avoid Feeding Your Pets.”
- Veterinary Medical Association (VMA) Guidelines on Canine Nutrition and Toxicology.