
For pet owners who desire to give their canine companions freedom to roam safely within their property without the visual obstruction of traditional fences, an Invisible Dog Fence offers an innovative and highly effective solution. These in-ground containment systems have become a trusted alternative for countless households, providing a balance of security for your dog and peace of mind for you. An invisible dog fence allows your furry friend to enjoy the outdoors, exercise, and explore while staying safely within designated boundaries, making it an excellent investment for spacious yards or properties with specific landscaping needs.
Understanding How an Invisible Dog Fence Works
At its core, an invisible dog fence system operates on a simple yet effective principle: a radio signal transmitted through a buried boundary wire. This wire defines the perimeter of your dog’s safe play area, creating a “Boundary Area” that your pet learns to respect. Your dog wears a lightweight collar receiver equipped with contact points that rest gently against their neck. As your dog approaches the edge of the designated safe zone, the collar receiver emits an audible warning beep and often a vibration, signaling that they are entering the “Warning Zone.”
Should your dog continue past this warning into the “Stimulation Zone,” the collar delivers a safe, static stimulation designed to get their attention without causing harm. This gentle correction encourages them to retreat back into the safe Boundary Area. Through consistent training, dogs quickly associate the warning signals with the boundary, learning to stay within their designated space. The system is designed to be a deterrent, not a punishment, empowering your dog to understand and navigate their freedom responsibly.
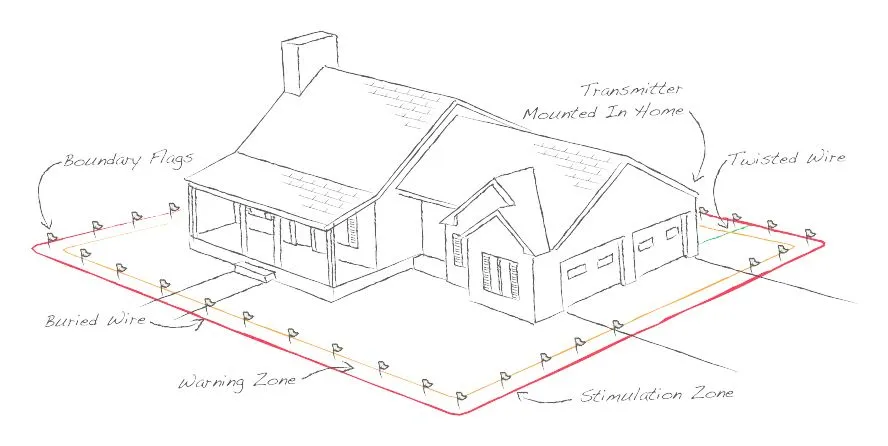 Diagram illustrating the operational concept of an in-ground invisible dog fence system around a house
Essential Features of Modern Invisible Dog Fence Systems
When considering an invisible dog fence, understanding the features that contribute to its effectiveness and user-friendliness is crucial. Modern systems are designed with versatility and safety in mind, catering to various dog breeds, property sizes, and owner preferences.
A significant advantage of these systems is their expandable containment area. Most starter kits cover substantial acreage, often 1 1/3 acres, and can typically be expanded to encompass up to 100 acres with additional wire. This scalability ensures that whether you have a small urban garden or a sprawling rural property, your invisible dog fence can adapt to your needs.
Another key feature is the provision of multiple stimulation types. Advanced systems offer a combination of tone and vibration warnings before static stimulation is applied. Furthermore, static stimulation levels are often adjustable, allowing owners to choose the appropriate intensity for their dog’s temperament and training phase. This customization is vital for humane and effective training.
For multi-dog households, the unlimited dog capability is a game-changer. While most systems include one collar, you can typically purchase additional collar receivers to accommodate any number of dogs, each with its own customized settings. This means every pet can enjoy the benefits of the invisible dog fence simultaneously. Lastly, waterproof designs are standard for quality collar receivers, ensuring they perform reliably in all weather conditions, from a light drizzle to a heavy downpour, allowing your dog to play outdoors worry-free.
Installing Your Invisible Dog Fence System
Setting up an invisible dog fence is often a manageable weekend project that requires basic handiwork and common yard tools. With a little planning, you can effectively create a safe enclosure for your pet.
The installation process typically begins with planning your layout. This involves deciding where your dog’s safe area will be and identifying any zones you wish to make off-limits. Once your plan is clear, you’ll lay out the boundary wire and test it before burying. This crucial step ensures the system is functioning correctly and helps you visualize the perimeter. After successful testing, you can proceed to bury the wire a few inches into the ground along your planned layout.
To aid in the initial training phase, place boundary flags at the edge of the warning zone. These visual markers help your dog understand where the invisible boundary lies. Throughout this process, it’s important to find the correct level of static stimulation for your dog during initial training sessions. This involves careful observation and starting at the lowest effective setting. The final, and arguably most important, step is to train your dog in short, consistent sessions over a period of about two weeks to ensure they fully understand and respect the new boundaries.
Important Installation Tips:
- The boundary wire must form a continuous loop, starting at the fence transmitter and returning to it. This ensures a consistent signal.
- Always use gradual turns at corners to maintain a consistent boundary width and prevent signal gaps. Avoid sharp, 90-degree turns.
- We recommend setting a boundary width for the warning and stimulation zones to approximately 16 to 24 feet (8 to 12 feet on each side of the wire) for optimal effectiveness.
- Be aware that the collar receiver can sometimes be activated inside the house if the boundary wire runs along an outside wall. To avoid this, you can remove your dog’s collar when indoors, decrease the range using the range adjuster, or consider an alternative layout that routes the wire away from the house’s immediate exterior.
Customizing Your Pet’s Play Area with Diverse Layouts
The flexibility of an invisible dog fence allows for various custom layouts, ensuring it can perfectly suit your property’s unique landscape and your dog’s needs.
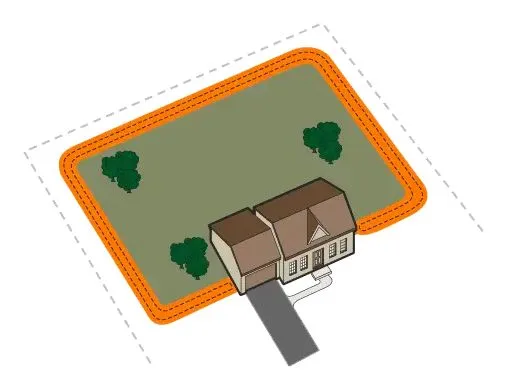
Simple Perimeter (Single Loop)
The most common and straightforward setup is the Perimeter Loop. This layout encloses your entire property, allowing your dog to roam freely and safely within the full extent of your yard. It’s ideal for homes where you want to provide your dog with maximum access to the outdoor space.
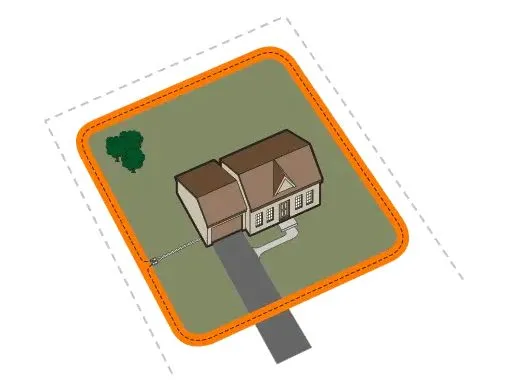 Overhead diagram of a simple perimeter loop invisible dog fence layout around a house
Exclusion Areas
For areas you wish to protect, such as gardens, swimming pools, or delicate landscaping, you can create Exclusion Areas. This is achieved by running the wire from the main perimeter, circling the area to be restricted, and twisting the wire on the way back to the perimeter. Twisted wires cancel the signal, allowing your dog to cross over them without receiving a correction, effectively creating a “dog-free” zone within the larger containment area.
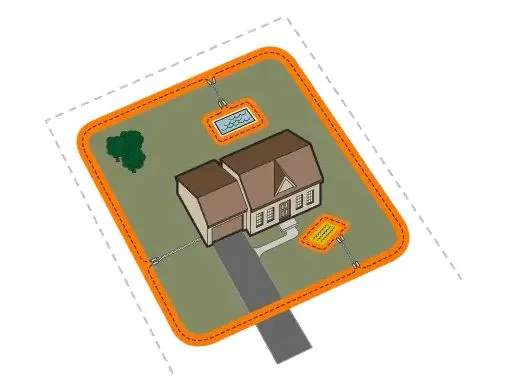 Overhead diagram showing an invisible dog fence with an exclusion area protecting a garden
Separate Front and Back Yard Layout
If you prefer to keep your dog contained to specific sections of your property, such as the backyard, a Separate Front and Back Yard Layout can be implemented. By running the boundary wire close to the sides of your house, you can create two distinct containment areas. This prevents your dog from moving between the front and back yards unsupervised, offering more controlled freedom.
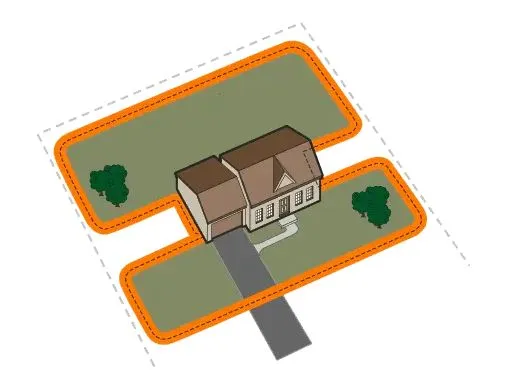 Overhead diagram of a separate front and back yard invisible dog fence layout
Double Loop
A Double Loop is necessary when you are not establishing a boundary on all sides of your property. For instance, this layout works well if you want to integrate the invisible fence with an existing physical fence or provide access to a lake or dock. When utilizing a double loop, it’s critical to separate the boundary wires by a minimum of three to five feet to prevent signal cancellation. Remember that a double loop will require twice the amount of boundary wire compared to a single loop perimeter.
 Overhead diagram of a double loop invisible dog fence layout around a backyard, allowing lake access
Training Your Dog for an Invisible Fence: A Phased Approach
Effective training is the cornerstone of a successful invisible dog fence system. It’s not just about installing the equipment; it’s about patiently teaching your dog to understand and respect the boundaries. A phased training approach, typically over two to four weeks, ensures your dog learns safely and confidently.
The initial phase focuses on boundary flag awareness. For the first few days, use the boundary flags as visual cues, walking your dog on a leash around the perimeter. When your dog approaches a flag and hears the warning tone, gently guide them back into the safe zone, reinforcing the concept with praise. This helps them associate the flags and tone with the invisible boundary.
Following this, you’ll gradually introduce distractions while still on a leash, helping your dog understand the boundary even when focused on other stimuli. As your dog shows consistent understanding, you can progress to unleashed supervision, allowing them to explore within the boundaries while closely monitoring their behavior. Finally, the system moves into a monitoring phase, where your dog can enjoy their freedom with less direct supervision, as they have learned to confidently stay within their safe zone. Consistency, patience, and positive reinforcement are key throughout this entire training journey.
Conclusion
An invisible dog fence provides a modern, discreet, and highly effective solution for keeping your beloved canine safe and secure within your property while offering them the freedom they deserve. By understanding how these systems work, considering their robust features, correctly installing the boundary, and committing to a structured training program, you can create a harmonious environment where your dog can thrive outdoors without the worry of them wandering off. Invest in an invisible dog fence system today to give your dog the gift of safe exploration and give yourself unparalleled peace of mind. For more detailed guides on pet care and containment solutions, explore other articles on our “Dog Care Story” website!