
A dog’s paw pad injury can range from simple burns to complex cuts or punctures, significantly impacting their comfort and mobility. As a dedicated resource for pet owners, Dog Care Story aims to equip you with the knowledge to handle these common yet critical situations. Integrative veterinarian Dr. Julie Buzby, a trusted expert in canine health, provides a comprehensive guide on recognizing different types of paw pad injuries, offering step-by-step first aid instructions, and advising when professional veterinary care is essential. Knowing how to treat a dog’s paw pad injury effectively is crucial for your pet’s well-being and a swift recovery.
Recently, one of Dr. Buzby’s clients brought her Labrador Retriever, April, in for a paw pad injury. During her daily walk, April started limping, and her mom discovered she had stepped on a sliver of broken glass. Thankfully, April’s owner had previously attended “doggie first aid” classes, which prepared her to act quickly. She gently removed the glass, cleaned, and bandaged the paw, then scheduled an appointment with Dr. Buzby. Upon examination, Dr. Buzby commended April’s mom for her excellent first aid, noting the paw looked great and the bandaging was superb—a testament to proactive pet care.
Recognizing that not all dog parents have access to such training, this article aims to provide valuable guidance on identifying and treating paw pad injuries. Before diving into specifics, let’s understand the fundamental importance of these remarkable structures.
Why Are Your Dog’s Paw Pads So Important?
The saying “put your best foot forward” usually refers to approaching new challenges with a positive attitude. However, for our canine companions, literally “putting their best foot forward” is vital for their physical well-being. Your dog’s paws play an enormous role in their overall health and quality of life. The intricate network of muscles, bones, tendons, and ligaments within the paw allows your dog to walk, run, and play comfortably and securely. This capability is made possible, in large part, by the unique design of their paw pads.
These thick, squishy foot pads provide essential cushioning, absorbing the impact of every step your dog takes. This critical function helps reduce the strain on the bones and joints of your dog’s foot, contributing to their overall mobility and helping them maintain optimal joint health. Furthermore, in conjunction with the toenails, the paw pads offer crucial traction, enabling your dog to navigate various terrains, including rough surfaces, with stability and confidence. Last but certainly not least, paw pads act as a natural protective barrier, shielding your dog’s feet from extreme temperatures, both hot and cold.
(For a deeper understanding of the amazing anatomy of your dog’s paw, you might explore detailed articles on dog paw anatomy.)
Common Types of Dog Paw Pad Injuries
Constantly in contact with the ground, a dog’s paw pads are exposed to numerous elements that can lead to wear and tear, making them susceptible to a variety of injuries. Understanding these different types of injuries is the first step in learning how to treat a dog’s paw pad injury.
Foreign Bodies
One of the more frequent paw injuries veterinarians encounter involves foreign objects puncturing the paw pad. Sharp items such as broken glass, splinters, nails, sticks, and even barbed structures like foxtails in dogs can become embedded in the soft tissue of the paw pad, causing pain and potential infection.
Cuts
If a sharp object doesn’t get lodged in the pad, it might instead cause a cut. Paw pad cuts are common because the pads’ primary function is to protect the rest of the foot from hazardous objects. These injuries often occur when a dog steps on or brushes against something sharp. Beyond traumatic incidents, dogs can also develop non-traumatic cuts if they suffer from dry paw pads that crack and split open, especially during extreme weather conditions.
Flaps
Paw pad flaps are similar to cuts but typically cover a larger surface area, often running roughly parallel to the pad’s surface. These usually occur when something slices the dog’s foot horizontally. For instance, if a dog’s foot becomes entangled in sharp wire or metal, it might partially shear off a section of the paw pad, creating a loose flap of skin. Flaps can also develop if a cut is left untreated and continues to enlarge, eventually tearing the tissue.
Sometimes the flap hangs loosely from the foot, while other times it partially folds back over the exposed tissue. Generally, flaps are more painful than simple cuts because each step the dog takes pulls on the loose skin, constantly irritating the injured area.
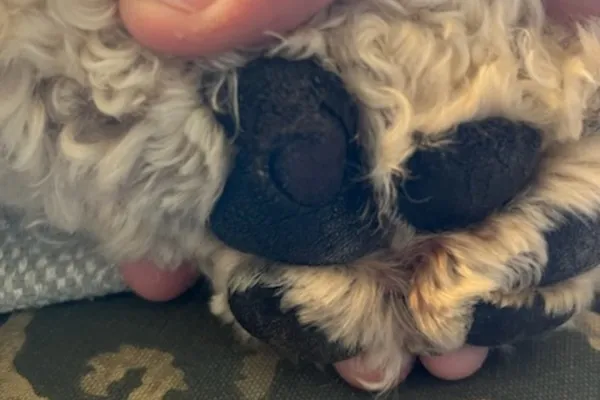 A dog's paw pad showing a healed area where a flap injury was previously located, emphasizing the need for proper treatment.
Burns
Unfortunately, paw pad burns are frequently observed, especially during warmer months. These typically result from walking on surfaces like asphalt, concrete, or artificial turf that become intensely hot under the sun. On a seemingly mild 86°F day, pavement can reach a scorching 135°F. When your dog walks on hot pavement, it can cause severe burns to their paw pads.
Conversely, extremely cold temperatures, such as prolonged exposure to ice, can also lead to cold burns on a dog’s paws. Additionally, walking on ice melt products can cause the paw pads to become dry, cracked, or chemically burnt. Chemical burns can also occur if a dog walks through spilled caustic substances. Finally, extensive running over abrasive surfaces, like rough tennis courts, can also create friction burns on the paw pads.
Ingrown Toenails
Overly long nails can sometimes curl inwards, eventually creating a penetrating wound in the paw pad. Not only are ingrown toenails extremely painful for your dog, but they also pose a significant risk of infection by trapping dirt and bacteria deep within the wound.
This is why regular trimming your dog’s toenails is paramount. If you’re not comfortable performing this task yourself, consider seeking help from your veterinarian or a professional groomer. Many resources, like Dr. Buzby’s Nail Trimming Master Course, are available to guide you.
Recognizing the Signs of a Paw Pad Injury in Dogs
If your dog experiences any of the paw pad injuries described above, several key symptoms might become apparent, prompting you to investigate further and learn how to treat a dog’s paw pad injury. These signs can indicate discomfort or pain in the paws:
- Sudden lameness: Your dog is limping or unwilling to put weight on the affected paw.
- Crying out: Vocalization when pressure is applied to the injured paw.
- Bleeding: Visible blood from the paw pad, which may be active or dried.
- Licking or biting: Persistent licking, chewing, or biting at the paw to alleviate pain or irritation.
- Swelling: Noticeable swelling of the entire foot or just the paw pad.
- Discoloration or reddening: The paw pad may appear redder than usual, or there might be unusual discoloration.
- Visible injury: You might see a clear cut, flap, puncture wound, or an object embedded in the paw pad.
- Discoloration of hair: The fur on the foot might be stained by blood, pus, or other fluids.
It’s important to remember that while a paw pad injury is a common cause of limping, other underlying conditions, such as arthritis in dog’s front legs, can also manifest as lameness or discomfort. If you notice any of these symptoms, it’s crucial to carefully inspect your dog’s paw. Depending on your findings, you may be able to provide immediate first aid before seeking veterinary attention.
Step-by-Step First Aid for Dog Paw Pad Injuries
Knowing how to treat a dog’s paw pad injury promptly and correctly can make a significant difference in your dog’s recovery. Follow these steps to assess the situation and provide effective first aid.
1. Assess Your Dog’s Overall Condition and Safety
Before anything else, comfort your dog and assess their general demeanor. If your dog is in severe pain, they may react negatively, even if typically gentle and well-behaved. Attempting to inspect or treat the paw could lead to a bite. If your dog resists or shows signs of aggression when you try to handle the injured paw, prioritize safety and seek immediate veterinary care rather than attempting to proceed with these steps yourself.
2. Carefully Inspect the Paw
If it is safe to examine your dog’s paw, carefully inspect all surfaces: the top, the bottom, the paw pads themselves, and the delicate areas between the toes and paw pads. It’s crucial to determine the nature of the injury—whether it’s a cut, flap, puncture wound, burn, an ingrown or ripped nail, or if there’s no visible injury but clear signs of pain. Different types of injuries will require specific first aid approaches.
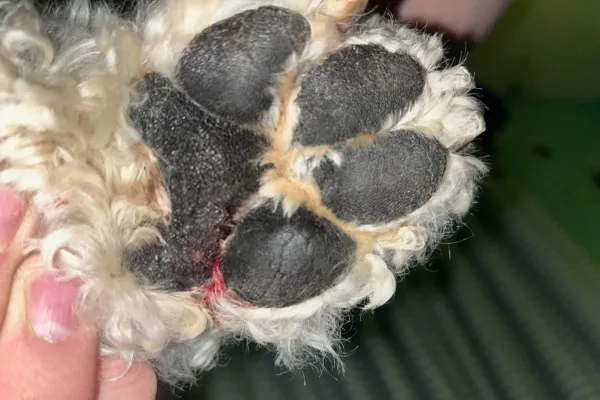 A dog's paw pad with a visible injury and minor bleeding, illustrating the initial signs that prompt dog paw pad injury treatment.
If you find a foreign object in the paw pad, proceed to step 3a. If the wound is bleeding but clear of objects, go to step 3b. For burns or non-bleeding wounds, move to step 4.
3. Remove Foreign Objects (If Present and Safe) and Control Bleeding
3a. Removing Objects: If your dog has a small, superficial object puncturing the paw pad, you might be able to remove it carefully with clean fingers or tweezers. However, if the object is deeply lodged, large, or if you suspect it might be puncturing a blood vessel, nerve, or joint, do not attempt to remove it yourself. Instead, cover the paw lightly and make an emergency vet visit immediately. Improper removal can cause further damage or severe bleeding.
3b. Controlling Bleeding: If the wound is actively bleeding, apply even pressure directly to the area with a clean cloth or paper towel. For minor wounds, bleeding should subside within one to two minutes. If the cut continues to bleed steadily for 10 to 15 minutes, or if the bleeding is profuse, contact your vet immediately as this could be an emergency requiring prompt professional intervention. This foundational step is essential, similar to how you would approach addressing pressure sores or other skin concerns.
4. Clean the Wound
Once the bleeding has stopped, thoroughly cleaning the wound is vital. Using cool water is highly recommended as it helps reduce swelling and can ease pain, particularly if your dog is suffering from a burn. You can also use a gentle anti-bacterial soap or antiseptic solutions like chlorhexidine or povidone-iodine (Betadine, diluted to a weak tea color) to help remove bacteria and prevent infection. Be gentle during cleaning, as the wound might start to bleed slightly again. If this happens, simply apply gentle pressure until the bleeding stops. This process is crucial for effective wound care, similar to how one might approach natural remedies for skin irritations to soothe and clean.
5. Apply a Protective Bandage
To keep the wound clean, protected from further injury, and to manage healing, you may need to bandage your dog’s foot. If proper bandaging materials aren’t available immediately, wrapping a clean towel or T-shirt around a bleeding wound can serve as a temporary measure while en route to the vet. When applying a bandage, always use clean materials such as sterile gauze pads and self-adhering vet wrap. For detailed, step-by-step instructions, refer to guides on how to wrap a dog’s paw.
A crucial reminder: a bandage that is too tight can cause more harm than no bandage at all. Ensure you can comfortably insert one to two fingers into the top of the bandage. If not, it’s likely too tight and needs to be reapplied. Also, diligently watch for signs that the bandage is restricting your dog’s circulation. These signs include swollen toes (if they are visible beyond the bandage) or a foot that feels cool to the touch or appears discolored.
6. Contact Your Veterinarian
Even after providing thorough first aid for your dog’s paw, it is absolutely essential to follow up with your veterinarian. A professional evaluation will determine if any additional steps, such as prescription medication, further cleaning, or specific wound care instructions, are necessary.
While awaiting your veterinary appointment (if one is needed), diligently check and change the bandage daily. This allows you to monitor the wound for any changes, such as increased swelling, discharge, foul odor, or other signs of infection. Regular bandage changes also reduce the risk of circulation constriction and promote a cleaner healing environment.
What to Expect at the Vet: Diagnosis and Treatment
When you bring your dog in for a paw pad injury, your veterinarian will typically begin with a comprehensive physical examination. While the immediate concern is the paw, a full body check helps ensure there are no other overlooked injuries.
The vet will then meticulously examine the affected foot, looking for cuts, punctures, burns, or any other visible damage. They will likely palpate and manipulate the bones and joints of the foot to check for underlying issues or related structural damage. This thorough assessment helps differentiate the injury from other conditions that might cause lameness or pain, such as the canine front leg arthritis or other mobility challenges often addressed with advanced treatment for arthritis.
If there’s a suspicion of an object (like a foxtail or a metal nail) deeply embedded in the foot, your vet may recommend an X-ray. This diagnostic tool is invaluable for determining if the wound involves bones or joints and precisely locating foreign bodies, especially metallic ones.
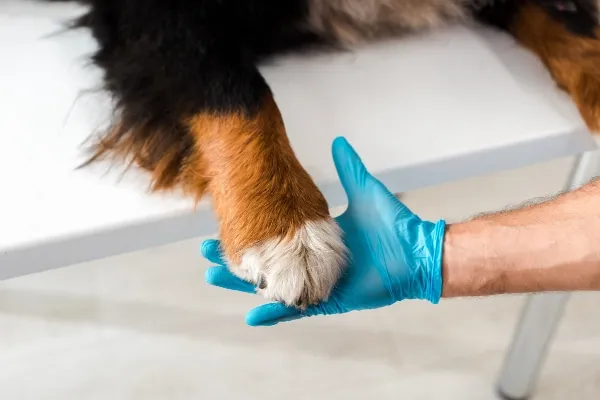 A veterinarian gently examining a dog's paw pad injury during a check-up, demonstrating professional canine foot care.
How the Vet Treats a Paw Pad Injury
Depending on the exact location and nature of the dog paw pad injury, the veterinarian may need to trim the hair on the affected foot. This allows for better visualization of the injury and helps keep the wound clean during the healing process. Following this, your vet will meticulously clean the wound and remove any debris or remaining foreign objects.
You might find it surprising that your veterinarian will probably not suture a paw pad cut or flap closed. This seems counter-intuitive, as deep cuts on other parts of the body typically require stitches. However, paw pads are unique. They do not hold stitches well due to the constant friction and movement they endure, which can easily tear sutures out. Furthermore, in many cases, suturing the pad does not significantly speed up the healing time.
Instead, bandaging the foot plays a critical role. If there is a cut or burn, your veterinarian might apply an antibacterial ointment or a soothing cream directly to the wound to promote healing and reduce pain. A professionally applied bandage then serves multiple purposes:
- Controlling bleeding: Provides pressure to stop any lingering bleeding.
- Decreasing the chances of re-injury: Protects the delicate healing tissue from further trauma.
- Keeping the wound clean: Acts as a barrier against dirt, bacteria, and environmental contaminants.
- Containing medication: Ensures topical treatments stay on the wound, maximizing their effectiveness.
- Preventing licking or chewing: Discourages your dog from interfering with the healing process (though sometimes an Elizabethan collar, or “E-collar,” may also be necessary).
As your veterinarian applies the bandage, pay close attention to their instructions. They will guide you on how often to change the bandage, what materials and medications to use, and whether follow-up appointments are needed for rechecks.
Be Patient and Stay in Contact with Your Vet
As your vet will likely emphasize, paw pad injuries can be slow to heal because your dog constantly uses their feet. Patience is key throughout the recovery process. Consistently follow your veterinarian’s instructions and do not hesitate to contact them if you suspect your dog’s injury isn’t healing properly or if you notice any concerning changes.
(It’s worth reiterating that placing a bandage too tightly is a common complication. Foot and toe swelling caused by an overly tight bandage is one of the most frequent issues observed with paw pad injuries, so vigilant monitoring is crucial.)
Preventing Future Paw Pad Injuries
While some injuries are unavoidable, there are several effective precautions you can take to prevent future paw pad injuries, thus minimizing the need to learn how to treat a dog’s paw pad injury in the first place.
- Avoid Extreme Temperatures: Time your walks to avoid the hottest parts of the day, which also helps prevent heat stroke in dogs. Adjust your route to avoid walking on hot asphalt or concrete. A simple test: if you can’t comfortably hold the back of your hand against the pavement for 7-10 seconds, it’s too hot for your dog’s paws. Similarly, protect paws from prolonged exposure to ice or extremely cold surfaces.
- Consider Protective Dog Booties: Products like PawZ dog boots offer a thin rubber barrier that allows your dog to still feel the ground while providing protection against ice melt products or extreme temperatures. They are also excellent for keeping bandages clean and dry when your dog goes outside. A word of caution: remove PawZ boots once indoors, as prolonged use can compromise circulation.
- Clean Feet After Walks: After winter walks, thoroughly wash your dog’s feet to remove any residue from ice melt products. Do the same if you suspect your dog has walked through any other chemicals.
- Use Thicker Dog Boots or Socks for Hazards: If walking in areas with sharp rocks, trash, or other dangers, thicker dog boots or socks can offer additional protection. However, be aware that these types of boots can sometimes make it harder for dogs to sense where their feet are (affecting proprioception in dogs), so they are not always ideal for every dog or situation.
- Inspect for Foxtails: If you live in or visit areas where foxtails are prevalent, carefully inspect your dog’s feet (and entire body) after every outing to remove these barbed grass seeds before they can burrow into the skin.
- Regular Nail Trims: Consistently trim your dog’s nails to prevent them from growing too long and curling into the paw pad, which can cause painful puncture wounds and infections.
- Watch for Hazards: Always keep a vigilant eye out for potential hazards along your walking path or trail, such as broken glass, sharp objects, or chemical spills.
You Can Provide Paw Pad Injury First Aid for Your Dog
While all these prevention strategies are helpful, being prepared for potential injuries is equally important. If you don’t already have a dog first aid kit, now is an excellent time to assemble one for your home and another for your car or backpack. You never know when you might need it!
Hopefully, your dog will never experience a paw pad injury. But if they do, remember to remain calm, reach for your first aid kit, and follow the steps outlined in this article. With a clear understanding of how to treat a dog’s paw pad injury, you can provide crucial immediate care.
Trust in your ability to provide first aid for your dog. However, when in doubt, always contact your veterinarian for advice. They are your best resource to help manage your dog’s paw pad injury, ensuring your beloved pup can return to playing and exploring in no time!