
A dog’s paw pads are remarkably resilient, yet they are constantly exposed to environmental hazards, making paw pad injuries a common concern for dog owners. From minor cuts and punctures to severe burns and tears, knowing How To Treat A Dog Paw Pad Wound is crucial for every pet parent. This comprehensive guide, crafted by an integrative veterinarian, will walk you through identifying different types of paw pad injuries, understanding their symptoms, administering effective first aid, and knowing when veterinary care is essential. Equipped with this knowledge, you can ensure your beloved canine companion receives the best possible care for their precious paws.
Recently, one of my clients brought her Labrador Retriever, April, to see me for a paw pad injury. April started limping during her daily walk, and her mom discovered she had stepped on a sliver of broken glass. Thankfully, my client had previously taken classes about “doggie first aid,” so she was well prepared. She gently removed the sliver of glass from April’s paw, then cleaned and bandaged it, and made an appointment with me. As I examined April’s injured paw, I commended her mom on a job well done. The paw looked great, and the bandaging was excellent. Her first aid classes had definitely paid off. Not all dog parents may have had the chance to take such a course, so I wanted to provide guidance about recognizing and treating paw pad injuries. But before we get to that, let’s start with some paw pad basics.
Why Are a Dog’s Paw Pads So Important?
Have you ever heard the saying “put your best foot forward”? Usually, this refers to entering a new challenge or situation with a good attitude. But literally “putting their best foot forward” is also important for our dogs. What I mean to say is that your dog’s paws play a big role in his or her well-being. The muscles, bones, tendons, and ligaments help your dog walk, run, or play. And doing so comfortably and securely is made possible in part by your dog’s paw pads.
Paw pads provide essential support and cushioning, acting as natural shock absorbers for every step your dog takes. This crucial function reduces the strain on the bones and joints of your dog’s foot. Furthermore, in combination with the toenails, the foot pads provide vital traction as your dog walks, helping them navigate various terrains, from smooth indoor floors to rough outdoor paths. Last but certainly not least, the paw pads serve as a protective barrier, shielding your dog from extreme temperatures, both hot and cold. Understanding the vital role these pads play underscores the importance of proper care and prompt attention to any injuries.
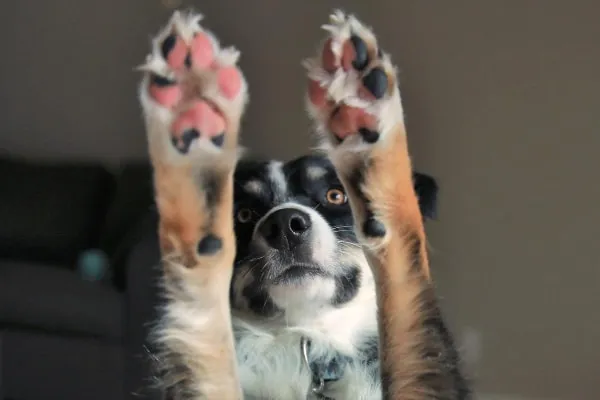 Happy dog showing healthy paw pads, emphasizing their importance in overall mobility.
What Are Common Types of Paw Pad Injuries in Dogs?
A dog’s paw pads are in constant contact with the ground, exposing them to numerous elements that can cause wear, tear, and various injuries. Recognizing the different types of paw pad wounds is the first step in understanding how to treat a dog paw pad wound effectively.
Foreign Bodies
One of the more common foot injuries I see in my patients involves a foreign object puncturing the paw pad. Various sharp items such as broken glass, nails, sticks, fishing hooks, splinters, or even plant matter like foxtails, can become embedded in the paw pad. These objects can cause pain, lameness, and are a primary source of infection if not removed properly.
Cuts and Lacerations
If a sharp object doesn’t get lodged in the pad, it could cause a cut instead. Paw pad cuts are another frequent injury, as one of the pad’s jobs is to protect the rest of the foot from dangerous objects. These cuts often occur when a dog slices its foot on something sharp while walking or running. Beyond traumatic injuries, dogs can also get non-traumatic cuts if they have excessively dry paw pads that crack and split open, especially in harsh weather conditions.
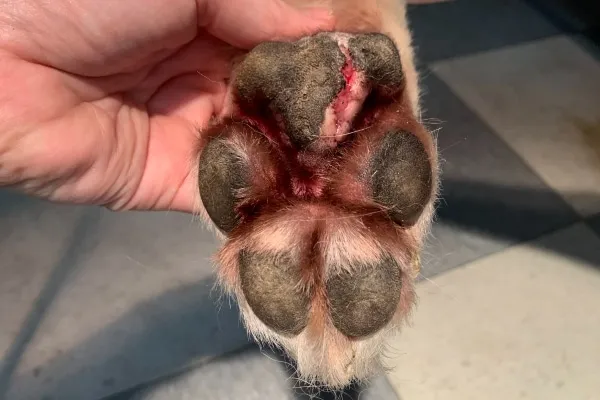 Close-up of a dog's paw pad with a visible cut, indicating a common paw injury from a sharp object.
Paw Pad Flaps
Paw pad flaps are similar to cuts but tend to cover more surface area on the paw, running roughly parallel to the surface of the paw pad. Typically, a flap will occur when something slices the dog’s foot horizontally. For example, if your dog’s foot becomes tangled in sharp wire or metal, it might partially shave off a section of the paw pad, creating a loose flap of skin. Flaps can also develop if a deep cut is left untreated and the tissue tears further. These are generally more painful than simple cuts because each step pulls on the loose skin, irritating the exposed tissue underneath.
Burns
Unfortunately, I see a lot of paw pad burns in my patients. These usually occur in the summer months as the sun heats up asphalt, concrete, artificial turf, or other dark surfaces. Even on a seemingly pleasant 86°F (30°C) day, pavement can reach a blistering 135°F (57°C), which can physically burn your dog’s paw pads. Conversely, extremely cold temperatures, like prolonged walking on ice or snow, can also cause frostbite-like burns. Additionally, walking on harsh ice melt products can cause chemical burns, and extended running on abrasive surfaces like tennis courts can lead to friction burns.
Ingrown Toenails
Sometimes overly long nails can begin to curl toward the paw pad. If the nail grows long enough and has no where else to go, it may create a penetrating wound in the pad. Not only are ingrown toenails extremely painful for your dog, but they can also cause a severe paw pad infection by trapping dirt and bacteria in the wound. This is one of the many reasons why regular nail trimming is so important for your dog’s overall health and paw integrity. If you’re uncomfortable trimming them yourself, your veterinarian can provide guidance or perform the trimming for you. For dogs with specific skin sensitivities, ensuring overall skin health can also play a role in preventing secondary issues; you might want to learn more about medications for itchy skin allergies in dogs to address broader dermatological concerns that could indirectly affect paw health.
What Are the Signs of a Paw Pad Injury?
Recognizing the signs of a paw pad injury early is key to prompt treatment. If your dog experiences any of the paw pad injuries listed above, you might notice several symptoms:
- Sudden lameness: Your dog may start limping or refusing to put weight on the affected paw.
- Crying out or yelping: Especially when putting pressure on the paw.
- Reluctance to walk or play: A noticeable decrease in activity levels.
- Bleeding: Visible blood from the paw pad, which can range from a few drops to a steady flow.
- Licking or biting: Continuous, obsessive licking or chewing at the paw.
- Swelling: The foot or paw pad appearing visibly swollen.
- Discoloration or reddening: The paw pad or surrounding skin may look inflamed or red.
- Visible injury: A clear cut, flap, puncture, or an embedded object in the paw pad.
- Discoloration of hair: Staining of the fur on the foot due to blood or discharge.
 Dog licking its injured paw, a common sign of discomfort and pain from a paw pad wound.
If you notice any of these symptoms, carefully inspect your dog’s paw. Depending on what you find, there may be some helpful first aid measures you can take until you can get your dog to the veterinarian.
First Aid for Paw Pad Injuries: A Step-by-Step Guide
Knowing how to treat a dog paw pad wound at home with proper first aid can make a significant difference in your dog’s comfort and recovery. Follow these steps carefully:
1. Evaluate Your Dog as a Whole
First, comfort your dog and assess their overall attitude. If your dog is severely painful, they may not allow you to safely examine their foot by yourself. Even the nicest and most well-behaved dog can react negatively when in pain. If your dog does not want you interfering with the injured paw, please seek immediate veterinary care rather than attempting to follow the rest of the steps, as you could risk further injury to your dog or yourself.
2. Take a Closer Look at the Paw
If you feel it is safe to look at your dog’s paw, carefully inspect the top and bottom, the paw pads themselves, and the area between the toes and paw pads. It is important to know if your dog has a cut, flap, puncture wound, burn on the paw pad, or if there is no visible injury but pain is present. Depending on the specific problem, you might need to provide different types of first aid care. The following steps are specific to paw pad injuries. If there is an object in the paw pad, proceed to step 3a. Otherwise, continue to step 3b for a bleeding wound or step 4 for a burn or non-bleeding wound.
3. Remove Foreign Objects (If Safe) and Apply Pressure to Stop Bleeding
3a. Removing Foreign Objects: If your dog has a small or superficial object puncturing the paw pad, you may be able to gently remove it with your fingers or a pair of sterilized tweezers. However, if the object is deeply lodged, or if you suspect it might be puncturing a blood vessel, nerve, or joint, do not remove it yourself. Instead, make an emergency vet visit immediately. Attempting to remove a deeply embedded object can cause further damage or severe bleeding.
3b. Stopping Bleeding: If the wound is actively bleeding, apply steady, even pressure with a clean cloth or paper towel. Minor wounds should stop bleeding within a minute or two. However, if the cut continues to bleed steadily for 10 to 15 minutes, you should contact your vet immediately as this could be an emergency requiring professional attention.
4. Clean the Wound
Once the bleeding has stopped, it is crucial to clean the wound thoroughly. I recommend doing so with cool water, as it can help reduce swelling and ease pain, especially if your dog is suffering from a burn. You can also use gentle antibacterial soap or disinfecting agents like chlorhexidine or povidone-iodine (Betadine) diluted to a tea-like color, to help remove bacteria and prevent infection. Remember that as you clean the wound, it might start bleeding a little again. If this happens, gently re-apply pressure until the bleeding stops.
5. Apply a Bandage
In order to keep the wound clean and safe from further injury, you might need to bandage your dog’s foot. If you don’t have bandaging materials readily available, wrapping a clean towel or T-shirt around a bleeding wound while you make your way to the vet will also work in a pinch. When applying the bandage, it is important to use clean materials like sterile gauze pads, self-adhering wrap (vet wrap), and medical tape. For detailed instructions, please read my article about how to wrap a dog’s paw.
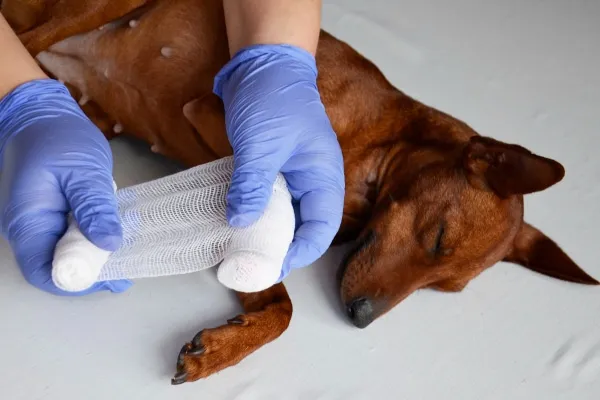 Veterinarian carefully applying a protective bandage to a dog's injured paw pad.
Remember that a bandage that is too tight is far worse than no bandage at all, as it can cut off circulation. Please ensure that you can insert one to two fingers into the top of the bandage. If not, it is likely too tight. Also, watch carefully for signs that the bandage is cutting off your dog’s circulation. Signs to look for include swollen toes (if they are sticking out of the bandage), a foot that is cool to the touch, or any discoloration. Proper bandaging is a critical part of knowing how to treat a dog paw pad wound without causing secondary issues.
6. Contact Your Veterinarian
Even if you have successfully provided first aid for your dog’s paw, it is always important to follow up with your vet to see if any additional steps are necessary. They can assess the wound, check for infection, and recommend further treatment or medication. While waiting for the veterinary appointment (if one is needed), check and change the bandage daily. This allows you to monitor the wound for any changes or signs of infection. Regular bandage changes also decrease the risk that the bandage is restricting your dog’s circulation.
How Will the Veterinarian Evaluate and Treat a Dog’s Paw Pad Injury?
During the appointment, your veterinarian will start by performing a thorough physical exam on your dog. Although the main problem is your dog’s paw pad injury, the vet will probably want to do a full body exam to ensure your dog doesn’t have any other concurrent injuries or underlying health issues.
Then, while examining the injured foot, he or she will carefully look for cuts, punctures, burns, or other visible injuries. Additionally, the vet will likely palpate and manipulate the bones and joints of the foot to check for issues with those structures, ensuring there are no fractures or ligament damage. If your vet suspects there is an object (like a foxtail or a metal fragment) deeply embedded in the foot, he or she may also recommend an X-ray. This diagnostic tool can be invaluable in determining if the wound involves the bones or joints, and especially with a metallic object, the X-ray helps the vet assess the precise position and location of the foreign body for safe removal.
Depending on the location and severity of the dog pad injury, the vet may want to trim the hair on the affected foot. This crucial step allows for better visualization of the dog foot pad injury and significantly helps in keeping the wound clean. Following this, your vet will meticulously clean the wound and remove any remaining debris or foreign objects.
If your dog has a cut or a paw pad flap, your veterinarian will probably not suture the pad closed. I know this may seem odd because usually getting a deep cut means needing stitches. However, the paw pads are a bit different from other areas on your dog’s body. They don’t usually hold stitches very well due to the constant friction and movement they endure, making sutures prone to tearing out. In many cases, suturing the pad does not significantly speed up the healing time.
However, bandaging the foot is often very helpful. If there is a cut, burn, or other open wound, your veterinarian might apply an antibacterial ointment or a soothing cream to promote healing and decrease pain. Next, they will apply a clean, protective bandage. This bandage serves multiple purposes: it helps control bleeding, decreases the chances of re-injury, keeps the wound clean, contains the medication that is applied, and helps prevent your dog from licking or chewing on the wound (though sometimes an E-collar, or “cone of shame,” is also necessary).
As your veterinarian is applying the bandage and discussing aftercare, be sure to listen carefully to all instructions. He or she will direct you regarding how often to change the bandage, what materials and medications to use, and if you need to bring your dog back in for rechecks.
Be Patient and Stay in Contact with Your Vet
As your vet will probably explain, paw pad injuries can take a considerable amount of time to heal since your dog is constantly using the foot. Remember to be patient with the healing process. Diligently follow all of your vet’s instructions and do not hesitate to contact them if you suspect your dog’s injury isn’t healing well, if you notice signs of infection (redness, swelling, pus, foul odor), or if your dog’s pain seems to worsen. And keep in mind that, as discussed earlier, it is critical that you don’t place the bandage too tightly; foot and toe swelling from an overly tight bandage is one of the most common complications I see with paw pad injuries that have been improperly managed at home.
How Do I Prevent Future Paw Pad Injuries?
While sometimes an injury is unavoidable, there are several precautions you can take to significantly reduce the risk of paw pad injuries. Preventing these issues is as important as knowing how to treat a dog paw pad wound when they occur.
- Avoid Extreme Temperatures: Do not expose your dog’s feet to extreme temperatures. This means timing your walks so that they are not during the hottest part of the day (which also helps avoid heat stroke in dogs) or revising your route to avoid hot sidewalks or scorching sand. A good rule of thumb: if you can’t comfortably hold the back of your hand against the pavement for 7-10 seconds, it is too hot for your dog to walk on. Similarly, avoid prolonged exposure to icy surfaces in winter.
- Consider Protective Dog Booties: Products like PawZ dog boots are thin enough to allow your dog to sense the ground while also providing protection against harsh ice melt products, chemical spills, or extreme temperatures. They can also be great for keeping a bandage clean and dry while outside. As a word of warning, remove the PawZ boots once you come inside, as they could compromise your dog’s circulation if left on too long.
- Clean Paws After Walks: Wash your dog’s feet off after winter walks to remove any ice melt products (and do the same if you suspect your dog walked through any other potentially caustic chemicals). This simple step can prevent chemical burns and irritation.
- Use Thicker Dog Boots for Rough Terrain: For walks where there could be sharp rocks, glass, trash, or other dangers, consider thicker dog boots or socks. Be warned, though, that these types of dog boots tend to make it harder for dogs to sense where their feet are (i.e., proprioception in dogs), so they aren’t always ideal for extended wear or for dogs that are not accustomed to them. Training your dog to wear them gradually is key.
- Inspect Paws Regularly: Carefully inspect your dog’s feet (and whole body) for foreign bodies like foxtails, burrs, or ticks after every trip outside, especially if you live in or visit areas where these are common.
- Regular Nail Trims: Regularly trim your dog’s nails to keep them from growing too long and potentially curling into the paw pad, which can cause painful puncture wounds and infections. For additional proactive care, consider learning about safe flea remedies for puppies to ensure overall hygiene and prevent other parasitic discomforts that might lead to paw irritation or excessive licking.
- Watch for Hazards: Always keep your eyes open for potential hazards along the path or trail where your dog walks. Being vigilant can help you steer your dog away from broken glass, sharp objects, or dangerous substances.
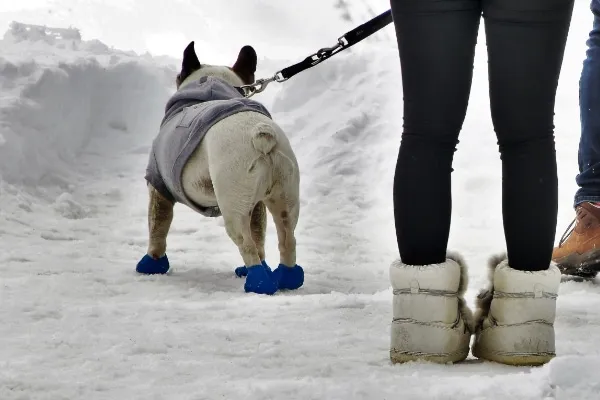 Dog wearing protective boots in the snow, a measure to prevent paw pad injuries from extreme temperatures or chemicals.
You Can Provide Paw Pad Injury First Aid for Your Dog
While all these prevention strategies are helpful, I also want to remind you of the importance of being prepared for possible injuries ahead of time. If you don’t already have a well-stocked dog first aid kit, now is a great time to make one for your house and one for your car or backpack. You never know when you might need it!
Hopefully, your dog doesn’t ever get a paw pad injury. But if he or she does, remain calm, grab your first aid kit, and follow the steps I outlined for you in this article. I believe that with the right knowledge and tools, you can confidently provide initial first aid to your dog. But when in doubt, remember to contact your veterinarian for advice. He or she can provide professional guidance and help you manage your dog’s pad injury so that your pup can be back to playing happily in no time!