
A dog paw pad injury can range from minor scrapes to serious burns, deep cuts, or punctures. As a veterinarian and content editor for “Dog Care Story”, my goal is to provide comprehensive, actionable advice for every dog parent. Understanding How To Treat A Dog Paw Injury is crucial for your pet’s well-being and recovery. This guide will walk you through recognizing various paw pad injuries, providing essential first aid, understanding professional veterinary care, and implementing preventative measures to keep your furry friend’s paws healthy and protected.
Recently, one of my clients brought her Labrador Retriever, April, to see me for a paw pad injury. During her daily walk, April suddenly began limping, and her mom quickly discovered a sliver of broken glass embedded in her paw. Thankfully, April’s mom was well-prepared, having previously taken a “doggie first aid” class. She calmly removed the glass, thoroughly cleaned and bandaged April’s paw, and promptly made an appointment with me. When I examined April, I was truly impressed; her paw looked excellent, and the bandage was perfectly applied. Her proactive knowledge had certainly paid off.
Not every dog parent has the opportunity to attend such a course, which is why I’m sharing this detailed guide. My aim is to equip you with the knowledge and confidence to recognize, respond to, and ultimately prevent dog paw pad injuries. But before we delve into treatment specifics, let’s understand why these resilient, yet vulnerable, paw pads are so vital.
The Unsung Heroes: Why Your Dog’s Paw Pads Are So Important
Have you ever heard the saying, “put your best foot forward”? For our canine companions, this sentiment is literally true, as their paws play an enormous role in their overall health and mobility. The intricate network of muscles, bones, tendons, and ligaments within your dog’s paw enables them to walk, run, and play comfortably and securely. A key component of this functionality is their paw pads.
These thick, squishy foot pads serve as natural shock absorbers, providing cushioning and absorbing impact with every step your dog takes. This critical function helps reduce the strain on the bones and joints of your dog’s foot, safeguarding them from repetitive stress injuries. Furthermore, in conjunction with their toenails, paw pads offer essential traction, allowing your dog to navigate various surfaces confidently and securely, even on rough or uneven terrain. Last but certainly not least, these remarkable pads provide a vital protective barrier, shielding your dog from the potential hazards of extreme temperatures, whether scorching hot or freezing cold.
Common Types of Dog Paw Pad Injuries
Being in constant contact with the ground, paw pads are perpetually exposed to elements that can lead to significant wear, tear, and a variety of injuries. Understanding these common types can help you identify what your dog might be experiencing.
Foreign Bodies
One of the most frequent paw injuries I encounter is a foreign object puncturing or becoming embedded in the paw pad. Dogs are naturally curious and explore their environment with their feet, making them susceptible to stepping on sharp items. Common culprits include shards of broken glass, thorns, splinters, sharp rocks, nails, and even fishing hooks. In some regions, notorious plant awns like foxtails in dogs can also burrow deep into the paw, causing severe discomfort and infection.
Cuts and Lacerations
If a sharp object doesn’t become lodged, it can still cause a painful cut. Paw pad cuts are extremely common because the pads’ primary function is to protect the underlying structures of the foot. These injuries often occur when a dog accidentally steps on or slices its paw pad on sharp debris. Beyond traumatic cuts, dogs can also develop non-traumatic lacerations if their paw pads become excessively dry and cracked, leading to painful splits that can bleed and become infected.
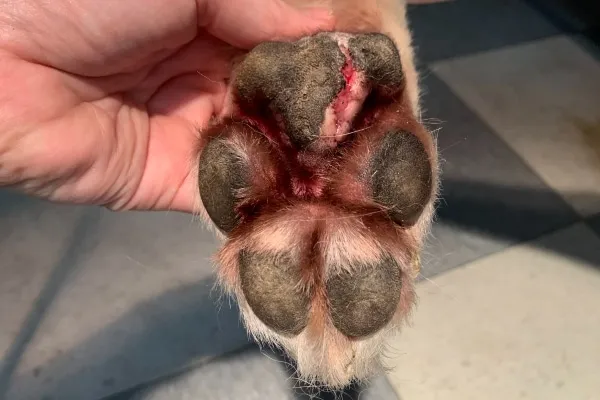 Injured dog paw pad with a fresh lacerationThis dog sustained a cut on her paw pad after stepping on a sharp object during a walk.
Paw Pad Flaps
Paw pad flaps are similar to cuts but typically involve a larger surface area, often running roughly parallel to the surface of the paw pad. A flap usually occurs when something slices the dog’s foot horizontally, partially detaching a section of the pad. For instance, if a dog’s foot gets entangled in sharp wire or metal, it might literally shave off a section of the paw pad, creating a loose flap of skin. These can also develop if a simple cut goes untreated and widens, eventually tearing into a flap. Flaps are generally more painful than simple cuts because each step the dog takes pulls on the loose skin, exposing sensitive underlying tissue and causing significant irritation.
Burns
Unfortunately, paw pad burns are a common seasonal injury, especially during warmer months. Surfaces like asphalt, concrete, and artificial turf can absorb and retain an alarming amount of heat from the sun. On what feels like a pleasant 86°F (30°C) day, pavement temperatures can easily reach a blistering 135°F (57°C), causing severe burns when your dog walks on hot pavement. Conversely, prolonged exposure to extremely cold temperatures, such as walking on ice, can also lead to frostbite-like burns. Additionally, ice melt products used in winter can be chemically abrasive, causing dryness, cracking, or chemical burns. Running for extended periods on rough, abrasive surfaces like tennis courts can also generate enough friction to cause thermal burns.
Ingrown Toenails
Sometimes, neglected or overly long nails can begin to curl and grow towards the paw pad. If the nail continues to grow without being trimmed, it can penetrate the soft pad tissue, creating a painful puncture wound. Ingrown toenails are not only agonizing for your dog but also create an ideal entry point for bacteria and dirt, potentially leading to a severe paw pad infection. This highlights the critical importance of regularly trimming your dog’s toenails as a vital part of preventative paw care. If you’re uncomfortable performing nail trims yourself, consider my Nail Trimming Master Course or consult your veterinarian.
Recognizing a Paw Pad Injury: Signs and Symptoms
If your dog experiences any of the paw pad injuries discussed above, they will almost certainly exhibit noticeable symptoms indicating pain or discomfort. Prompt recognition allows for timely intervention.
Common signs you might observe include:
- Sudden Lameness: Your dog may start limping or suddenly refuse to bear weight on the affected paw. Understanding why your dog is limping is often the first clue.
- Vocalization: Crying out, yelping, or whimpering when trying to put weight on the paw.
- Reluctance to Move: Hesitancy to walk, run, or jump, indicating pain.
- Bleeding: Visible blood from the paw pad, which can range from minor spotting to more significant bleeding.
- Licking or Biting: Persistent, obsessive licking, chewing, or biting at the paw. This is a clear indicator your dog is trying to soothe or clean a painful area. Continuous licking or biting at the paw, a common symptom of injury, can sometimes lead to secondary skin issues like hot spots. While our focus here is on paw injuries, knowing about natural remedies for hot spots on dogs can be beneficial for managing related skin irritations.
- Swelling: The paw or individual toes may appear visibly swollen.
- Discoloration or Reddening: The paw pad itself might look unusually red, inflamed, or discolored.
- Visible Injury: A clear cut, flap, puncture wound, burn, or embedded object.
- Hair Discoloration: Staining of the hair on the foot from dried blood or discharge.
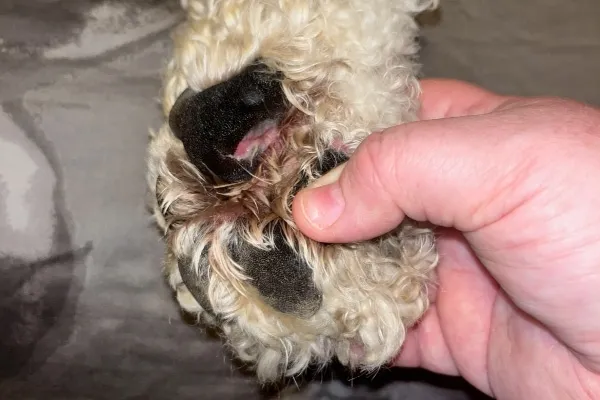 Dog focused on licking a sore paw, a common sign of injuryDogs with paw pad injuries often continuously lick or limp, signaling discomfort.
If you notice any of these symptoms, it’s essential to carefully inspect your dog’s paw. Depending on what you discover, you may be able to provide immediate first aid before seeking professional veterinary care.
Step-by-Step First Aid for Dog Paw Injuries
Knowing how to treat a dog paw injury with proper first aid can significantly impact your dog’s comfort and recovery. Here’s a detailed guide:
1. Prioritize Safety and Comfort for Your Dog
Before attempting any examination or treatment, your primary concern must be your dog’s safety and your own. A dog in pain, even the most gentle and well-behaved, can react unpredictably out of fear or discomfort.
- Assess your dog’s demeanor: Approach calmly and speak in a reassuring voice. If your dog is severely painful, agitated, or showing any signs of aggression (growling, snapping, baring teeth), do NOT attempt to handle the paw yourself.
- Seek veterinary care immediately: If your dog doesn’t want you touching the injured paw, it’s best to go directly to your veterinarian or an emergency vet clinic rather than trying to proceed with first aid at home. Attempting to force an examination could worsen the injury or result in you being bitten. For highly anxious dogs, understanding what is the best calming treat for dogs might be helpful in other stressful situations, but for an acute injury, prioritizing immediate safety is key.
2. Carefully Examine the Injured Paw
If you determine it’s safe to proceed, a thorough inspection will help you understand the nature of the injury.
- Systematic check: Gently lift the paw and examine all aspects: the top of the paw, each individual paw pad (including the digital pads and the larger carpal/metacarpal pads), and the spaces between the toes and paw pads. Check for redness, swelling, punctures, cuts, flaps, burns, or embedded objects. Also, check for signs like a dog ripped a nail off, which can also cause significant pain.
- Identify the injury type: Knowing whether it’s a foreign body, cut, flap, or burn will guide your next steps.
3. Address Foreign Objects and Bleeding
If an object is present or the wound is bleeding, these are the immediate concerns.
- Removing Superficial Objects (if safe): If you can clearly see a small, superficial object (like a tiny splinter or piece of glass) that is not deeply embedded and appears easy to grasp, you may attempt to remove it carefully with clean fingers or sterilized tweezers.
- When NOT to Remove: Never attempt to remove deeply lodged objects or anything that appears to be puncturing a blood vessel, nerve, or joint. Doing so could cause more damage, severe bleeding, or complications. In such cases, stabilize the object as best you can (e.g., by wrapping a clean cloth around it to prevent movement) and make an emergency vet visit immediately.
- Stopping Bleeding: If the wound is actively bleeding, apply direct, firm, and even pressure with a clean cloth, gauze, or paper towel. Maintain pressure for at least 5-10 minutes without lifting to check. Minor wounds should stop bleeding within this timeframe. If the cut continues to bleed steadily or profusely for 10-15 minutes despite pressure, contact your vet immediately as this could indicate a more serious injury requiring urgent medical attention.
4. Thoroughly Clean the Wound
Once any bleeding has stopped or is under control, cleaning the wound is essential to prevent infection.
- Cool Water: Gently rinse the wound with cool running water. This helps flush out debris, and the cool temperature can also help reduce swelling and provide some pain relief, especially for burns.
- Antiseptics: You can use a mild antibacterial soap, or a diluted antiseptic solution like chlorohexidine (often sold as Hibiclens) or povidone-iodine (Betadine) diluted to a weak tea color with water. Avoid harsh chemicals, alcohol, or hydrogen peroxide, as these can damage healthy tissue and delay healing.
- Gentle Cleaning: Carefully wipe away any remaining dirt or debris. Be prepared for some minor re-bleeding during cleaning; if this happens, gently apply pressure again until it stops.
5. Apply a Protective Bandage
A proper bandage is crucial for keeping the wound clean, protected from further injury, and allowing it to heal. If you don’t have proper bandaging materials, wrapping a clean towel or T-shirt around a bleeding wound can serve as a temporary measure while you head to the vet.
- Materials: Use clean, sterile materials like non-stick gauze pads directly over the wound, followed by layers of softer padding, and finally secured with self-adhering vet wrap (coban).
- Detailed Instructions: For detailed guidance, you can refer to resources on how to wrap a dog’s paw. The key is to create a secure, protective covering without restricting circulation.
- CRITICAL WARNING – Bandage Tightness: A bandage that is too tight is far worse than no bandage at all. It can cut off circulation, causing severe swelling, tissue damage, and even loss of the paw. Always ensure you can comfortably insert one to two fingers into the top of the bandage.
- Monitor for Circulation Issues: Watch for signs that the bandage is compromising your dog’s circulation. These include swollen toes (if they are sticking out of the bandage), a foot that feels cool to the touch, or any discoloration (pale, blue, or purplish). If you notice any of these signs, remove the bandage immediately and reapply it more loosely, or seek veterinary attention if swelling persists.
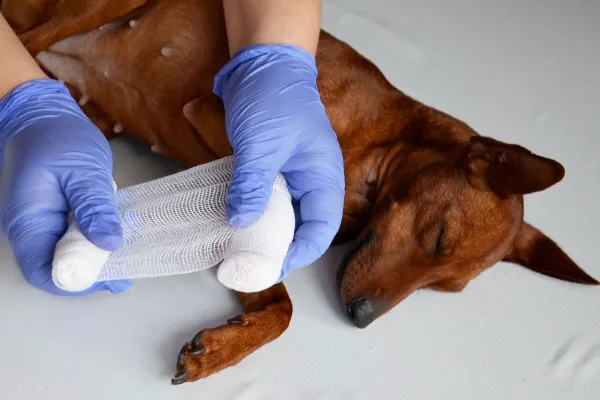 Close-up of a dog's paw being bandaged after an injuryProper bandaging is often necessary to help heal your dog’s paw injury, keeping it clean and protected.
6. Contact Your Veterinarian for Professional Guidance
Even after providing thorough first aid, it is almost always important to follow up with your veterinarian. They can properly assess the injury, ensure all foreign material is removed, prescribe appropriate medications (like antibiotics or pain relief), and provide guidance on long-term wound care.
- Daily Checks: While waiting for your vet appointment (if one is needed), diligently check and change the bandage daily. This allows you to monitor the wound for any changes, such as signs of infection (increased redness, swelling, pus, foul odor), and ensures the bandage isn’t restricting circulation.
What to Expect at the Vet: Diagnosis and Treatment
When you bring your dog in for a paw pad injury, your veterinarian will conduct a comprehensive examination to determine the best course of treatment.
- Physical Examination: The vet will start with a full physical exam to ensure your dog doesn’t have any other concurrent injuries or underlying health issues that might impact healing.
- Detailed Paw Examination: They will then meticulously examine the affected paw, palpating and manipulating the bones and joints to check for fractures, dislocations, or sprains. They’ll look for cuts, punctures, burns, flaps, swelling, and any embedded foreign material.
- Diagnostic Imaging: If your vet suspects a deep foreign object (like a foxtail, glass, or metal fragment) or if there’s concern about bone or joint involvement, X-rays may be recommended. X-rays are excellent for identifying metallic objects and assessing the integrity of bones and joints, helping the vet pinpoint the exact location of the problem.
How Your Vet Will Treat the Injury
Depending on the specific nature and severity of the paw pad injury, your veterinarian’s treatment approach will vary:
- Hair Trimming: Often, the vet will trim the hair around the injured paw pad. This allows for better visualization of the wound, facilitates thorough cleaning, and helps keep the area free of contaminants.
- Cleaning and Debridement: The wound will be meticulously cleaned again, and any remaining debris, dirt, or damaged tissue (debridement) will be carefully removed to promote healthy healing.
- Sutures – A Special Consideration: Interestingly, your veterinarian will likely NOT suture or stitch a paw pad closed, even for deep cuts or flaps. Paw pads are unique structures: they experience immense friction and constant movement. Sutures in this area often don’t hold well and can easily tear out, potentially causing more damage. In many cases, suturing does not significantly speed up the healing time for paw pad injuries. The body has an incredible capacity to heal these wounds naturally with proper care.
- Medications: Your vet may apply an antibacterial ointment or a soothing cream directly to the wound to prevent infection, reduce inflammation, and alleviate pain. Oral antibiotics might be prescribed if there are signs of infection or a high risk of bacterial contamination. Pain relief medication is also commonly prescribed to ensure your dog’s comfort during recovery.
- Professional Bandaging: The vet will apply a carefully constructed bandage. This bandage serves multiple critical purposes: controlling any remaining bleeding, reducing the chances of re-injury, keeping the wound clean and protected, containing any applied medication, and preventing your dog from licking or chewing at the wound (though an Elizabethan collar, or E-collar, may also be necessary to fully deter licking).
- Post-Treatment Instructions: Your veterinarian will provide clear, detailed instructions on how often to change the bandage, what specific materials and medications to use, and when follow-up recheck appointments are necessary. Listen carefully and don’t hesitate to ask questions.
Be Patient and Stay in Contact with Your Vet
Paw pad injuries can be slow to heal because your dog constantly uses their feet. Patience is key during the recovery process. Diligently follow all of your vet’s instructions regarding bandage changes, medication administration, and activity restrictions. Always contact your vet if you suspect the injury isn’t healing well, if your dog’s pain increases, or if you notice any new symptoms. Remember, swelling in the foot and toes due to an overly tight bandage is one of the most common complications I observe with paw pad injuries, so always double-check the tightness.
Preventing Future Paw Pad Injuries
While some accidents are unavoidable, you can take several proactive precautions to significantly reduce your dog’s risk of paw pad injuries. Maintaining your dog’s overall health, including proper parasite prevention with top rated flea and tick for dogs, contributes to healthy skin and paws, making them less susceptible to certain irritations that might be confused with injuries.
- Mind the Temperature Extremes:
- Hot Pavement: Avoid walking your dog during the hottest parts of the day, especially on asphalt, concrete, or sand. A good rule of thumb: if you can’t comfortably hold the back of your hand against the pavement for 7-10 seconds, it’s too hot for your dog’s paws.
- Cold Surfaces: Prolonged exposure to ice or extremely cold surfaces can cause frostbite.
- Consider Protective Dog Booties:
- Lightweight Protection: For general protection against hot pavement, ice melt products, or minor abrasions, consider lightweight rubber boots like PawZ dog boots. They are thin enough for your dog to still feel the ground, offering good tactile feedback, while providing a protective barrier. Remember to remove PawZ boots once indoors, as leaving them on too long can restrict circulation.
- Heavy-Duty Boots: For walks in areas with sharp rocks, rough terrain, or trash, thicker dog boots or socks can offer more substantial protection. However, be aware that these types of dog boots can sometimes make it harder for dogs to sense where their feet are (affecting proprioception in dogs), so choose carefully and ensure they fit well.
 Paw boots protecting a dog's feet from cold and snowTraining your dog to wear protective booties in snow can significantly help prevent paw pad injuries from extreme temperatures and harsh elements.
- Post-Walk Paw Care:
- Winter Cleansing: After winter walks, especially where ice melt or road salt is used, thoroughly wash your dog’s paws with warm water to remove any chemical residue that could cause burns or irritation.
- Chemical Exposure: Do the same if you suspect your dog has walked through any other spilled chemicals.
- Hazard Awareness: Always keep a vigilant eye out for potential hazards along your walking path or trail, such as broken glass, sharp objects, or thorny plants.
- Regular Nail Trims: Consistent trimming of your dog’s toenails is crucial to prevent them from growing too long and curling into the paw pad, which can cause painful ingrown nails and infections.
- Routine Paw Inspections: After every outdoor adventure, especially if you live or visit an area prone to foxtails or other plant awns, carefully inspect your dog’s paws (and their entire body) for any embedded foreign objects. Beyond injury prevention, routine paw care involves keeping them clean and free from parasites. For general care, understanding options like best flea treatment for dogs without a vet prescription can be part of comprehensive pet management. While a sudden paw injury requires immediate attention, sometimes chronic licking or irritation is due to allergies. If your dog suffers from persistent paw irritation, exploring best allergy medicine for dogs with itchy skin might be a conversation to have with your vet.
You Can Provide Paw Pad Injury First Aid for Your Dog
While all these prevention strategies are incredibly helpful, I also want to emphasize the importance of being prepared for the unexpected. If you don’t already have a well-stocked dog first aid kit, now is the perfect time to assemble one for your home and another for your car or backpack. You never know when you might need it!
Hopefully, your dog will never experience a paw pad injury. But if he or she does, remember to remain calm, retrieve your first aid kit, and follow the step-by-step instructions I’ve outlined in this article. With a little knowledge and preparation, you can confidently provide the initial care your dog needs. Ultimately, when in doubt, always contact your veterinarian for advice. They are your best resource to help manage your dog’s paw pad injury, ensuring your beloved pup can get back to playing in no time!
Has your dog ever had a paw pad injury?
Please share your experiences, challenges, and successful strategies in the comments below.