
A dog paw pad injury can range from minor burns and cuts to more severe punctures or tears. Knowing How To Treat A Dog Pad Injury is crucial for every pet parent, as quick and appropriate first aid can significantly impact your dog’s recovery. As an integrative veterinarian, Dr. Julie Buzby emphasizes the importance of understanding different types of paw pad injuries, along with step-by-step first aid instructions, and when it’s essential to seek professional veterinary care.
Recently, I encountered a client whose Labrador Retriever, April, had sustained a paw pad injury. During her daily walk, April suddenly began limping, and her owner quickly discovered a sliver of broken glass embedded in her paw. Fortunately, April’s mom had previously taken doggie first aid classes, which proved invaluable. She carefully removed the glass, cleaned and bandaged the paw, and scheduled an appointment with me. When I examined April, I was pleased to see her paw was healing well, a testament to her owner’s preparedness and excellent first aid skills.
Not all dog parents have access to such training, and that’s why this guide is designed to provide clear, actionable advice on recognizing and treating paw pad injuries. Before delving into treatment specifics, let’s establish a foundational understanding of your dog’s paw pads.
Understanding Your Dog’s Paw Pads: Why They’re So Important
The saying “put your best foot forward” holds literal truth for our canine companions. Your dog’s paws are fundamental to their overall well-being and mobility. Comprising intricate networks of muscles, bones, tendons, and ligaments, these structures facilitate walking, running, and playing comfortably and securely. A key component in this functionality is the paw pad itself.
These thick, resilient foot pads offer essential cushioning, absorbing the impact of every step your dog takes. This vital function helps to reduce strain on the bones and joints of your dog’s foot, safeguarding against potential long-term issues.
In addition to their shock-absorbing capabilities, paw pads work in conjunction with the toenails to provide superior traction, enabling your dog to navigate diverse terrains with confidence. Perhaps equally important, they act as a protective barrier, shielding your dog’s delicate foot structures from extreme temperatures, whether blistering hot pavement or freezing ice.
Common Types of Dog Paw Pad Injuries
Given their constant contact with the ground and exposure to various elements, paw pads are highly susceptible to wear, tear, and injury. Understanding the different types of injuries can help you identify and address them promptly.
Foreign Bodies
One of the most frequent paw pad injuries encountered is a foreign object piercing the pad. Dogs can step on a variety of sharp items, such as broken glass, splinters, nails, thorns, or even fishing hooks, which then become lodged in the thick tissue of the paw pad. These objects can cause pain, lameness, and a risk of infection.
Cuts
Cuts are another common paw pad injury, often occurring when a dog steps on a sharp object that slices the pad rather than embedding itself. The durable nature of paw pads means they often take the brunt of such encounters to protect the rest of the foot. Beyond traumatic incidents, dogs can also develop non-traumatic cuts if their paw pads become excessively dry and crack or split open. Ensuring good paw health can help prevent these painful fissures. When you notice concerns like dry, flaky skin and scabs home remedy on your dog’s paws, it’s wise to address them promptly to prevent cracking and potential cuts.
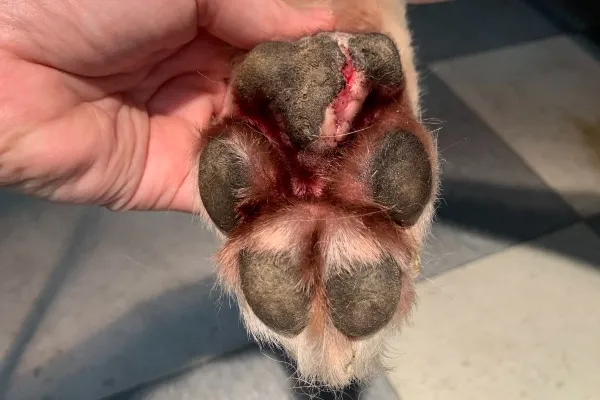 Close-up view of a dog's paw pad with a visible cut or laceration, indicating an injury.
Flaps
Paw pad flaps are a more extensive form of injury, distinct from simple cuts by their larger surface area and the way they run roughly parallel to the pad’s surface. These typically result from an object slicing the foot horizontally, partially detaching a section of the paw pad and creating a loose flap of skin. This can happen if a dog’s foot gets caught in sharp wire or metal. If an untreated cut expands, the tissue may eventually tear, forming a painful flap. Flaps are often more painful than simple cuts because each step your dog takes pulls on the loose skin, causing constant irritation.
Burns
Pad burns are unfortunately common, especially during warmer months. Surfaces like asphalt, concrete, or artificial turf can reach blistering temperatures under the sun. Even on a moderately warm day, pavement can become dangerously hot, causing severe burns to your dog’s paw pads. Conversely, prolonged exposure to extremely cold temperatures, such as walking on ice, can also lead to burns. Furthermore, exposure to de-icing salts and other ice melt products can cause chemical burns, dryness, or cracking. Contact with spilled caustic substances can also result in chemical burns, and extensive running on abrasive surfaces like tennis courts can similarly damage the pads.
Ingrown Toenails
Overly long or improperly trimmed toenails can curl downwards and eventually penetrate the paw pad. This creates a painful penetrating wound that not only causes discomfort but can also trap dirt and bacteria, leading to a paw pad infection. Regular nail trimming is a vital part of preventative care, as it helps prevent such painful and potentially serious injuries.
Recognizing a Paw Pad Injury: Key Signs to Watch For
If your dog has sustained a paw pad injury, they will likely exhibit several noticeable symptoms. Being observant can help you identify the problem quickly and take appropriate action.
Common signs of a paw pad injury include:
- Sudden lameness: Your dog may suddenly start limping or refusing to put weight on the affected paw.
- Crying out: Vocalization of pain when pressure is applied to the injured paw.
- Reluctance to bear weight: Hesitation or refusal to walk, stand, or put full weight on the injured foot.
- Bleeding: Any visible blood from the paw pad.
- Licking or biting: Persistent licking, chewing, or biting at the paw to alleviate discomfort.
- Swelling: Noticeable swelling of the entire foot or localized around the injury.
- Discoloration or reddening: Changes in the color of the paw pad, indicating inflammation or irritation.
- Visible injury: An obvious cut, flap, puncture, or an embedded object in the paw pad.
- Hair discoloration: Staining or discoloration of the hair around the paw due to blood or discharge.
If you observe any of these symptoms, it’s crucial to carefully inspect your dog’s paw. Depending on your findings, there are specific first aid measures you can take before or while arranging veterinary care.
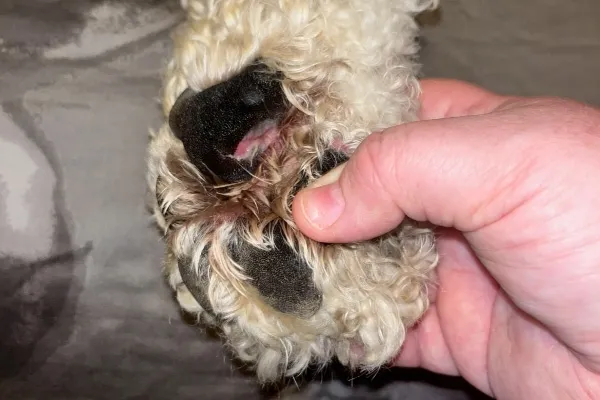 A dog licking its paw continuously, a common indicator of pain or irritation from a paw pad injury.
Step-by-Step First Aid: How to Treat a Dog Pad Injury at Home
Knowing how to treat a dog pad injury at home with proper first aid can make a significant difference. Follow these steps to assess and manage your dog’s paw pad injury before professional veterinary help.
1. Evaluate Your Dog’s Overall Condition
First and foremost, comfort your dog and assess their general demeanor. An injured dog, even the most gentle, can react unpredictably when in pain. If your dog is severely painful, agitated, or shows any aggression when you attempt to touch their paw, do not try to inspect or treat the injury yourself. Prioritize your safety and seek immediate veterinary care instead of proceeding with the following steps.
2. Close Inspection of the Paw
If you determine it’s safe to examine your dog’s paw, carefully inspect all aspects of it: the top, the bottom, the individual paw pads, and the spaces between the toes and paw pads. It’s important to identify the type of injury—whether it’s a cut, flap, puncture wound, burn, or if there’s no visible trauma but symptoms like limping persist. The specific type of injury will guide the appropriate first aid.
If you find an object embedded in the paw pad, proceed to step 3a. If the wound is bleeding without an embedded object, or if it’s a burn or non-bleeding wound, continue to step 3b or 4, respectively.
3. Addressing Foreign Objects and Stopping Bleeding
3a. Removing Foreign Objects (if safe): If your dog has a small, superficial object (like a tiny splinter) puncturing the paw pad, you might be able to gently remove it using your fingers or tweezers. However, if the object is deeply lodged, large, or if you suspect it might have penetrated a blood vessel, nerve, or joint, do not attempt to remove it yourself. Removing such objects incorrectly can cause more damage, severe bleeding, or introduce infection. In these cases, it’s best to stabilize the paw and transport your dog to an emergency vet.
3b. Stopping Active Bleeding: For actively bleeding wounds, apply firm, even pressure with a clean cloth, gauze, or paper towel. Most minor paw pad cuts should stop bleeding within one to two minutes. If the cut continues to bleed steadily for 10 to 15 minutes despite pressure, or if the bleeding is severe and spurting, contact your veterinarian immediately as this could indicate an emergency.
4. Cleaning the Wound
Once any bleeding has subsided, cleaning the wound is vital to prevent infection. I recommend using cool water, which can help reduce swelling and provide some pain relief, particularly beneficial for burns. You can also use a mild antibacterial soap or diluted antiseptic solutions like chlorhexidine or povidone-iodine to thoroughly clean the area and remove bacteria or debris. Be aware that cleaning might cause the wound to bleed slightly again; if this happens, gently reapply pressure until it stops.
5. Applying a Protective Bandage
To keep the wound clean, protected from further injury, and to help with healing, applying a bandage may be necessary. If you don’t have proper bandaging materials, even a clean towel or T-shirt can be temporarily wrapped around a bleeding wound while you travel to the vet. For effective bandaging, use clean, sterile materials such as non-stick gauze pads, rolled gauze, and self-adhesive vet wrap.
When applying the bandage, it is critically important to avoid making it too tight. A bandage that restricts circulation can cause more harm than good, potentially leading to swelling and even tissue damage. You should be able to comfortably insert one to two fingers into the top of the bandage. Keep an eye out for signs that the bandage is too tight, such as swollen toes (if they are visible), a foot that is cool to the touch, or discoloration. Learning how to heal pressure sores on dogs becomes crucial if complications arise from improper bandaging or prolonged pressure.
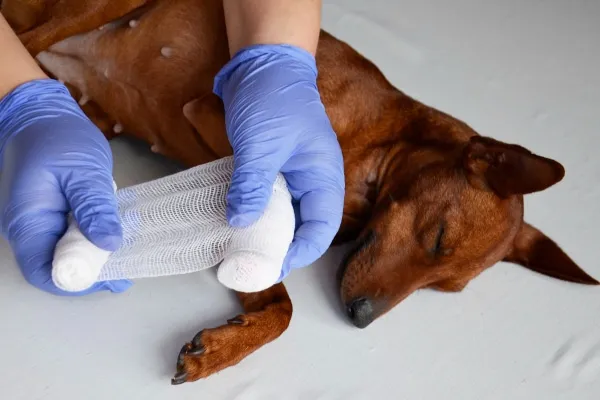 An owner or veterinarian carefully applying a bandage to a dog's injured paw, demonstrating proper first aid.
6. Contacting Your Veterinarian
Even after providing thorough first aid, it’s essential to follow up with your veterinarian. They can properly assess the injury, provide additional cleaning, medication, or specific instructions to ensure optimal healing and prevent complications.
While waiting for your veterinary appointment, check and change the bandage daily. This allows you to monitor the wound for any changes, signs of infection (like excessive redness, swelling, pus, or foul odor), and ensures the bandage is not restricting circulation.
What to Expect at the Vet: Professional Treatment for Paw Pad Injuries
When you bring your dog to the veterinarian for a paw pad injury, the vet will typically begin with a comprehensive physical examination. While the immediate concern is the paw, a full body check ensures no other injuries are present.
During the focused paw examination, your vet will meticulously inspect for cuts, punctures, burns, or other visible traumas. They will also carefully palpate and manipulate the bones and joints of the foot to rule out any underlying structural damage. If a deeply embedded object (like metal or a foxtail) is suspected, an X-ray may be recommended. X-rays help determine if bones or joints are affected and can pinpoint the exact location of foreign bodies, especially metallic ones.
Depending on the injury, your vet may need to trim the hair around the affected paw. This improves visibility, allows for a more thorough cleaning, and helps keep the wound sterile. After trimming, the vet will meticulously clean the wound and remove any remaining debris or foreign objects.
For cuts or flaps, your veterinarian will generally not suture the paw pad closed. While deep cuts in other areas of the body often require stitches, paw pads are different. Their unique structure, constant movement, and friction make it difficult for sutures to hold securely, and they can easily tear out. In many cases, suturing the pad doesn’t significantly speed up the healing process.
Instead, bandaging the foot is a cornerstone of veterinary treatment for paw pad injuries. The bandage serves several critical purposes:
- Controlling bleeding: It helps apply continuous pressure to stop active bleeding.
- Decreasing re-injury risk: It protects the delicate healing tissue from further trauma.
- Keeping the wound clean: It creates a sterile barrier against dirt and bacteria.
- Containing medication: It holds any topical antibacterial ointments or soothing creams in place, allowing them to work effectively.
- Preventing licking/chewing: While sometimes an Elizabethan collar (E-collar) is also needed, a bandage can deter your dog from irritating the wound with their tongue.
Your veterinarian will provide detailed instructions on how often to change the bandage, what materials and medications to use, and when to bring your dog back for recheck appointments. It’s vital to listen carefully and follow these instructions precisely.
As your vet will likely explain, paw pad injuries can take a considerable amount of time to heal because your dog constantly uses their feet. Patience is key throughout the recovery process. Always adhere to your vet’s instructions and contact them if you notice any concerns about the healing progress. Remember, foot and toe swelling caused by an overly tight bandage is a common complication, so monitoring the bandage for proper fit is crucial.
Preventing Future Paw Pad Injuries
While some injuries are unavoidable, implementing preventative measures can significantly reduce the risk of your dog developing paw pad injuries.
- Avoid Extreme Temperatures: Be mindful of pavement temperatures. During hot weather, walk your dog during cooler parts of the day. If you can’t comfortably hold the back of your hand against the pavement for 7-10 seconds, it’s too hot for your dog’s paws. In winter, limit exposure to ice and extremely cold surfaces.
- Consider Protective Dog Booties: Products like rubber dog boots can offer a protective layer against hot pavement, ice, salt, and abrasive surfaces while still allowing your dog to feel the ground. Thicker dog boots can be used for walks in areas with sharp rocks or debris, though some dogs find them cumbersome.
- Wash Paws After Walks: After winter walks, thoroughly wash your dog’s feet to remove any ice melt chemicals or other potentially irritating substances. Do the same if you suspect they’ve walked through any spilled chemicals.
- Regular Inspections: After every outdoor excursion, especially in grassy or wooded areas, carefully inspect your dog’s paws and entire body for foreign objects like thorns, splinters, or foxtails.
- Routine Nail Trimming: Keep your dog’s nails trimmed regularly to prevent them from growing too long and curling into the paw pads, which can cause painful puncture wounds and infections.
- Hazard Awareness: Always be vigilant about potential hazards along your walking path or trail, such as broken glass, sharp objects, or uneven terrain.
- Comprehensive Health Care: Maintaining your dog’s overall health, including flea, tick, and worm treatment for dogs 3 monthly, contributes to their general well-being and resilience against injuries. Regular preventative care and addressing issues like fleas with over-the-counter flea medicine for dogs or home remedies for fleas on puppies under 12 weeks can indirectly support paw health by reducing irritation and potential for self-trauma.
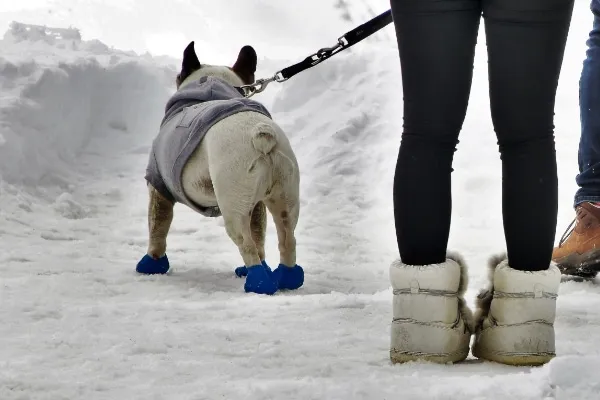 A dog wearing protective winter booties on its paws while walking in the snow, highlighting prevention of paw pad injuries.
You Can Provide Paw Pad Injury First Aid for Your Dog
While all these prevention strategies are incredibly helpful, being prepared for potential injuries is equally important. If you don’t already have a well-stocked dog first aid kit, now is an excellent time to assemble one for your home and another for your car or backpack. You never know when you might need it!
Hopefully, your dog will never experience a paw pad injury. But if they do, remember to remain calm, refer to your first aid kit, and follow the steps outlined in this article. With a calm approach and the right knowledge, you can effectively provide initial care. However, when in doubt or if the injury seems severe, always contact your veterinarian for professional advice and treatment. Your vet is your best resource to help manage your dog’s paw pad injury, ensuring your furry friend can get back to playing comfortably in no time!
Has your dog ever had a paw pad injury?
Please share your experiences and insights in the comments below.
References
- The Kennel Club. (n.d.). Hot Pavements: Is it too hot to walk your dog? Retrieved from https://www.thekennelclub.org.uk/health-and-dog-care/health/health-and-care/a-z-of-health-and-care-issues/hot-pavements/