
Teaching a horse to bow on one knee is an impressive trick that can be achieved with patience and a systematic approach. While it may seem complex, breaking the behavior down into manageable steps makes it accessible for most horse and trainer partnerships. This guide will walk you through the process, focusing on safety, positive reinforcement, and ensuring the horse’s comfort and understanding.
The bow, particularly the variation where the horse lowers itself onto one knee with its nose tucked close to the ground, is a popular equestrian trick. Variations exist, including those where the horse rests on both knees or extends its front legs. The key is to train a behavior that is comfortable and achievable for your individual horse.
To successfully teach a horse to bow, several component behaviors are essential:
- Stretching: The horse should be able to widen its stance slightly, placing its front and hind legs a bit farther apart than normal. This optional step can make it easier for the horse to achieve the bowing position.
- Lifting a Front Leg: The horse needs to be able to pick up a front leg and hold it elevated.
- Lowering the Shoulders: With the front leg lifted, the horse must learn to rock back and lower its shoulders. Some horses may naturally step back with their hind legs to facilitate this.
- Finishing the Bow: The horse completes the bow by bringing the folded front leg down towards the ground. It’s crucial that if the horse’s leg touches the ground, the cannon bone is parallel to it to prevent knee injury.
Throughout the training process, cues and guidance are provided to help the horse through each stage. With consistent practice, the amount of assistance can be gradually reduced. A well-trained horse will be able to perform the bow with minimal cues, adjusting its legs as needed. The horse’s strength and flexibility will influence how easily it can perform the bow and transitions in and out of the position.
Historical training methods often involved food lures and a whip as cues. Modern approaches, incorporating clicker training and target sticks, offer a more precise and often more rewarding experience for the horse. The following steps are designed to be adaptable, allowing you to utilize your preferred training strategies, such as targeting, molding, or luring.
Steps to Teach the Bow
The bow can be broken down into the following sequential steps. Remember to be flexible and adjust the process based on your horse’s individual learning pace and physical capabilities.
Step 1: Prepare the Horse and Footing
Begin with your horse standing square in a quiet environment. Ensure the footing is soft and deep, such as thick shavings, to provide cushioning. You may consider wrapping the horse’s left front leg with a polo bandage for added protection and comfort during training.
Step 2: Encourage a Wider Stance (Optional Stretch)
This step is optional but can be beneficial for some horses. If your horse already knows how to stretch on cue, ask for it before proceeding. If not, you can teach a stretch by having the horse stand with its front feet on one mat and hind feet on another, gradually increasing the distance between them. This helps the horse learn to widen its stance, which can assist in the bowing motion. If your horse struggles to rock back and down in later steps, revisiting the stretch behavior may be helpful.
Step 3: Teach the Horse to Lift and Hold a Front Leg
Using your established cue for picking up a foot, ask your horse to lift its left front leg. A target stick can be useful here; hold it so the horse’s knee touches it when lifting its leg. Mark and reinforce this action with a clicker when the knee contacts the target. Once consistent, gradually increase the duration the leg is held up. For detailed instructions on body part targeting, refer to resources on clicker training for horses.
Step 4: Cue the Rock Back and Weight Shift
With the leg held up, prompt the horse to rock back. You can gently draw the folded leg backward, marking and rewarding any shift in weight. Alternatively, use a target stick or a long carrot placed between the front legs, reinforcing the horse for touching it. This stage may require more time, especially if the horse finds the physical movement challenging. Remember, the horse cannot see its own legs, so your guidance is essential.
Step 5: Lowering the Shoulders
Continue to encourage the horse to shift its weight back and lower its shoulders. If you are supporting the folded leg, ensure the horse is dropping its shoulders rather than simply straightening the elbow. If the horse is holding the leg up independently, monitor to prevent it from unfolding as it nears the ground, which could lead to an awkward weight-bearing position.
Some horses naturally step their hind legs back to create more space for lowering. If you are using targeting or luring, reinforce moments when the horse lowers its shoulders, as some flexible horses may instead arch their necks excessively. Adjust your target placement or lure as needed.
Step 6: Reaching the Ground
As the horse lowers itself, gradually work towards getting the cannon bone close to or parallel with the ground. This process should be slow and deliberate to avoid startling or injuring the horse. If the horse becomes unbalanced or frightened, rebuilding its confidence will take time.
For bows where the horse rests on its folded leg, teach it that ground contact is the goal. You can add extra padding, like a pile of shavings or a stuffed pillowcase, under the expected landing spot. This makes the contact easier and provides more support. Over time, the amount of padding can be reduced. It’s important to note that not all horses need to bear weight on the folded leg; many will hold it slightly elevated, supporting their weight on the outstretched leg.
Step 7: Shaping Head Position
Once the horse’s general posture is correct, you can refine the head position. Common positions include tucking the nose between the legs or beside the bent leg. This can be achieved through shaping or by using a target stick to guide the nose into place.
Additional Tips for Bowing Training
- Individual Style: Recognize that each horse will have a unique way of bowing. The final position should be one that the horse can easily assume and exit. If a horse struggles to get up, the bow may need to be shallower.
- Kneeling vs. Bowing: Some horses may naturally kneel, which can be a more comfortable position. If kneeling is not the desired outcome, simply ask the horse to stand and reinforce the folded front leg, gradually building the rock back. Alternatively, you can embrace the kneel as the desired behavior.
- Progress and Safety: Be satisfied with small improvements in each session. Avoid rushing, as a fall or injury can significantly set back training and damage the horse’s confidence. Bowing can be physically demanding, requiring flexibility in the legs and back.
- Modifications for Physical Limitations: If your horse has physical limitations, such as back or shoulder issues, consider teaching a modified bow where the horse doesn’t lower as far. Observe the horse closely for any signs of discomfort.
Willy demonstrating the finished bow.
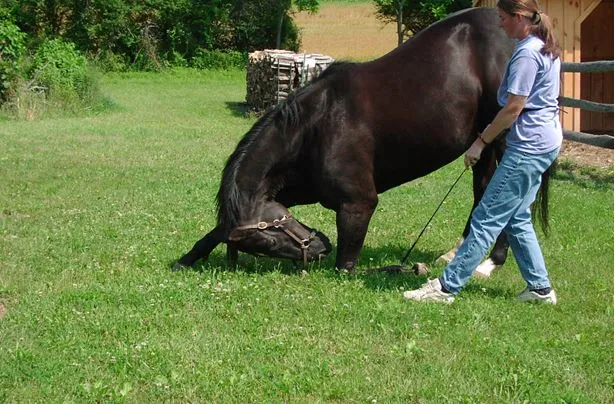 A horse named Willy is in a bowing position, with its left front leg bent and tucked under its body, and its head lowered towards the ground.
Share this:
- Share on X (Opens in new window) X
- Share on Facebook (Opens in new window) Facebook
Like Loading…