
Disposable puppy pads, while convenient for quick cleanup, often present a host of frustrations for dog owners. From leaks around the edges to the constant expense and environmental impact of single-use products, many seek a more sustainable and effective solution. This guide delves into a practical, DIY approach to creating reusable puppy pads with a frame, specifically addressing the common problem of How To Make Puppy Pads Stay In Place and prevent accidents from spreading.
For years, dedicated dog owners have grappled with the limitations of standard puppy pads. Their generic, clinical appearance often clashes with home decor, and their absorbency can be questionable. A frequent complaint is that dogs don’t always aim perfectly, leading to urine seeping under the pad and onto valuable flooring. This not only creates extra cleaning work but also defeats the purpose of using pads in the first place. Beyond the mess, the sheer volume of disposable pads used daily, especially for puppies, senior dogs, or those with incontinence, raises significant environmental concerns.
Recognizing these challenges, this guide offers a superior alternative: a reusable puppy pad system with an integrated frame. This innovative solution aims to solve common issues by ensuring pads remain stationary and contain liquids effectively, while also being visually appealing and eco-friendly.
Crafting Your Reusable Puppy Pads
The core of this project involves creating durable, absorbent, and washable pads. The goal is to assemble layers of fabric that can withstand repeated use and washing, providing reliable protection against accidents.
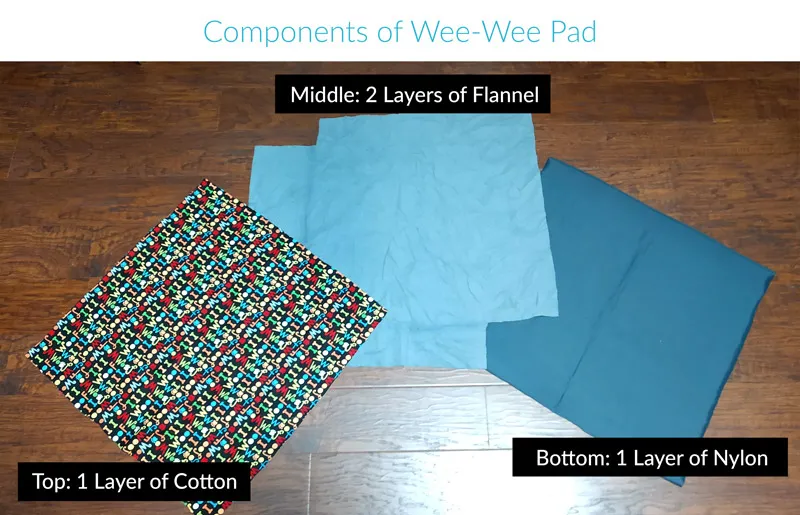
Materials for the Pads:
- Top Layer: One 23” x 23” piece of cotton fabric with a design. Darker colors are recommended to camouflage any minor stains.
- Absorbent Layers: Two 23” x 23” pieces of flannel. These provide the bulk of the absorption.
- Waterproof Backing: One 23” x 23” piece of polyurethane-coated nylon (150-200 denier is ideal). The coated side should face upwards.
Assembling the Pad Layers:
- Layer Preparation: Cut all fabric pieces to the specified 23” x 23” dimensions. This size allows for trimming after sewing to achieve a final approximate size of 22” x 22”.
- Stacking: Arrange the layers in the following order from top to bottom: cotton, flannel, flannel, and then the polyurethane-coated nylon. Ensure the coated side of the nylon faces upwards.
- Clipping: Secure all layers together with clips around the edges. Minor misalignment is acceptable at this stage.
- Initial Stitching: Using a standard presser foot on your sewing machine, select a stitch pattern like “Rampart” (or a similar straight stitch). Sew around the entire border, maintaining a seam allowance of ¼” to ½” from the edge. This secures all layers into a single piece.
- Trimming: Trim any excess fabric from the edges, ensuring you maintain the ¼” – ½” seam allowance.
- Finishing the Edge: For a professional and durable finish, switch to an overcast foot. Use a similar stitch (like Rampart) and align the foot so the center metal bar is on or slightly past the fabric edge. This mimics a serged seam without needing a serger. Carefully test the stitch width and ensure the needle passes through the gaps in the foot to avoid breakage. Stitch all the way around the border to enclose the raw edges.
 Dog pee pad layers assembled
You have now created your first reusable puppy pad! It’s recommended to make several to have backups for washing. These pads are machine washable; use a delicate cycle with a low spin and standard detergent, avoiding bleach.
Designing and Building the Pad Holder Frame
The frame is crucial for keeping the pads in place and preventing urine from running off the edges. This DIY frame uses PVC pipes and vinyl fabric for a durable and waterproof solution.
Materials for the Frame:
- Frame Structure: Four 22” long pieces of 1” PVC or ABS piping, and four 1” PVC or ABS elbows. ABS piping is recommended for its black color, which is less conspicuous.
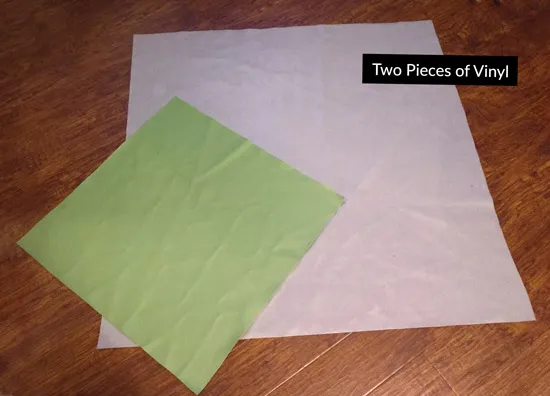
- Large Vinyl Piece: One 43” x 43” piece of thick vinyl fabric (mute grey color used in the example).
- Accent Vinyl Piece: One 25” x 25” piece of vinyl fabric (green accent color used in the example). This forms the inner base of the frame.
- Elastic Cord: Approximately 60” of elastic cord.
- Safety Pin: For threading the elastic.
Constructing the Frame:
- Assemble the PVC Frame: Cut four equal pieces of 22” piping and connect them using the four elbows to form a square frame.
- Prepare Vinyl Pieces:
- The large vinyl piece (43” x 43”) will serve as the outer structure.
- The smaller vinyl piece (25” x 25”) will be the inner bottom of the frame.
- Mark and Cut Large Vinyl: On the 43” x 43” vinyl piece, measure 9” down and inward from each corner. These marks will guide your cuts and folds.
- Position Accent Piece: Center the 25” x 25” vinyl piece on top of the larger piece. The corners of the smaller piece should align with the marks you made on the larger piece.
- Fold and Secure Flaps: Fold each of the four flaps of the large vinyl piece over the smaller accent piece. The folded edges should slightly overlap the edges of the accent square.
- Sewing the Flaps: Using a standard presser foot and a zig-zag stitch with very small width and length settings, sew along the overlapping edges of the flaps to secure them to the accent piece. Also, sew along the sides of the flaps, leaving a 1” opening at the top of each flap.
 Dog pee pad vinyl pieces
- Threading the Elastic: Attach a safety pin to one end of the elastic cord. Guide the safety pin through the 1” opening in one of the vinyl flaps. Nudge it through the fabric, out the other end. Repeat this process for all four flaps, ensuring the elastic runs through each opening.
- Tensioning the Frame: Once both ends of the elastic cord are at one corner, place the PVC frame centered onto the vinyl. Pull both ends of the elastic cord firmly. This action will cause the flaps to rise and wrap tightly around the PVC pipes, creating the frame. Continue pulling until the fabric is snug and secure around the pipes, then tie the two ends of the cord into a tight knot. Trim any excess cord.
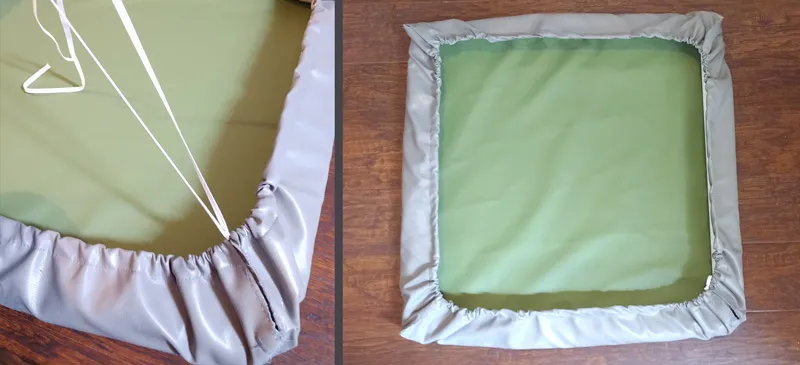 Dog pee pad tightening elastic cord
You now have a functional and sturdy frame for your reusable puppy pads!
Finalizing the Setup and Training
With your reusable pads and frame complete, the final steps involve introducing them to your dog and ensuring they are used effectively.
- Placement: Place the assembled frame on the floor in the designated potty area, where you have traditionally placed disposable pads.
- Pad Insertion: Lay one of your newly made reusable pads inside the frame.
- Transition Period: To help your dog adjust, you can initially place a disposable pad on top of your reusable pad for a day or two. This familiar scent can encourage them to use the new setup.
- Removal: After the transition period, remove the disposable pad, leaving only your reusable pad within the frame.
By implementing this DIY solution, you effectively solve the problem of how to make puppy pads stay in place. The frame ensures stability, while the multi-layered pads provide superior absorbency and leak protection. This method not only keeps your floors clean but also offers a cost-effective and environmentally conscious alternative to disposable pads. Should you have a male dog with a tendency to lift his leg on vertical surfaces, you can also consider attaching a piece of clear vinyl to the wall above the pad setup to provide a dedicated marking spot without compromising your furniture.
For more advanced training techniques, such as teaching your dog to walk off-leash or to walk beside you, explore our comprehensive guides on how to train a dog to walk off leash and teach your dog to walk beside you. If you’re encountering issues with your puppy biting the leash during walks, our article on how to stop your puppy from biting the leash offers practical solutions. Remember, consistent training and the right tools are key to a well-behaved canine companion; there are many things you can train a dog to do to enrich their lives and yours.
This project provides a robust answer to how to keep puppy pads from shifting, offering peace of mind and a cleaner home environment. For personalized assistance with challenging training scenarios or to explore professional training services, we encourage you to contact a certified dog trainer.
References:
- This guide draws inspiration from various DIY and pet care resources. Specific product recommendations for related items can be found on platforms like Amazon.
- Information on fabric properties and sewing techniques is based on standard textile knowledge and sewing best practices.