
A torn paw pad can be a distressing injury for any dog owner, ranging from minor cuts to deep lacerations. Knowing how to heal a dog’s torn paw pad effectively is crucial for your pet’s comfort and quick recovery. As a veterinarian, I’ve seen countless paw pad injuries, and a client’s story with her Labrador Retriever, April, always comes to mind. April started limping during her daily walk, and her mom discovered she had stepped on broken glass. Thanks to her prior “doggie first aid” training, April’s mom was able to gently remove the sliver, clean, and bandage the paw before bringing her in. Her preparedness was commendable, and April’s paw looked great. This experience highlighted the importance of accessible guidance for all dog parents. This article aims to provide that guidance, offering step-by-step first aid instructions, explaining when veterinary care is essential, and sharing preventative measures to keep your dog’s paws healthy.
The Vital Role of Your Dog’s Paw Pads
Your dog’s paws are essential for their overall well-being and mobility, serving as their primary interaction point with the world. The intricate network of muscles, bones, tendons, and ligaments within the paw enables movement, while the paw pads provide crucial support and protection.
These thick, resilient foot pads act as natural shock absorbers, cushioning every step your dog takes. This minimizes stress on their bones and joints, making running, walking, and playing comfortable. In conjunction with their toenails, paw pads offer vital traction, allowing your dog to navigate various terrains, from slippery floors to uneven trails. Furthermore, they serve as a protective barrier against extreme temperatures, shielding sensitive tissues from hot pavement in summer and icy surfaces in winter. Understanding their importance underscores why any injury, especially a torn paw pad, requires prompt and careful attention. For a deeper dive into their anatomy, you can explore articles on dog paw anatomy.
Understanding Types of Paw Pad Injuries
Given their constant contact with the ground, paw pads are prone to various injuries. While our focus here is on how to heal a dog’s torn paw pad, it’s helpful to understand the spectrum of potential issues.
Cuts and Tears
Cuts are among the most common paw pad injuries. They occur when a dog steps on sharp objects like glass, metal shards, or even sharp stones. These can range from superficial nicks to deep lacerations that bleed significantly. A torn paw pad is essentially a more severe form of a cut, often involving a larger area of tissue separation or a deeper wound. Sometimes, even non-traumatic factors, such as extremely dry paw pads, can lead to painful cracks and splits. Learning how to treat a torn paw pad on dog involves careful cleaning and protection to prevent infection and promote healing.
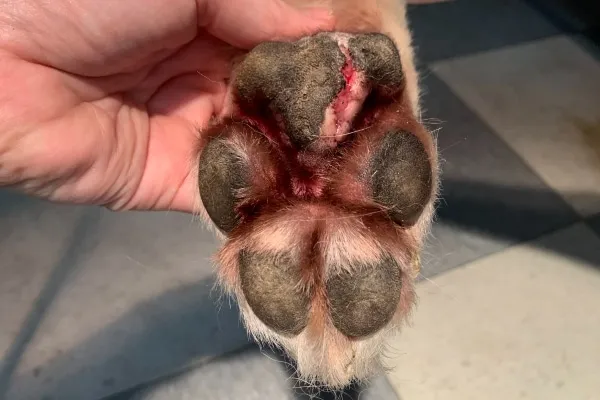 Close up of a dog with a paw pad injuryThis dog likely sustained a paw pad cut from a sharp object during a walk.
Flaps: When Tissue Lifts
Paw pad flaps are similar to cuts but typically involve a broader surface area where a section of the pad is partially detached from the underlying tissue. This type of injury often results from a shearing force, such as a foot getting caught in wire or metal that slices horizontally. A flap creates a loose piece of skin that can be incredibly painful, as each step pulls on the detached tissue. If a cut is left untreated or experiences further trauma, it can also develop into a flap. Healing a flap effectively usually involves careful bandaging to keep the tissue in place, though surgical removal might sometimes be necessary. Exploring options for healing a dog’s ripped pad is essential for these types of injuries.
Foreign Bodies
Objects embedded in paw pads are a frequent issue. Sharp items like splinters, thorns, glass fragments, or even small rocks can puncture the pad. Certain natural hazards, like foxtails, are particularly problematic as they can burrow deep into the tissue, causing pain and infection. The challenge with foreign bodies is often detection, as they might not be immediately visible and can cause persistent discomfort or recurrent lameness.
Burns: Hot Pavement and Chemicals
Paw pad burns are prevalent, especially during summer months. Surfaces like asphalt, concrete, or artificial turf can reach scorching temperatures on sunny days, easily burning a dog’s sensitive paw pads. For instance, on an 86°F day, pavement can be a blistering 135°F. Conversely, extreme cold or prolonged contact with ice melt products can also lead to burns or severe dryness and cracking. Exposure to spilled caustic chemicals can cause chemical burns, and extensive running on abrasive surfaces like tennis courts can lead to friction burns. How to treat a bruised dog paw might also involve similar considerations if the bruising is due to impact or friction.
Ingrown Toenails
Overly long or neglected toenails can curl downwards, eventually growing into the paw pad itself. This creates a painful puncture wound that is highly susceptible to infection, trapping dirt and bacteria. Regular nail trimming is a critical preventative measure, not just for comfort but also to prevent these serious injuries. If you’re uncomfortable with DIY nail trims, professional help or resources like a Nail Trimming Master Course can be invaluable.
Recognizing the Signs of a Torn Paw Pad or Injury
Detecting a paw pad injury early is key to effective treatment. If your dog has a torn paw pad or any other foot injury, you might observe several tell-tale symptoms:
- Sudden lameness: Your dog might start limping noticeably or be unwilling to put weight on the affected paw.
- Vocalization: Crying out, yelping, or whimpering, especially when trying to walk or bear weight.
- Bleeding: Visible blood from the paw pad, which can range from minor spotting to significant pooling.
- Excessive licking or biting: Dogs instinctively try to clean and soothe their injuries. Persistent licking or chewing at a specific paw is a strong indicator of discomfort.
- Swelling: The paw or individual toes might appear swollen or puffy.
- Discoloration: The paw pad may look redder than usual, or the hair around the paw might be discolored from dried blood or discharge.
- Visible wound: You might see an obvious cut, puncture, flap, or even a foreign object embedded in the pad.
 Dog licking its paw, a common sign of injuryDogs often lick continuously at an injured paw pad to soothe discomfort.
If you notice any of these signs, a careful inspection of your dog’s paw is warranted. Your findings will help you determine the appropriate first aid steps before deciding if a vet visit is necessary for treating a paw injury.
Immediate First Aid for Your Dog’s Torn Paw Pad
Knowing how to react quickly and calmly can make a significant difference in how to heal a dog’s torn paw pad. Here’s a step-by-step guide for providing immediate first aid:
1. Assess Your Dog’s Overall Condition and Temperament
Before attempting to examine or treat the paw, gauge your dog’s pain level and temperament. A dog in severe pain, even one usually gentle, might react defensively by snapping or biting. If your dog is showing signs of extreme pain, aggression, or unwillingness to let you touch the paw, do not proceed on your own. Instead, prioritize getting them to an emergency vet immediately. Safety first – for both you and your dog.
2. Carefully Examine the Injured Paw
If it’s safe to proceed, gently lift your dog’s paw and inspect it thoroughly. Look at the top and bottom of the paw, paying close attention to the pads themselves, the spaces between the toes, and around the nails. Identify the type of injury: Is it a clean cut, a flap, a puncture, a burn, or a suspected foreign object? Note any bleeding, swelling, or obvious deformities. This initial assessment helps tailor your first aid response.
3. Address Foreign Objects and Stop Bleeding
- Foreign Objects: If you find a small, superficial object like a splinter or a piece of glass that is easily visible and removable, you may carefully extract it with clean tweezers. However, if the object is deeply embedded, large, or appears to be near a blood vessel, nerve, or joint, do not attempt to remove it. Removing it incorrectly could cause more damage or severe bleeding. In such cases, stabilize the object as best you can (e.g., by loosely bandaging around it) and seek immediate veterinary care.
- Stopping Bleeding: For actively bleeding wounds, apply firm, even pressure directly to the wound with a clean cloth, gauze, or paper towel. Most minor cuts should stop bleeding within a few minutes. If the bleeding is profuse, spurting, or continues steadily for 10-15 minutes despite pressure, it’s an emergency, and you should contact your vet immediately.
4. Clean the Torn Pad or Wound
Once the bleeding is under control, the next critical step is to clean the wound thoroughly to prevent infection. Use cool running water to flush the wound, which can also help reduce swelling and discomfort, especially if it’s a burn. You can also use a mild antibacterial soap, povidone-iodine (Betadine diluted to the color of weak tea), or chlorhexidine solution to gently cleanse the area. Avoid harsh chemicals or alcohol, which can irritate the delicate tissue. As you clean, the wound might bleed slightly again; if so, reapply gentle pressure until it stops.
5. Apply a Protective Bandage
Bandaging is crucial for keeping the wound clean, preventing further injury, and allowing the healing process to begin. Use sterile gauze pads directly over the wound, followed by a layer of conforming bandage material (like roll gauze) and then a self-adherent wrap (like vet wrap). Ensure the bandage is snug enough to stay in place but not too tight, as this can cut off circulation. You should be able to comfortably insert one or two fingers under the top edge of the bandage. Watch for signs of a too-tight bandage, such as swollen toes (if visible), a cold or discolored foot, or increased lameness. Detailed instructions on how to wrap a dog’s paw are invaluable here.
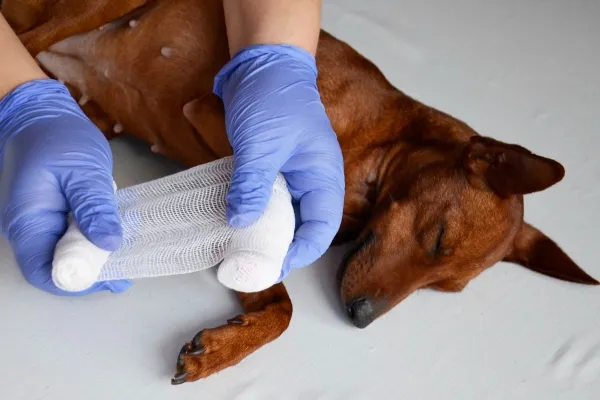 Dog receiving a paw bandageProper bandaging is vital for healing a dog’s torn paw pad and preventing infection.
6. Contact Your Veterinarian
Even after providing first aid, it’s almost always recommended to follow up with your veterinarian. They can properly assess the extent of the damage, prescribe antibiotics if necessary, provide pain relief, and ensure the wound is healing correctly. While waiting for your vet appointment, check and change the bandage daily. This allows you to monitor for any signs of infection (redness, swelling, discharge, foul odor) and ensures the bandage isn’t restricting circulation. This follow-up is critical to ensure proper healing of a dog’s split pad or other severe injuries.
Veterinary Diagnosis and Treatment for Torn Paw Pads
When you bring your dog to the vet for a paw pad injury, especially a torn pad, a thorough evaluation will be performed. This professional assessment is crucial for effective treatment and recovery.
What Your Vet Will Look For
Your veterinarian will begin with a comprehensive physical exam, not just focusing on the injured paw, as sometimes other injuries might be present. For the paw itself, they will:
- Visually inspect: They will meticulously examine the paw for cuts, punctures, flaps, burns, foreign objects, or any other visible damage.
- Palpate and manipulate: They will gently feel and move the bones and joints of the paw to check for fractures, dislocations, or sprains.
- Imaging: If a foreign object is suspected to be deeply embedded (especially metal) or if there’s concern about bone or joint involvement, X-rays may be recommended. This helps to determine the exact location and nature of the foreign body or rule out more serious skeletal injuries.
Treatment Approaches
Based on their diagnosis, your vet will implement a tailored treatment plan. This often includes:
- Hair trimming: Hair around the wound may be carefully trimmed to allow for better visualization, cleaning, and to prevent contamination.
- Cleaning and debridement: The wound will be thoroughly cleaned, and any debris, foreign material, or necrotic tissue will be removed.
- Sutures (stitches): Interestingly, for many paw pad cuts or tears, vets often opt not to suture the pad closed. Paw pads experience a lot of friction and movement, which can easily tear out stitches, and suturing typically doesn’t significantly speed up the healing time for these unique tissues.
- Medications: Antibacterial ointments or soothing creams may be applied directly to the wound to prevent infection and promote healing. Oral antibiotics might be prescribed if there’s a risk of systemic infection. Pain relief medications are also commonly given to keep your dog comfortable during recovery.
- Bandaging: A professional bandage will be applied. This serves multiple purposes: controlling bleeding, protecting the wound from contamination and re-injury, holding medication in place, and acting as a barrier to prevent your dog from licking or chewing the wound (though an Elizabethan collar, or E-collar, might also be necessary).
Patience and Follow-Up are Key
Your vet will provide detailed instructions on how to care for the bandage, including how often to change it and what materials and medications to use at home. Follow these instructions diligently. Patience is paramount; paw pad injuries can take time to heal because your dog is constantly using their feet. Regular recheck appointments will be scheduled to monitor the healing progress. It’s crucial to contact your vet if you notice any concerning signs like worsening swelling, foul odor, discharge, or if your dog is in increased pain. Remember, a bandage that is too tight is a common complication, so regularly check for signs of impaired circulation (swollen, cold, or discolored toes).
Preventing Future Paw Pad Injuries
While some accidents are unavoidable, taking proactive steps can significantly reduce the risk of your dog sustaining another paw pad injury. Preventing these issues is as important as knowing how to heal a dog’s torn paw pad.
- Mind the Temperature: Avoid walking your dog on extremely hot surfaces like asphalt or concrete during peak sun hours. If you can’t comfortably hold the back of your hand against the pavement for 7-10 seconds, it’s too hot for your dog’s paws. Similarly, protect paws from extreme cold, ice, and harsh ice-melt chemicals in winter. This also helps prevent conditions like heat stroke in dogs.
- Consider Protective Booties: For walks on extreme temperatures, rough terrain, or chemically treated surfaces, consider using protective dog booties. Products like PawZ dog boots are thin enough to allow ground feel while offering protection. Remember to remove them indoors to prevent circulation issues. For more rugged protection, thicker dog boots or socks can be used, though be aware they might slightly reduce your dog’s proprioception (awareness of paw position).
- Wash Paws Regularly: After walks, especially in winter or if you suspect exposure to chemicals, wash your dog’s paws thoroughly to remove any irritants.
- Inspect and Clear Paths: Be vigilant for hazards on your walking routes. Look out for broken glass, sharp rocks, discarded trash, or other dangerous objects.
- Regular Nail Trimming: Keep your dog’s nails trimmed to an appropriate length. This prevents them from growing too long and curling into the paw pad, which can cause painful ingrown nails and infections. If you’re unsure how to trim them, consult your vet or a professional groomer.
- Post-Outdoor Inspection: If you live in or visit areas with hazards like foxtails, always inspect your dog’s paws (and their entire body) thoroughly after every outdoor excursion to catch any embedded foreign bodies early.
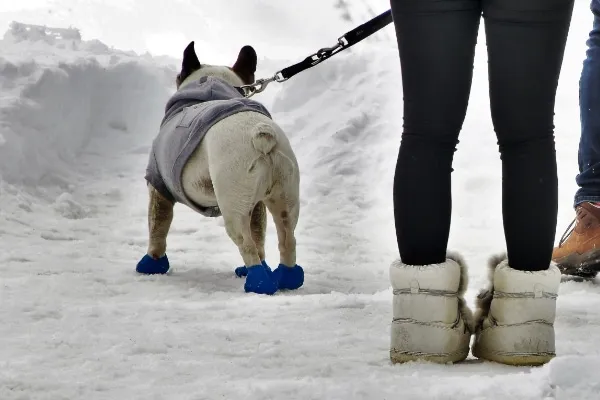 Dog wearing paw boots in snowDog booties offer crucial protection against harsh weather and rough surfaces.
Conclusion: Empowering You to Care for Your Dog’s Paws
A torn paw pad can be a painful and concerning injury for your beloved dog, but with the right knowledge and timely action, you can significantly aid their recovery. This guide has provided you with the essential information on how to heal a dog’s torn paw pad, from understanding different injury types to administering crucial first aid and implementing preventative measures. Remember, your dog’s paw pads are their connection to the world, providing cushioning, traction, and protection, so their health is paramount.
While empowering you with first aid skills is important, it’s equally vital to recognize when professional veterinary care is necessary. Always remain calm, follow the outlined steps, and when in doubt, do not hesitate to contact your veterinarian. With your attentive care and your vet’s expertise, your pup can quickly get back to happy walks and playtime, putting their best paw forward.