
Few things are as distressing for a dog parent as discovering their beloved canine companion has a painful injury, especially one involving their paws. Recently, a client brought her spirited Labrador Retriever, April, to me after a routine walk took an unexpected turn. April had stepped on a sliver of broken glass, resulting in a significant rip to her paw pad. Thankfully, April’s mom, having taken doggie first aid classes, acted quickly and competently, removing the glass, cleaning, and bandaging the wound before making an appointment with me. Her preparedness was commendable, and April’s paw was already on the path to healing.
Not every dog owner has the benefit of such training, and the sight of a dog’s ripped pad can be alarming. Understanding how to react, what immediate steps to take, and when to seek professional veterinary care is crucial for your dog’s well-being and recovery. This comprehensive guide, informed by veterinary expertise, will walk you through everything you need to know about how to heal a dog’s ripped pad, from recognizing the signs of injury to providing effective first aid and managing the healing process.
Why Are Your Dog’s Paw Pads So Important?
The paw pads are often overlooked, yet they are vital components of your dog’s locomotion and overall health. They are the primary interface between your dog and the ground, serving multiple critical functions that contribute to their ability to move comfortably and safely.
Cushioning and Impact Absorption
Your dog’s paw pads are composed of thick, fatty, and elastic tissue designed to absorb the shock and impact of every step. This cushioning effect is essential for protecting the bones, joints, and ligaments of the foot from the constant stress of walking, running, and jumping. Without healthy pads, the strain on these structures would be immense, leading to pain and potential long-term orthopedic issues.
Traction and Navigation
In conjunction with their toenails, paw pads provide the necessary traction for your dog to maintain balance and grip on various surfaces. Their rough texture allows for better purchase, preventing slips and falls, whether your dog is navigating slick indoor floors or uneven outdoor terrain. This natural grip is especially important for athletic dogs or those playing on diverse landscapes.
Protection from Extreme Temperatures
One of the most remarkable features of paw pads is their ability to withstand and protect against extreme temperatures. The thick skin acts as an insulator, shielding the delicate internal structures from hot pavement in summer and freezing ground in winter. However, this protection is not limitless, and prolonged exposure to very hot or cold surfaces can still lead to severe injuries like burns or frostbite. To delve deeper into the intricate structure that enables these functions, consider learning more about dog paw anatomy.
Understanding “Ripped Pads”: Types of Paw Pad Injuries in Dogs
A “ripped pad” is a general term often used to describe a significant paw pad injury that involves a tear, deep cut, or flap of skin. While the term implies a specific type of injury, many different kinds of trauma can lead to a paw pad appearing “ripped.” The paw pads are constantly exposed to environmental elements, making them susceptible to a range of injuries.
Foreign Bodies
One of the most common causes of paw pad injuries I encounter is foreign objects becoming embedded. Sharp items like broken glass, thorns, splinters, nails, or even sharp pieces of ice can puncture and get lodged in the thick tissue of the paw pad. While some may cause a simple puncture, others can lead to a larger tear if the object is dragged or the dog continues to walk on it.
Cuts
Cuts are another frequent injury, varying in severity from superficial scrapes to deep lacerations. A dog can slice its paw pad on sharp objects found outdoors, such as jagged rocks, metal edges, or sharp debris. Additionally, non-traumatic cuts can occur if a dog’s paw pads become excessively dry and cracked, leading to painful splits that can resemble small rips. Deeper cuts are particularly concerning as they can affect underlying blood vessels or tendons, potentially leading to more extensive tearing if left untreated.
Flaps
Paw pad flaps are a distinct type of injury that directly relates to the concept of a “ripped pad.” These occur when a section of the paw pad is partially detached, creating a loose flap of skin or tissue. This often happens when a dog’s foot slides or gets caught on a sharp edge, which then shaves off a layer of the pad horizontally. Flaps can also develop from untreated, expanding cuts. They are typically more painful than simple cuts because each step pulls on the loose tissue, irritating the exposed raw flesh underneath. Sometimes, a flap may be completely torn off, leaving a raw, open wound.
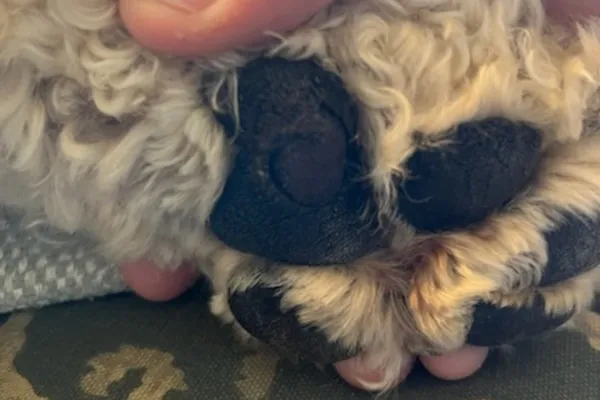 Dog pad with a section of a flap removed
Burns
Severe burns can also lead to a ripped or sloughed pad. Walking on extremely hot surfaces like asphalt or concrete during summer months can cause blistering and eventually lead to layers of the paw pad peeling or tearing away. Conversely, prolonged exposure to extremely cold surfaces, or contact with harsh ice-melt chemicals, can cause chemical burns, leading to similar tissue damage. Abrasive surfaces, like prolonged running on artificial turf or rough pavement, can also create friction burns that damage and effectively “rip” the pad’s surface.
Ingrown Toenails
Though not a direct cause of a ripped pad, an ingrown toenail can create a penetrating wound in the paw pad that mimics a deep rip or puncture. If a dog’s nails are allowed to grow too long, they can curl under and pierce the sensitive paw pad, causing pain, infection, and tissue damage. This type of injury can be particularly insidious as it’s often hidden until it causes significant discomfort. Regular nail trimming is a simple yet crucial preventive measure against this painful condition.
Recognizing the Signs of a Ripped or Injured Paw Pad
Identifying a paw pad injury early is critical for prompt treatment and a better prognosis. Your dog cannot tell you directly where it hurts, so it’s up to you to recognize the subtle and overt signs of discomfort.
 Dogs with paw pad injuries may limp or lick continuously at them
If your dog has sustained a ripped or otherwise injured paw pad, you might observe one or more of the following symptoms:
- Sudden lameness or limping: This is often the most obvious sign. Your dog may suddenly favor one paw, refuse to put weight on it, or display a noticeable limp during or after activity.
- Crying out or yelping: Pain signals may manifest as vocalizations when the affected paw is touched or when weight is placed on it.
- Reluctance to walk or play: A dog in pain from a ripped pad may become lethargic, unwilling to go for walks, or avoid favorite games.
- Excessive licking or biting at the paw: Dogs instinctively lick wounds, but persistent or obsessive licking can indicate significant pain or irritation and may worsen the injury.
- Visible bleeding: Even small cuts can bleed profusely due to the rich blood supply in the paw pads. A ripped pad will almost certainly show signs of active bleeding.
- Swelling of the foot: Inflammation around the injury site can cause the entire paw to appear swollen.
- Discoloration or reddening of the paw pad: The injured area may look redder than usual, or you might see bruising if there’s underlying trauma.
- A visible cut, flap, puncture, or foreign object: Directly inspecting the paw might reveal the injury itself. A loose flap of skin clearly indicates a ripped pad.
- Discoloration of the hair on the foot: If there’s dried blood or discharge, the fur around the paw may appear matted or discolored.
If you observe any of these symptoms, it’s essential to carefully inspect your dog’s paw. Depending on what you find, there are immediate first aid measures you can take before seeking veterinary care.
Immediate First Aid for Your Dog’s Ripped Paw Pad
When faced with a dog’s ripped pad, remaining calm is paramount. Your composure will help keep your dog calm, making the first aid process safer and more effective. Follow these steps carefully:
1. Evaluate Your Dog’s Overall Condition and Temperament
Before attempting to examine the paw, take a moment to assess your dog. Is your dog showing signs of severe pain, shock, or aggression? Even the most gentle dog can lash out when in extreme pain. If your dog is severely distressed, growling, snapping, or unwilling to let you near the paw, do not force the issue. Prioritize your safety and your dog’s comfort. In such cases, it’s best to seek immediate veterinary care without attempting further first aid at home. If you can safely approach, comfort your dog with soothing words and gentle petting.
2. Carefully Inspect the Paw
If your dog allows, gently examine the injured paw. Hold it carefully and check all surfaces: the top, the bottom (pads), and especially the areas between the toes and paw pads. Look for the exact nature of the injury – is it a deep cut, a torn flap, a puncture, a burn, or is there a foreign object embedded? Understanding the type of injury will guide your next steps. Pay close attention to the severity of the rip or cut, and note any active bleeding.
3. Address Foreign Objects and Stop Bleeding (If Safe)
If you see a small, superficial foreign object (like a tiny splinter) that is easy to grasp and remove without causing further damage, you may attempt to do so with clean fingers or tweezers. However, never remove an object that is deeply embedded, or if you suspect it might be puncturing a blood vessel, nerve, or joint. Attempting to remove such objects can cause more severe harm or lead to uncontrollable bleeding. In these situations, stabilize the object as best you can (e.g., with a light bandage around it if possible) and seek emergency veterinary care immediately.
For actively bleeding wounds, including healing paw cuts that are fresh, apply firm, even pressure directly to the wound with a clean cloth, gauze pad, or paper towel. Most minor paw pad rips or cuts will stop bleeding within 5-10 minutes. If the bleeding is profuse, or if it continues steadily for more than 15 minutes, this is an emergency, and you should contact your vet without delay.
4. Clean the Ripped Pad Thoroughly
Once the bleeding has subsided, cleaning the wound is crucial to prevent infection. Gently rinse the ripped pad with cool, clean water. Cool water can also help reduce swelling and provide some pain relief, especially for burns. You can also use a mild antiseptic solution like diluted chlorhexidine (e.g., hibiclens, often found in human first aid kits) or povidone-iodine (Betadine) to disinfect the area. Avoid using hydrogen peroxide or rubbing alcohol, as these can damage healthy tissue and delay healing. As you clean, the wound might start to bleed a little again; simply reapply gentle pressure until it stops.
5. Apply a Protective Bandage
Bandaging the ripped pad is essential to keep the wound clean, protect it from further injury, and minimize your dog’s licking or chewing. If you don’t have proper bandaging materials, a clean towel or T-shirt can serve as a temporary wrap until you reach the vet. For effective bandaging, use clean, non-stick gauze pads directly over the wound, followed by a layer of soft padding, and then secure it with self-adhering vet wrap (coban). Ensure the bandage is snug enough to stay in place but not too tight. You should be able to comfortably insert one to two fingers under the top edge of the bandage. Watch for signs of impaired circulation, such as swollen toes (if visible), coldness to the touch, or discoloration of the paw. For detailed instructions on proper technique, refer to guides on how to wrap a dog’s paw. Remember that proper technique is critical for a successful torn foot pad healing process.
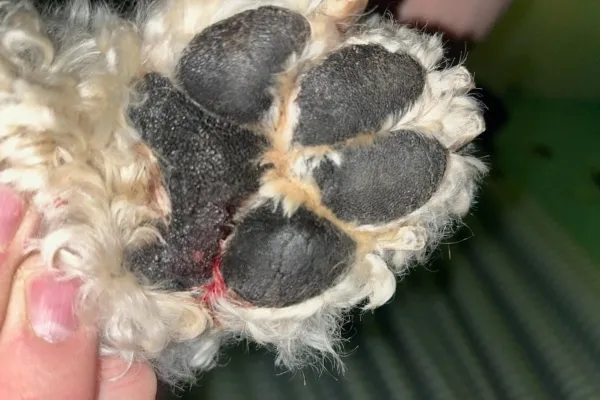 Dog paw pad with some bleeding seen
6. Contact Your Veterinarian Promptly
Even after providing thorough first aid, it is almost always advisable to contact your veterinarian for a professional evaluation of a ripped paw pad. Many ripped pads, especially deep ones or those with flaps, require veterinary attention to ensure proper cleaning, debridement (removal of damaged tissue), and appropriate ongoing care. They can assess the full extent of the injury, prescribe pain medication or antibiotics if needed, and give you specific instructions for bandage changes and wound management.
While awaiting your vet appointment, continue to monitor your dog closely. Check the bandage daily for signs of slippage, wetness, or swelling above or below it.
What to Expect at the Vet: Diagnosis and Treatment for Ripped Pads
When you bring your dog to the veterinarian for a ripped pad, they will conduct a thorough examination and discuss a treatment plan tailored to your dog’s specific injury.
Veterinary Examination and Diagnostics
Your vet will start with a general physical examination to ensure your dog is otherwise healthy and hasn’t sustained any other hidden injuries. They will then focus on the injured paw. This involves carefully inspecting the ripped pad, assessing its depth, width, and whether any foreign material remains. The vet will gently palpate and manipulate the bones and joints of the foot to check for underlying structural damage.
In some cases, if there’s a suspicion of a deeply embedded foreign object (like a nail or glass shard) or if bone or joint involvement is suspected, your veterinarian may recommend an X-ray. This diagnostic tool can help pinpoint the exact location of radio-opaque foreign bodies and assess the integrity of the underlying skeletal structures.
Cleaning and Debridement
Once examined, the vet will likely trim the hair around the paw pad to allow for better visualization and to keep the wound cleaner. They will then thoroughly clean the ripped area, often under sedation or local anesthesia if the wound is particularly painful or deep. This process, called debridement, involves removing any dead, contaminated, or damaged tissue. This is a critical step in preventing infection and promoting healthy healing.
Why Sutures are Often Avoided for Paw Pads
It might seem counterintuitive, but for many ripped or cut paw pads, veterinarians often choose not to suture (stitch) the wound closed. The paw pads are unique because they are constantly subjected to immense pressure, friction, and movement. Sutures in this area tend to tear out easily, often failing to hold the wound edges together effectively. Furthermore, stitching a paw pad often doesn’t significantly speed up the healing time compared to other methods. The goal is to facilitate natural healing while protecting the area. If you’re exploring treating a torn paw pad on your dog, this is a key consideration.
The Role of Bandaging in Healing Ripped Pads
Instead of sutures, therapeutic bandaging plays a central role in managing and healing a dog’s ripped pad. Your veterinarian will apply a specialized bandage that serves multiple purposes:
- Controlling bleeding: The bandage applies pressure to stop any residual oozing.
- Decreasing the chances of re-injury: It acts as a protective shield, preventing your dog from reinjuring the healing tissue.
- Keeping the wound clean: A properly applied bandage creates a sterile environment, shielding the wound from dirt and bacteria.
- Containing medication: Antibacterial ointments or soothing creams applied to the wound are held in place by the bandage, maximizing their effectiveness.
- Preventing licking and chewing: The bandage creates a physical barrier, deterring your dog from interfering with the healing process. In some cases, an Elizabethan collar (E-collar) may also be necessary to fully prevent access.
Your vet will provide precise instructions on how often to change the bandage, what materials and medications to use, and when to schedule follow-up appointments.
Medications and Aftercare Instructions
Depending on the severity of the rip and the risk of infection, your vet may prescribe oral antibiotics to prevent or treat bacterial infections. Pain management is also crucial; your dog may be sent home with anti-inflammatory medications or pain relievers to ensure comfort during recovery.
It’s vital to follow your veterinarian’s aftercare instructions meticulously. This typically includes:
- Regular bandage changes: This allows you to inspect the wound for signs of infection (redness, swelling, pus, foul odor) and ensure the bandage isn’t too tight.
- Keeping the bandage dry: Moisture can lead to skin maceration and infection. Use a protective boot or plastic bag over the bandage during outdoor bathroom breaks, but remove it once back inside.
- Restricting activity: High-impact activities or long walks should be avoided to allow the paw to heal undisturbed.
- Monitoring for complications: Watch for any signs that the wound isn’t healing well or if your dog seems to be in increased pain.
Patience is Key: Understanding the Healing Process
Healing a ripped paw pad can be a lengthy process because dogs constantly use their feet. The thick tissue and constant pressure mean that these injuries often take weeks, sometimes even months, to fully heal. It requires patience and consistent care from your end. Expect a full recovery, but understand that it’s a marathon, not a sprint. Remember, ongoing injured paw pad care is vital to prevent setbacks and ensure optimal healing. Do not hesitate to contact your vet if you have any concerns during the recovery period.
Preventing Future Paw Pad Injuries and Rips
While some accidents are unavoidable, many paw pad injuries, including rips, can be prevented with a few proactive measures. Incorporating these strategies into your routine can significantly reduce the risk of your dog experiencing a painful foot injury.
- Protecting Paws from Extreme Temperatures:
- Hot Pavement: During warmer months, avoid walking your dog during the hottest parts of the day. A good rule of thumb: if the pavement is too hot for you to comfortably hold the back of your hand against it for 7-10 seconds, it’s too hot for your dog’s paws. Stick to grass or shaded areas.
- Cold Surfaces: In winter, prolonged exposure to ice, snow, and especially ice-melt chemicals can damage paw pads. Limit time on icy surfaces.
- Considering Protective Dog Booties:
- Lightweight Protection: Products like PawZ dog boots offer a thin, rubber barrier that allows your dog to feel the ground while protecting against hot pavement, ice melt, and minor abrasions. They are also excellent for keeping bandages clean and dry outdoors. Remember to remove them once inside to prevent circulation issues.
- Heavy-Duty Boots: For walks in very rocky terrain, areas with significant debris, or extreme weather, thicker dog boots can offer more robust protection. Be aware that some dogs find these harder to adjust to, as they can interfere with their proprioception (awareness of paw position).
- Post-Walk Paw Care:
- Rinsing: After walks, particularly in winter or if you suspect your dog has walked through chemicals, rinse their paws with clean water. This removes any irritants, salts, or debris.
- Inspection: Make it a habit to quickly inspect your dog’s paws after every walk. Check for thorns, foxtails, small cuts, or any foreign objects lodged between the pads or toes.
- Regular Nail Trimming:
- Prevent Ingrown Nails: Overly long nails can curl and grow into the paw pad, causing painful punctures and infections. Regular monthly nail trims are essential. If you’re uncomfortable doing this yourself, your vet or a professional groomer can help. Resources like a Nail Trimming Master Course can also provide guidance.
- Vigilance on Walks:
- Scan the Path: Always keep an eye on the path ahead, especially in new or unpredictable environments. Look for broken glass, sharp rocks, trash, or other hazards that could cause a ripped pad.
- Avoid Known Hazards: If you know certain areas are prone to debris or extreme temperatures, choose alternative routes for your dog’s safety.
You Can Provide Paw Pad Injury First Aid for Your Dog
The possibility of your dog getting a ripped paw pad can be unsettling, but being prepared and knowing what to do can make all the difference. Hopefully, your dog will never experience such an injury. However, if they do, remember to stay calm, rely on your knowledge, and act decisively.
Keep a well-stocked dog first aid kit at home and in your car—it’s an invaluable resource for unexpected incidents. By following the first aid steps outlined in this article, you can provide immediate and effective care for your dog’s ripped pad. While your initial actions are crucial, always remember the importance of veterinary follow-up. Your veterinarian is your best partner in ensuring your beloved companion receives the best possible care, helping them get back on their feet and enjoying their lives to the fullest in no time.
Has your dog ever had a paw pad injury?
Please comment below.
Reader Interactions
We welcome your comments and questions about senior dog care. However, if you need medical advice, diagnosis, or treatment, please contact your local veterinarian.