
A dog’s paw pad injury can range from minor scrapes to serious burns, cuts, or punctures, significantly impacting their comfort and mobility. As pet parents, understanding how to heal a dog’s foot pad effectively is crucial for their well-being. Recently, a client brought her Labrador Retriever, April, to me after a walk during which April stepped on broken glass. Fortunately, April’s mom had taken “doggie first aid” classes, allowing her to carefully remove the sliver, clean, and bandage the paw before seeking veterinary care. This proactive approach greatly aided April’s recovery, highlighting the importance of being prepared.
Not all dog parents may have had such training, which is why this article provides detailed guidance on recognizing, performing first aid for, and managing the healing process of paw pad injuries. We’ll cover everything from initial care to long-term prevention, ensuring you have the knowledge to help your canine companion return to their happy, active self.
Understanding Your Dog’s Paw Pads: Foundation for Healing
Often overlooked, your dog’s paw pads are integral to their overall health and mobility. These thick, squishy foot pads serve multiple vital functions that are essential for comfortable movement and protection:
- Cushioning and Impact Absorption: Every step your dog takes, their paw pads absorb impact, reducing strain on the bones and joints of their feet. This cushioning is crucial for high-impact activities like running and jumping.
- Traction: In conjunction with their toenails, paw pads provide necessary grip, allowing your dog to navigate various terrains without slipping.
- Temperature Protection: They offer a degree of protection against extreme temperatures, both hot and cold, shielding the delicate tissues underneath.
When these vital structures are compromised by injury, it impacts your dog’s ability to walk, play, and live comfortably, making proper healing paramount.
Common Paw Pad Injuries and Their Healing Implications
The paw pads are constantly exposed to the ground and its elements, making them susceptible to a variety of injuries. Understanding these types is the first step in knowing how to heal a dog’s foot pad effectively.
Foreign Bodies
One of the most common foot injuries I encounter involves foreign objects puncturing the paw pad. Sharp items like broken glass, thorns, nails, splinters, or even fishing hooks can become embedded. The healing process here critically depends on the complete and safe removal of the object to prevent infection and allow the tissue to close.
Cuts
Cuts are another frequent injury, often resulting from sharp objects on walks. Paw pads can also suffer non-traumatic cuts if they become excessively dry and crack or split open. Proper cleaning and protection are key to preventing infection and promoting the closure of these wounds.
Flaps
Paw pad flaps are similar to cuts but involve a section of the pad being partially detached, often running parallel to the pad’s surface. These tend to be more painful than simple cuts because each step pulls on the loose tissue, irritating the wound. Healing a flap often requires careful reattachment or surgical removal of the damaged tissue, followed by diligent bandaging and rest.
Burns
Unfortunately, paw pad burns are common, especially during warmer months when asphalt, concrete, or artificial turf can reach scorching temperatures. Conversely, prolonged exposure to extreme cold or caustic ice-melt products can also cause burns. Chemical burns from spilled substances are another risk. The healing of burns depends on their severity and can be a lengthy, painful process requiring consistent veterinary care and protection.
Ingrown Toenails
Overly long nails can curl and grow into the paw pad, creating a painful penetrating wound. This not only causes discomfort but also introduces bacteria, leading to potential infection. Trimming your dog’s nails regularly is a vital preventive measure to avoid this type of injury and facilitate healing if it occurs.
Recognizing a Paw Pad Injury: Early Detection for Faster Healing
Prompt recognition of a paw pad injury is crucial for initiating timely treatment and ensuring a smoother healing journey. Dogs are adept at hiding pain, so keen observation is necessary. Look out for these common signs:
- Sudden Lameness or Limping: Your dog might favor a paw or suddenly start limping.
- Crying or Whining: Especially when putting weight on the affected paw.
- Reluctance to Put Pressure on the Paw: They might hold the paw up or avoid walking.
- Bleeding: Visible blood from the paw pad, which can range from a few drops to a steady flow.
- Excessive Licking or Biting: Directing attention to a specific paw.
- Swelling: The paw or individual toes might appear swollen.
- Discoloration or Reddening: The paw pad or surrounding skin might look redder than usual.
- Visible Wound: A clear cut, flap, puncture, or foreign object embedded in the pad.
- Discoloration of Hair: Blood or discharge might stain the fur around the paw.
If you observe any of these symptoms, carefully inspect your dog’s paw. Your findings will guide your immediate actions.
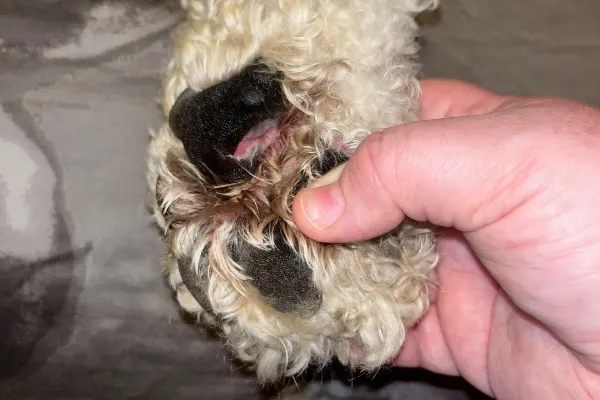 Dog examining its injured paw pad while sitting on the grass
Immediate First Aid: Setting the Stage for Successful Healing
Performing proper first aid is the critical first step in how to heal a dog’s foot pad injury. This initial care can prevent further damage and prepare the paw for professional treatment.
1. Evaluate Your Dog’s Overall Condition and Safety
Approach your dog calmly and assess their pain level and temperament. Even the most docile dog can react defensively when in pain. If your dog is severely painful or shows any aggression when you try to examine their paw, do not proceed by yourself. Seek immediate veterinary care. Your safety, and your dog’s, is paramount.
2. Take a Closer Look at the Paw
If it’s safe, gently lift and inspect the entire paw: the top, bottom, individual paw pads, and the spaces between the toes and pads. Note the type of injury—is it a cut, flap, puncture, burn, or something else? Understanding the injury type will help guide your first aid. If you see a small, superficial object, you may proceed to the next step. For bleeding wounds without a visible object, skip to step 3b.
3. Remove Foreign Objects (If Safe) and Apply Pressure to Stop Bleeding
- 3a. Removing Foreign Objects: For small, superficial objects (like a tiny splinter) that are easily visible and not deeply embedded, you might be able to remove it gently with your fingers or tweezers. However, if the object is deeply lodged, large, or if you suspect it might be puncturing a blood vessel, nerve, or joint, do not attempt to remove it yourself. Instead, make an emergency vet visit immediately. Improper removal can cause more damage or introduce infection.
- 3b. Stopping Bleeding: If the wound is actively bleeding, apply direct, firm, and even pressure with a clean cloth or paper towel. For minor wounds, bleeding should subside within one to two minutes. If the cut continues to bleed steadily for 10-15 minutes, or if the bleeding is severe, contact your vet without delay. This could indicate a more serious injury requiring immediate attention.
4. Clean the Wound
Once the bleeding is under control, cleaning the wound is essential to prevent infection. Use cool water, which can help reduce swelling and ease pain, especially for burns. You can also use a gentle antibacterial soap or diluted antiseptic solutions like chlorhexidine or povidone-iodine (Betadine), if available, to further cleanse the area. As you clean, slight re-bleeding might occur; simply apply gentle pressure until it stops again.
5. Apply a Temporary Bandage
To keep the wound clean, protected from further injury, and to apply gentle pressure, a temporary bandage is often necessary. If you don’t have proper bandaging materials, even a clean towel or T-shirt wrapped securely around the paw can serve as a temporary measure until you reach the vet. When applying a bandage, use clean materials like sterile gauze pads and self-adhering vet wrap. For detailed instructions, refer to how to wrap a dog’s paw. Ensure the bandage is not too tight; you should be able to comfortably insert one to two fingers into the top. Watch for signs of restricted circulation like swollen toes, coolness to the touch, or discoloration.
6. Contact Your Veterinarian
Even after providing first aid, it is crucial to follow up with your veterinarian. They can thoroughly assess the injury, ensure proper cleaning, provide professional treatment, and guide you on the best path for your dog’s recovery. For deeper insights into managing foot injuries, consider reading about how to treat a dog foot injury.
When Professional Veterinary Care is Essential for Healing
While first aid is vital, many paw pad injuries require professional veterinary attention to ensure optimal healing and prevent complications. You should seek immediate veterinary care if:
- The foreign object is deeply embedded, large, or you cannot safely remove it.
- Bleeding is profuse, continuous, or you cannot stop it with direct pressure.
- The wound is large, deep, appears infected (redness, swelling, pus, foul odor), or involves significant tissue loss.
- Your dog is in severe pain, unwilling to bear any weight, or cannot be comforted.
- You suspect a fracture or joint involvement.
- The injury is a severe burn.
Veterinarians have the tools, expertise, and medications to manage complex paw pad injuries, reducing pain, preventing infection, and promoting effective healing.
The Veterinary Approach to Healing Paw Pad Injuries
When you bring your dog to the vet for a paw pad injury, their primary goal is to assess the damage, alleviate pain, prevent infection, and facilitate the healing process.
Diagnosis
Your veterinarian will begin with a comprehensive physical exam, including a detailed inspection of the injured paw. They will look for the type of injury (cut, puncture, flap, burn), assess its depth and extent, and check for swelling, tenderness, or foreign material. If a deeply embedded object is suspected or if there’s concern about bone or joint involvement, X-rays may be recommended to pinpoint the location and severity.
Treatment Strategies
The specific treatment will depend on the nature and severity of the injury.
- Hair Trimming and Cleaning: The vet may trim the hair around the injury to allow for better visualization and to keep the wound clean. The area will then be thoroughly cleaned with appropriate antiseptic solutions to remove debris and bacteria.
- Foreign Object Removal: Any remaining foreign objects will be carefully removed, sometimes requiring sedation or local anesthesia for your dog’s comfort and safety.
- Why Sutures are Rarely Used: Unlike other areas of the body, paw pads typically do not hold stitches well. Due to constant friction and movement, sutures can easily tear out and often do not speed up healing time. Instead, the focus is on keeping the wound clean, protected, and allowing it to heal naturally from the inside out. For specific types of paw injuries, like torn pads, understanding how to treat a torn paw pad on dog involves these nuanced approaches.
- Medications: Antibacterial ointments or soothing creams may be applied directly to the wound to promote healing and reduce the risk of infection. Your vet may also prescribe oral antibiotics if infection is present or highly likely, and pain relief medication to keep your dog comfortable during recovery.
- Professional Bandaging: A well-applied bandage is a cornerstone of paw pad injury healing. It serves multiple purposes:
- Controlling Bleeding: Provides continuous pressure.
- Decreasing Re-injury: Protects the healing tissue from external trauma.
- Keeping the Wound Clean: Acts as a barrier against dirt and bacteria.
- Containing Medication: Holds topical treatments in place.
- Preventing Licking/Chewing: Although an Elizabethan collar (E-collar) might also be needed.
Your veterinarian will provide specific instructions on how often to change the bandage, what materials and medications to use, and when to schedule follow-up visits. This guidance is essential for successfully navigating how to heal dog paw pad cut or other severe injuries.
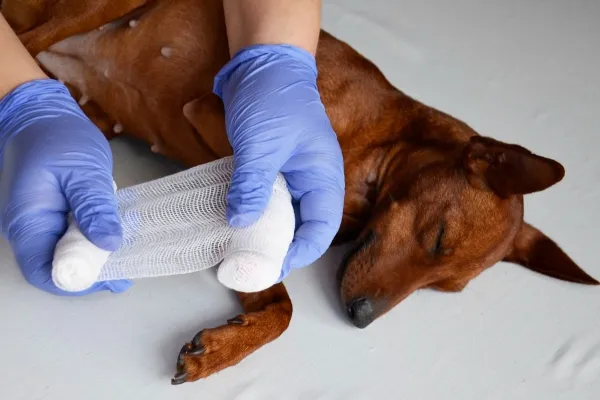 A dog's paw being carefully bandaged by a person, illustrating proper wound care
Post-Veterinary Care: Ensuring Optimal Healing at Home
The journey of how to heal a dog’s foot pad doesn’t end at the vet’s office. Diligent home care is critical for a full and speedy recovery.
Bandage Management
Your vet will instruct you on changing the bandage. This usually needs to be done daily. During each change, carefully inspect the paw for signs of improvement or complications. Always ensure the new bandage is secure but not too tight; monitor for swelling of the toes or signs of discomfort, which could indicate restricted circulation.
Wound Monitoring
Regularly check the wound for signs of infection (increased redness, swelling, heat, pus, foul odor) or delayed healing. A healthy healing wound should gradually look cleaner and show signs of tissue regeneration. Any concerning changes warrant a call to your vet. This meticulous monitoring is vital for conditions like how to treat a torn pad on a dog.
Preventing Licking and Chewing
Dogs instinctively lick their wounds, but this can actually hinder healing, introduce bacteria, and remove bandages or medication. An Elizabethan collar (E-collar or “cone of shame”) or specialized paw protectors may be necessary to prevent your dog from interfering with the healing process.
Activity Restriction
Healing takes time and rest. Limit your dog’s activity, especially running, jumping, and long walks, to prevent re-injury or excessive stress on the healing paw. Follow your vet’s recommendations for exercise restrictions, which may involve leash walks only or crate rest for a period.
Medication Administration
If your vet prescribed antibiotics or pain relievers, administer them strictly according to the instructions. Completing the full course of antibiotics is crucial, even if your dog seems better, to prevent antibiotic resistance and ensure the infection is fully cleared.
Nutrition and Hydration
A balanced diet rich in essential nutrients supports the body’s natural healing processes. Ensure your dog has access to fresh water at all times. Good nutrition and hydration are fundamental for tissue repair and immune function.
Regular Follow-ups
Attend all scheduled follow-up appointments with your veterinarian. These visits allow the vet to assess the healing progress, make any necessary adjustments to the treatment plan, and ultimately give the green light for resuming normal activities. Diligent home care combined with professional guidance significantly increases the chances of successful healing and full recovery. For more tips on nurturing your dog back to health, explore how to heal my dog’s paw pads.
Preventing Future Paw Pad Injuries and Promoting Long-Term Paw Health
While sometimes unavoidable, many paw pad injuries can be prevented with proactive care and vigilance. Integrating these practices into your routine can save your dog from pain and discomfort.
- Avoid Extreme Temperatures: Protect your dog’s paws from hot pavement, concrete, and artificial turf during summer months. If you can’t comfortably hold the back of your hand against the surface for 7-10 seconds, it’s too hot for your dog. Similarly, protect paws from ice, snow, and de-icing chemicals in winter. Consider timing walks for cooler parts of the day or adjusting routes.
- Consider Protective Dog Booties: Products like thin rubber dog boots (e.g., PawZ dog boots) can offer excellent protection against extreme temperatures, ice melt products, and rough terrain. They allow dogs to still feel the ground while providing a protective barrier. Thicker dog boots can be used for more hazardous environments but be aware that they can sometimes reduce a dog’s proprioception (sense of where their feet are). Remember to remove boots once inside to prevent circulation issues.
- Regular Paw Hygiene: After winter walks, wash your dog’s feet to remove any ice melt chemicals. Do the same if you suspect they’ve walked through any other potentially caustic substances.
- Regular Nail Trimming: Overly long nails can not only cause discomfort but can also curl and grow into the paw pad, leading to painful wounds and infections. Regular monthly nail trims are essential for paw health. If you’re uncomfortable doing it yourself, consult your vet or a professional groomer.
- Inspect Paths and Trails: Be mindful of your surroundings during walks. Keep an eye out for broken glass, sharp rocks, thorns, foxtails, or other debris that could injure your dog’s paws.
- Daily Paw Checks: Make it a habit to quickly inspect your dog’s paws after walks or play. This allows you to catch any minor cuts, embedded objects, or early signs of irritation before they become more severe.
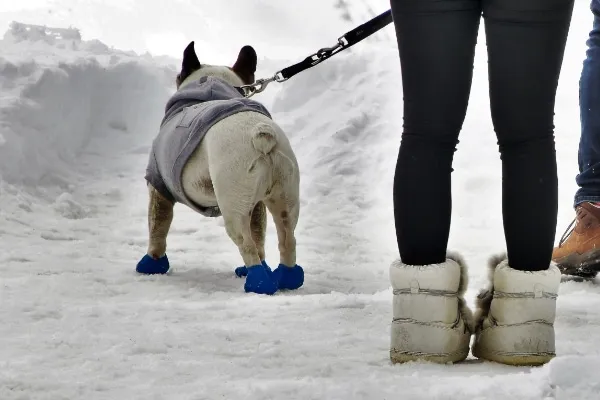 Dog wearing red paw boots while walking in the snow, protecting its feet from the elements
Conclusion: A Holistic Approach to Paw Pad Healing
Effectively knowing how to heal a dog’s foot pad injury requires a combination of immediate first aid, professional veterinary care, and diligent home management. While accidents can happen, being prepared with a dog first aid kit and the knowledge outlined in this guide empowers you to act calmly and effectively.
From understanding the vital role of paw pads and recognizing injury symptoms to administering first aid and meticulously following veterinary advice for post-care, your active involvement is crucial for your dog’s recovery. Remember, patience is key, as paw pad injuries can take time to heal due to the constant use of the foot. By taking proactive steps in prevention and knowing when to seek expert help, you ensure your beloved companion receives the best possible care, helping them get back to playing and enjoying life in no time. When in doubt, always contact your veterinarian for personalized advice and treatment.
Reader Interactions
We welcome your comments and questions about dog care. However, if you need medical advice, diagnosis, or treatment, please contact your local veterinarian.