
Are you tired of cluttered floors and uninspired pet corners? Elevate your home’s aesthetics and functionality with a custom Dog Feeding Station. This detailed guide will show you how to transform a simple space, like the side of a kitchen island, into a seamless and stylish built-in solution for your canine companion. Say goodbye to tripping hazards and hello to organized feeding times with a setup that looks professionally integrated into your home design. This project isn’t just about convenience; it’s about enhancing your living space while catering to your dog’s needs, ensuring comfort during mealtime.
A well-designed built-in dog feeder provides a dedicated, clean, and ergonomic space for your dog to eat and drink. Integrating such a feature into your kitchen island, for instance, offers a polished look that complements your existing cabinetry and overall home decor. Imagine the ease of refilling a water bowl without the hassle of carrying it back and forth to the sink, thanks to a thoughtfully included pot filler faucet. This guide will walk you through every step, making this rewarding DIY endeavor achievable for both seasoned crafters and those new to home improvement projects. For more insights on canine nutrition, check out our guide on what should you feed a dog.
Why Choose a Built-In Dog Feeding Station?
Opting for a built-in dog feeding station goes beyond mere convenience; it’s a significant upgrade for both pet owners and their furry friends. Here’s why this integrated solution is a game-changer for organizing your pet’s mealtime and improving your home’s functionality:
- Customizable for Optimal Comfort: A key advantage of a custom-built station is the ability to tailor its height and size precisely to your dog. This ensures that your pet can eat and drink comfortably without straining, which is particularly beneficial for larger breeds or older dogs. You can make sure the bowls are at the perfect ergonomic height.
- Enhanced Organization and Cleanliness: One of the biggest challenges for pet owners is keeping the feeding area tidy. A built-in station eliminates the issue of bowls being knocked over or food and water spills spreading across the floor. Everything is contained in one designated spot, making daily cleaning significantly easier and keeping your space organized.
- Seamless Aesthetic Integration: By incorporating the feeding station directly into existing cabinetry, like the side of a kitchen island, you achieve a sleek, polished look. This design choice elevates the appearance of your kitchen, turning a practical necessity into a refined element that complements your home’s interior design rather than detracting from it.
- Improved Daily Functionality: The thoughtful addition of a pot filler faucet above the water bowl transforms the daily routine. No more lugging heavy water bowls to the sink for refills. This small detail dramatically increases convenience, saving time and effort, and making your pet’s hydration more accessible.
Essential Materials for Your DIY Project
To embark on building your bespoke dog feeding station, gathering the right materials is crucial. This list provides the foundational items needed to construct a durable, functional, and aesthetically pleasing unit that will stand the test of time:
- ¾ Plywood: This will serve as the primary structural material for building the frame that securely holds the dog bowls and forms the face of the feeding station, providing a robust base.
- 2×4 Lumber: Essential for constructing the internal support frame for the feeding station itself, as well as providing critical backing and support for the pot filler faucet installation.
- Pot Filler Faucet: A highly convenient addition, this faucet allows for effortless refilling of the water bowl directly at the station, eliminating the need to carry bowls to the sink.
- Plumbing Supplies: Necessary components for properly installing and connecting the pot filler faucet to your home’s existing water supply, ensuring a leak-free and functional setup.
- Stainless Steel Dog Bowls: Opt for durable and hygienic stainless steel bowls. Their dimensions will dictate the size of the openings you need to cut into the plywood frame.
- Measuring Tape: Indispensable for achieving precise dimensions for every component of the frame and ensuring accurate cuts for the bowl slots.
- Saw and Drill: Fundamental power tools for cutting wood pieces to size and assembling the frame components with screws.
- Sandpaper/Sander: Used to smooth out all cut edges of the wood, preparing surfaces for painting or staining and ensuring a professional, splinter-free finish.
- Paint or Stain: To match the finished feeding station perfectly with your existing kitchen island or cabinetry, creating a cohesive look.
- Screws and Brackets: Various types of fasteners will be needed to securely attach the plywood frame components to each other and to the side of the kitchen island.
- Drywall Sheets and Screws: For covering the internal 2×4 frame, creating a smooth surface ready for tiling or finishing.
- Tile, Adhesive, and Grout: If you choose to finish part of the station with tile, these materials are necessary for a durable and elegant surface.
- Waterproof Sealant: Crucial for protecting the countertop and any exposed wood from moisture and spills, extending the lifespan of your feeding station.
Step-by-Step Guide: Crafting Your Built-In Dog Feeding Station
This section outlines the precise steps to construct your integrated dog feeding station, transforming a vision into a practical, beautiful reality. Following these instructions carefully will ensure a professional and durable outcome.
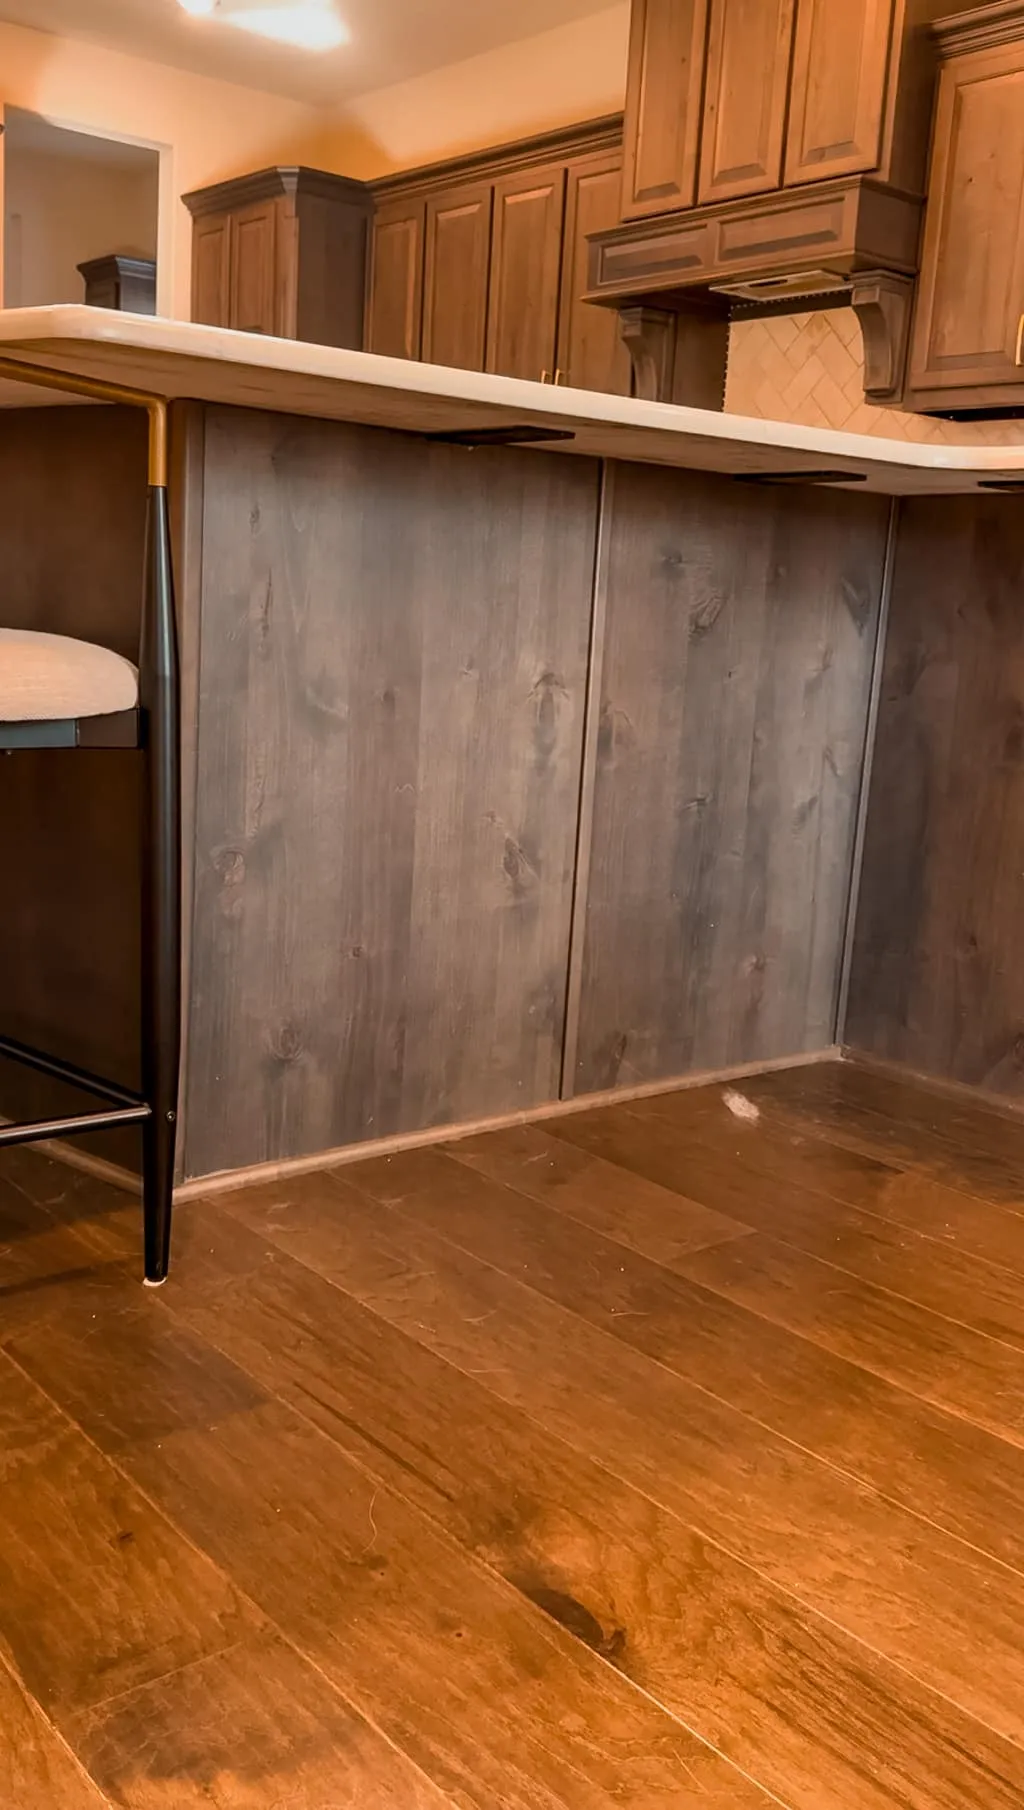
Plan the Design
The foundation of any successful DIY project is meticulous planning. Begin by carefully measuring the side of your kitchen island where the feeding station will be installed. These dimensions will dictate the size of your new unit. Crucially, consider your dog’s height to ensure the bowls are positioned at a comfortable, ergonomic level for them to eat and drink without straining. Mark out where the bowls will sit and plan for the pot filler’s placement to ensure optimal functionality.
 Measuring the side of a kitchen island for precise dimensions of a built-in dog feeding station
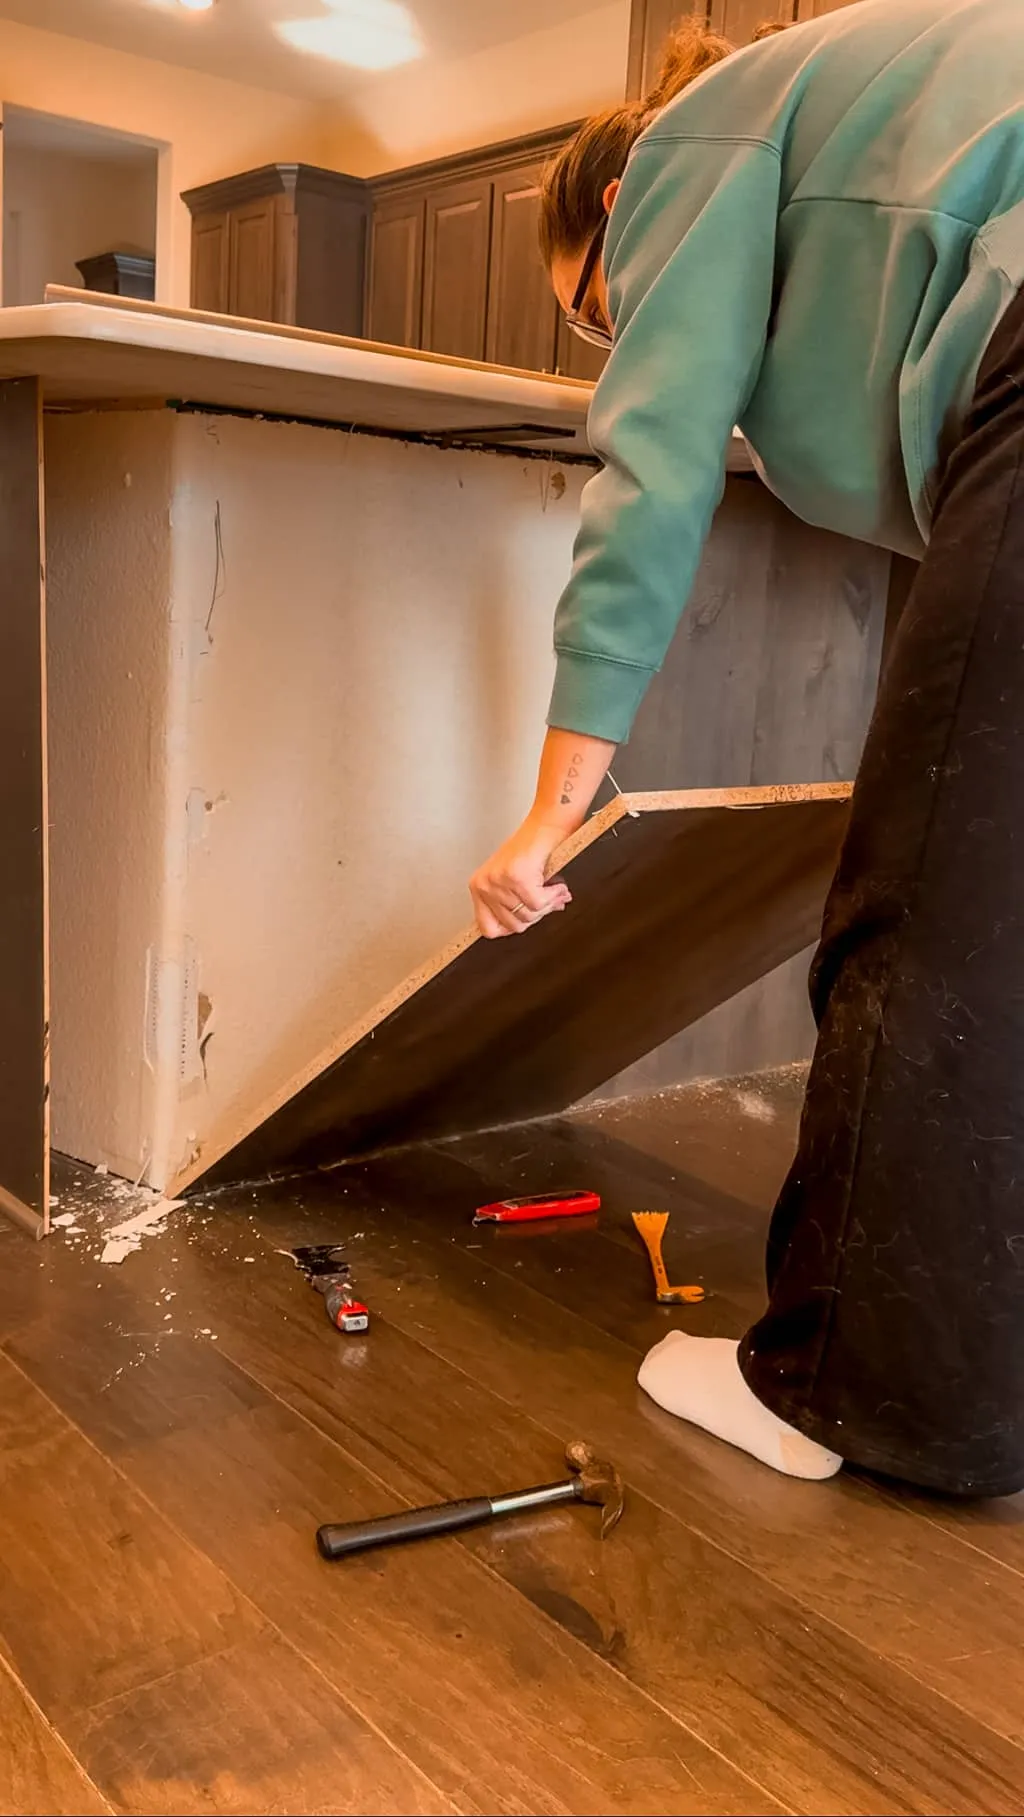
Demo the Island
To integrate the pet feeding station seamlessly, you’ll need to prepare the existing structure. Carefully remove any paneling or decorative trim from the side of your kitchen island using a pry bar and hammer. Work slowly and methodically to avoid damaging the surrounding cabinetry. Once the outer paneling is off, you may find drywall underneath. Cut and remove this drywall to expose the internal framing of the island, creating a clean cavity for your new structure. This step is vital for ensuring a flush and stable installation.
 Removing existing paneling from the side of a kitchen island to create space for a dog feeding station
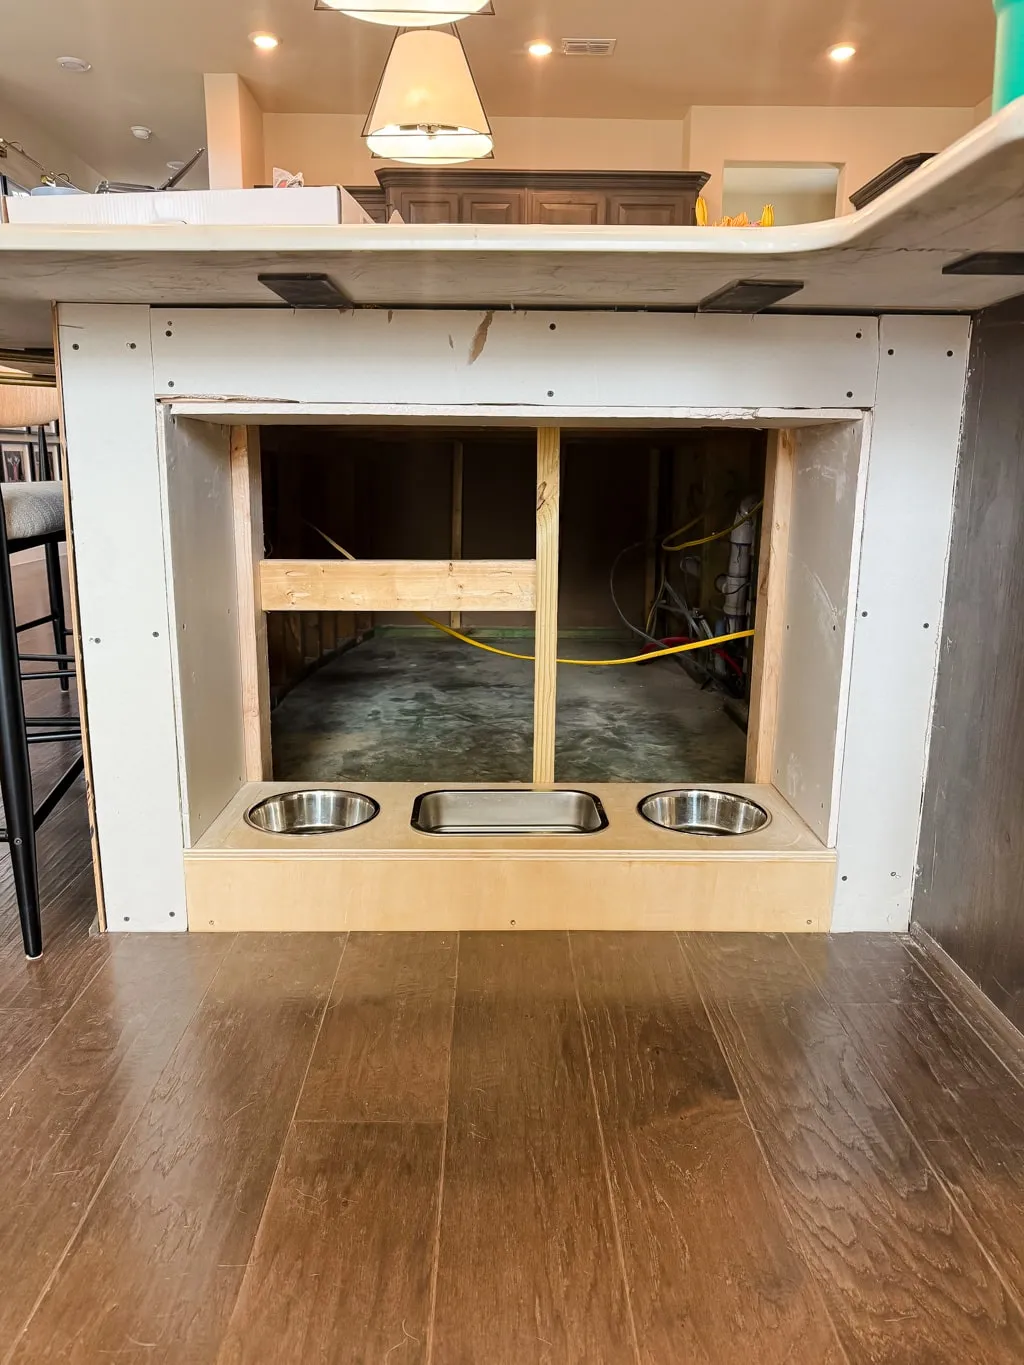
Cut and Assemble the Frame
With the space prepared, it’s time to build the internal framework. Using ¾ plywood, precisely cut the pieces that will form the main enclosure for the dog bowls. Sand all edges smooth for a refined finish and assemble these pieces using pocket screws and wood glue for maximum stability. Carefully measure the diameter of your stainless steel dog bowls and cut out the corresponding holes in the top plywood piece where the bowls will sit.
Next, construct the internal support frame for the station using 2×4 lumber. This “wall” will be secured inside the exposed island cavity. Attach this frame under the island, using screws and glue, ensuring it is perfectly square and level. This robust frame will provide crucial support for the entire feeding station and the pot filler.
Install the Pot Filler
This stage involves essential plumbing work. Position the pot filler faucet above where the water bowl will reside, securing it firmly to the 2×4 internal support wall you’ve built. Carefully connect the faucet to your home’s water supply, following local plumbing codes. If you’re not confident with plumbing tasks, it’s advisable to consult or hire a professional to ensure a secure, leak-free installation. Improper plumbing can lead to significant issues, so prioritize safety and expertise here.
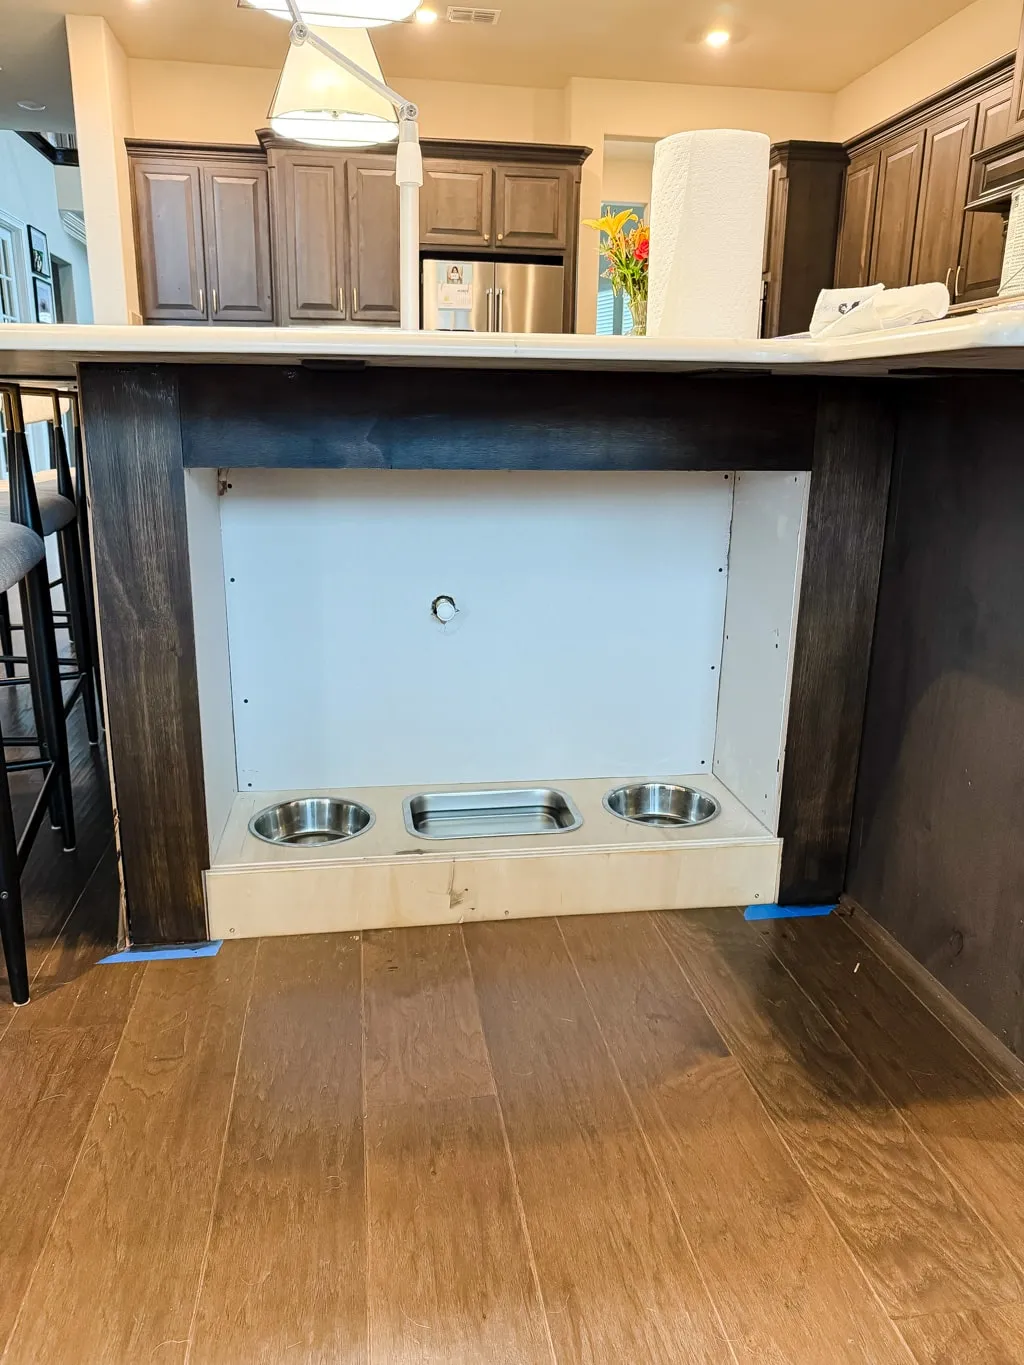
Add Drywall to the Frame
Once the internal 2×4 frame and plumbing for the pot filler are securely in place, you’ll need to create a smooth, finished surface. Measure and cut drywall sheets to perfectly fit over all exposed 2x4s and the internal structure. Secure the drywall with appropriate drywall screws, ensuring a flat and stable base for subsequent tiling or finishing layers. This step prepares the interior of your dog bowl stand for its final aesthetic touches.
 Adding drywall to the internal frame of a built-in dog feeding station
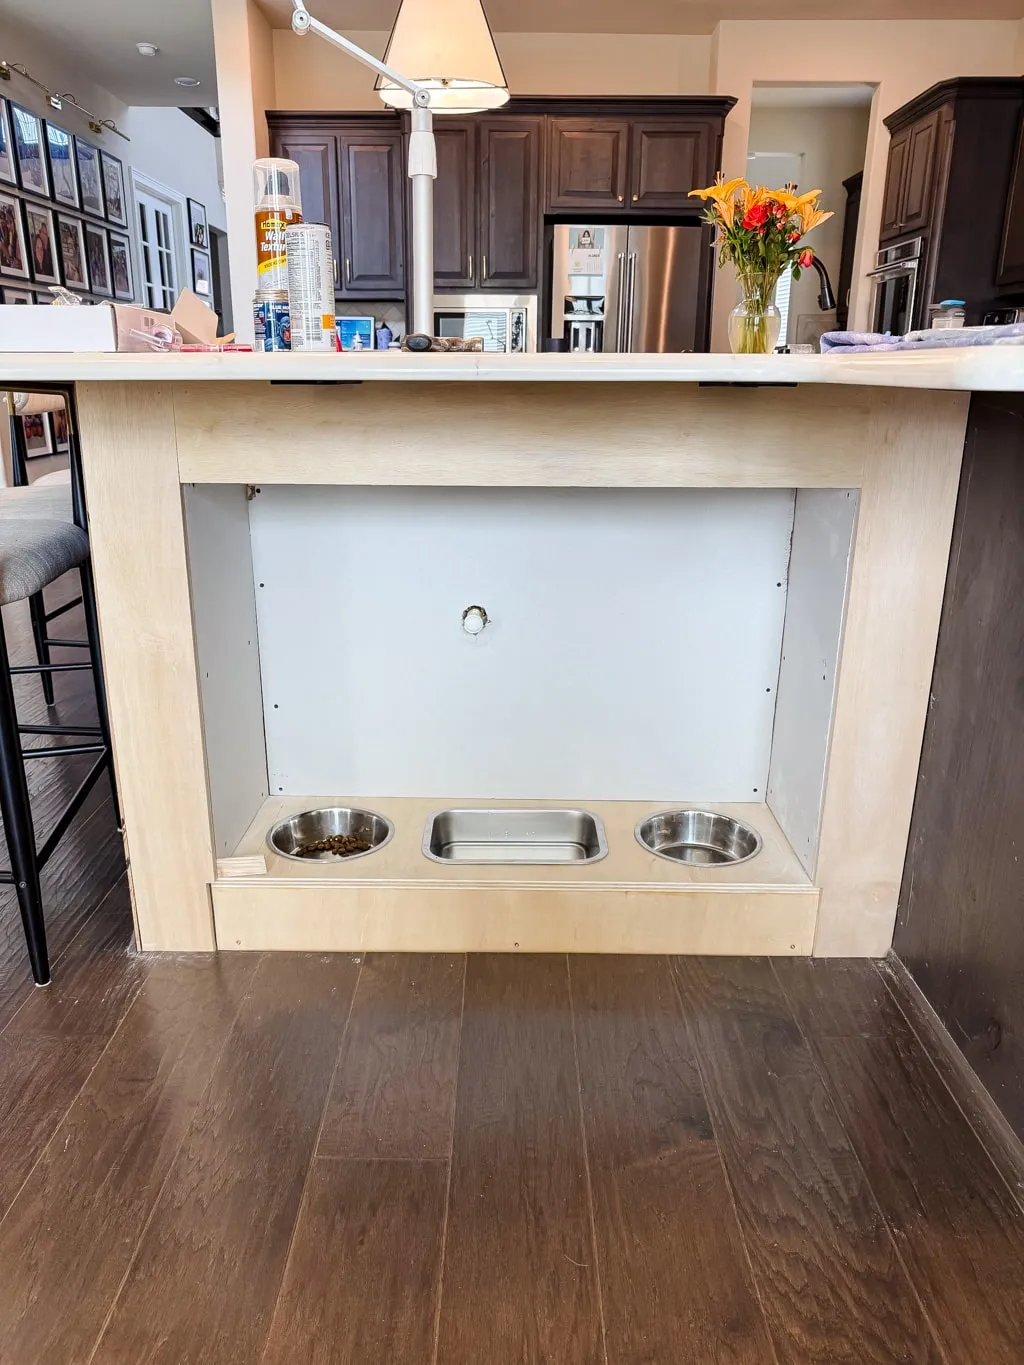
Build the Face Frame
With the drywall complete, it’s time to create the visible face of your built-in dog feeder. Cut ¾ plywood pieces to form the face frame that will cover the drywall and define the opening for the bowls. This frame will provide a smooth, consistent surface that can be stained or painted to match your existing kitchen cabinetry, giving the entire unit a cohesive and integrated look. Attach this face frame securely to the underlying structure.
 Building the plywood face frame for a custom dog feeding station
Stain the Frame
To ensure your new dog feeding station blends seamlessly with your kitchen’s aesthetic, apply a stain or paint to the face frame. Choose a shade that perfectly matches your kitchen island or cabinets. Apply the stain evenly, following the manufacturer’s instructions, and allow it to dry completely before proceeding. Proper drying time is crucial for achieving a durable and professional finish. For those considering making their own pet food, exploring homemade raw dog food recipes vet approved might be a useful next step.
 Staining the face frame of a dog feeding station to match kitchen cabinets
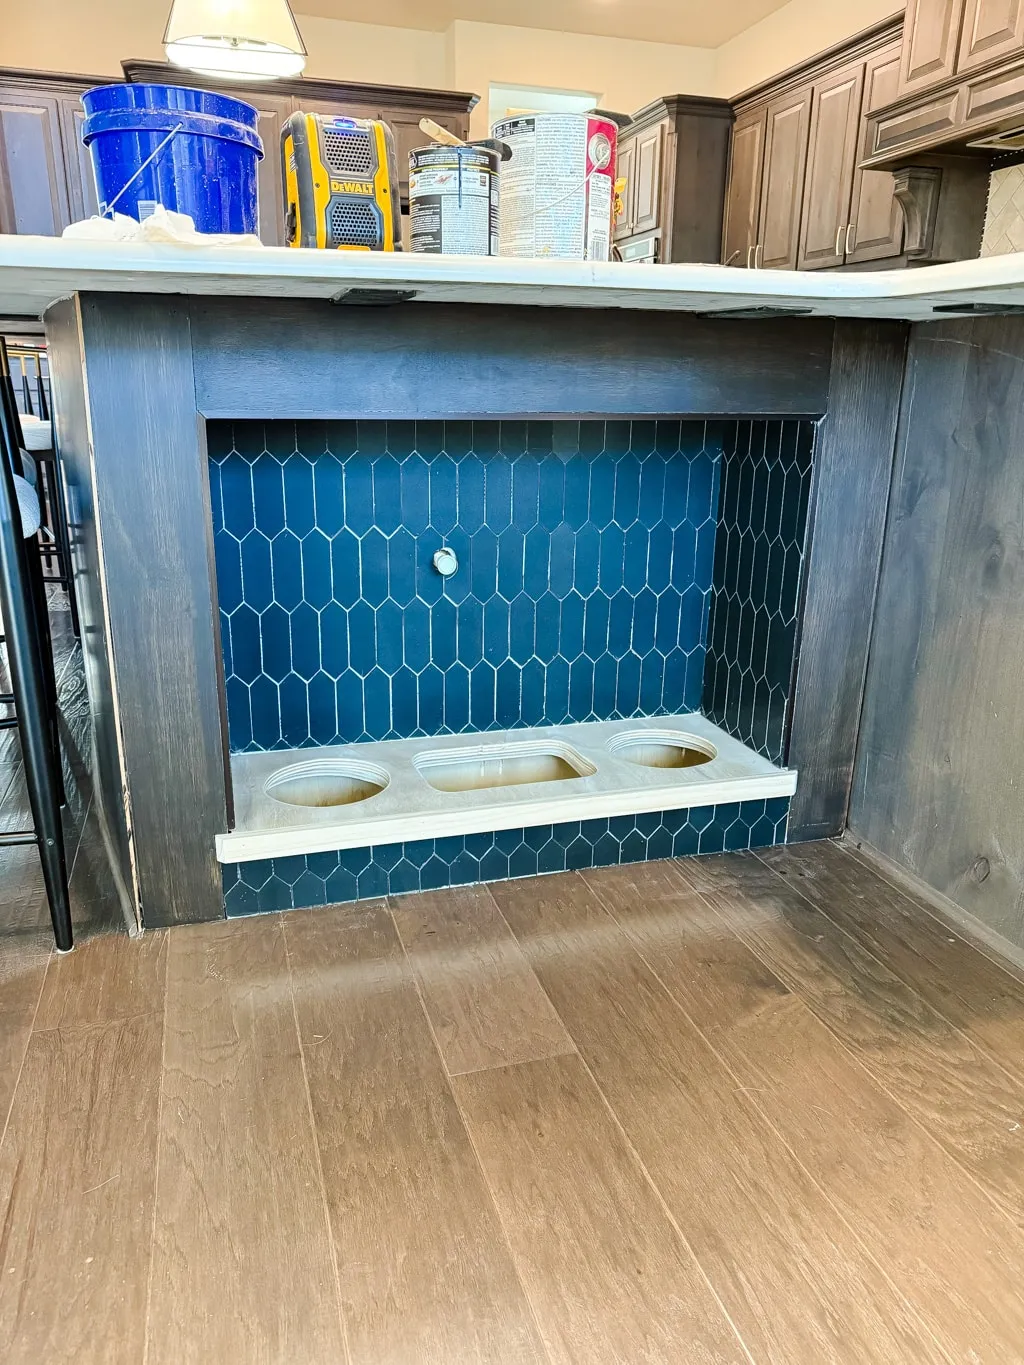
Install Tile
Adding tile can elevate the durability and elegance of your feeding station. Select tiles that complement your kitchen’s design and are easy to clean and water-resistant, such as ceramic or porcelain. Apply tile adhesive to the drywalled surfaces and carefully set the tiles in place, ensuring even spacing. Once the adhesive has cured, apply grout to fill the gaps between tiles, wiping away any excess promptly for a clean, polished finish. This tiled surface will protect against spills and splashes, making cleanup effortless.
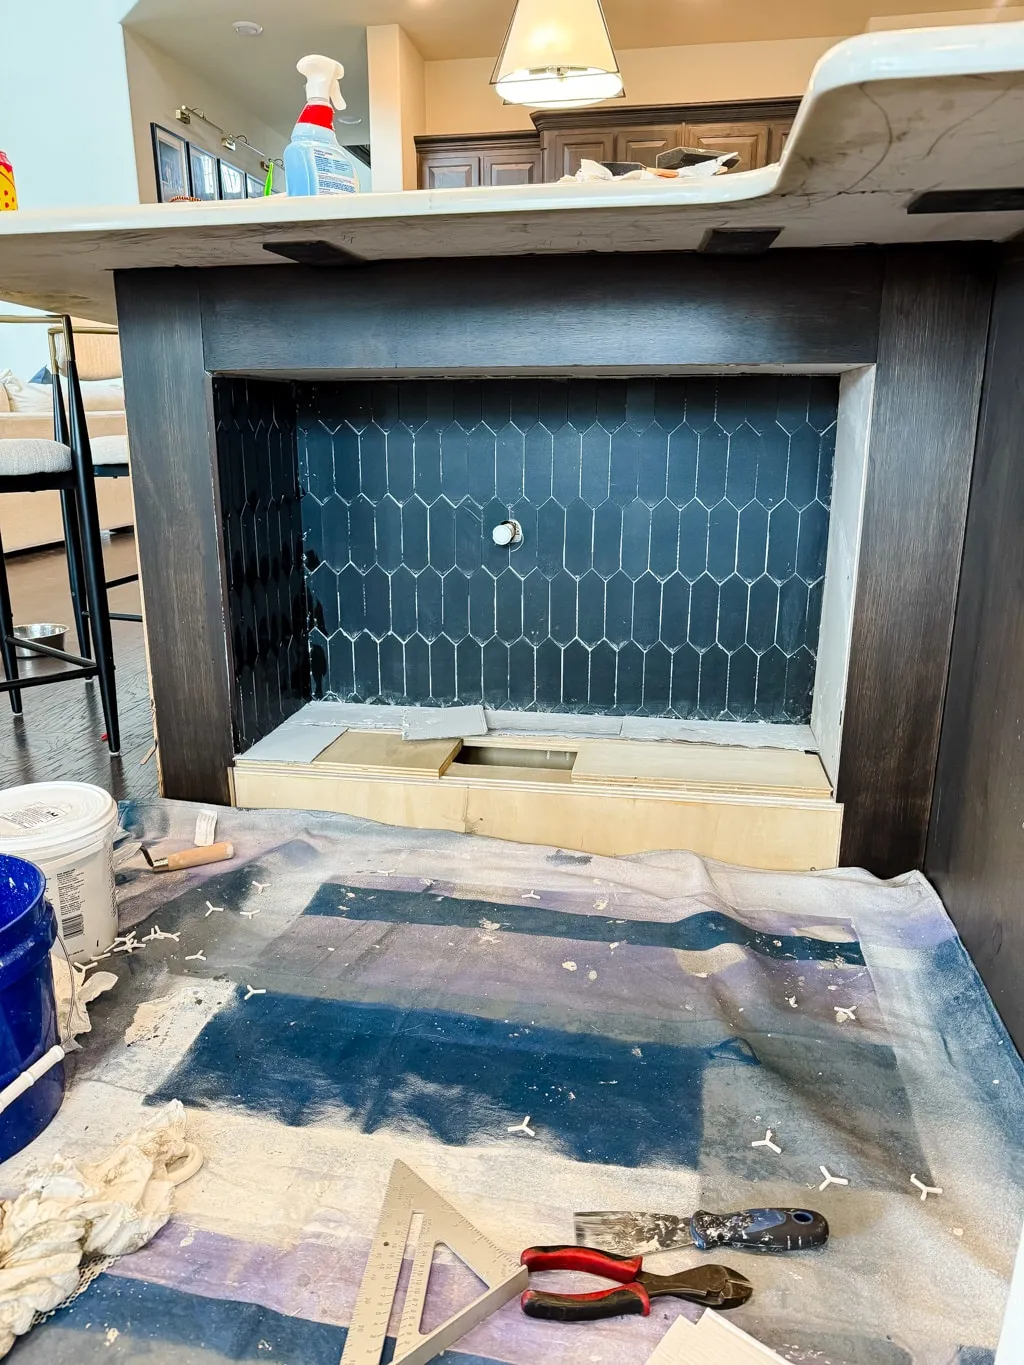 Installing decorative tiles around the built-in dog feeding station for a durable and elegant finish
Build and Install the Countertop
To complete the top of your elevated dog bowls station, construct a small countertop. Cut a piece of ¾-inch plywood to fit perfectly over the top of the feeding station frame. Sand the top and all edges thoroughly to achieve a smooth finish. Stain the countertop to match the newly stained face frame and cabinets, maintaining a cohesive aesthetic. Once dry, apply a high-quality waterproof sealant to the countertop, covering all surfaces, including the edges. This protective layer is vital for preventing water damage from spills and ensuring the longevity of your pet feeding station.
 Building a plywood countertop for a built-in dog feeding station, showing the stained wood
Add the Bowls
The final step brings your project to life. Gently place the stainless steel dog bowls into their designated, pre-cut slots in the plywood frame. Ensure they sit securely and are easily removable for cleaning. With the bowls in place, test the newly installed pot filler faucet to confirm it operates correctly and fills the water bowl effortlessly, without any leaks. This moment marks the successful completion of your functional and stylish built-in dog feeding station, ready for your furry friend to enjoy.
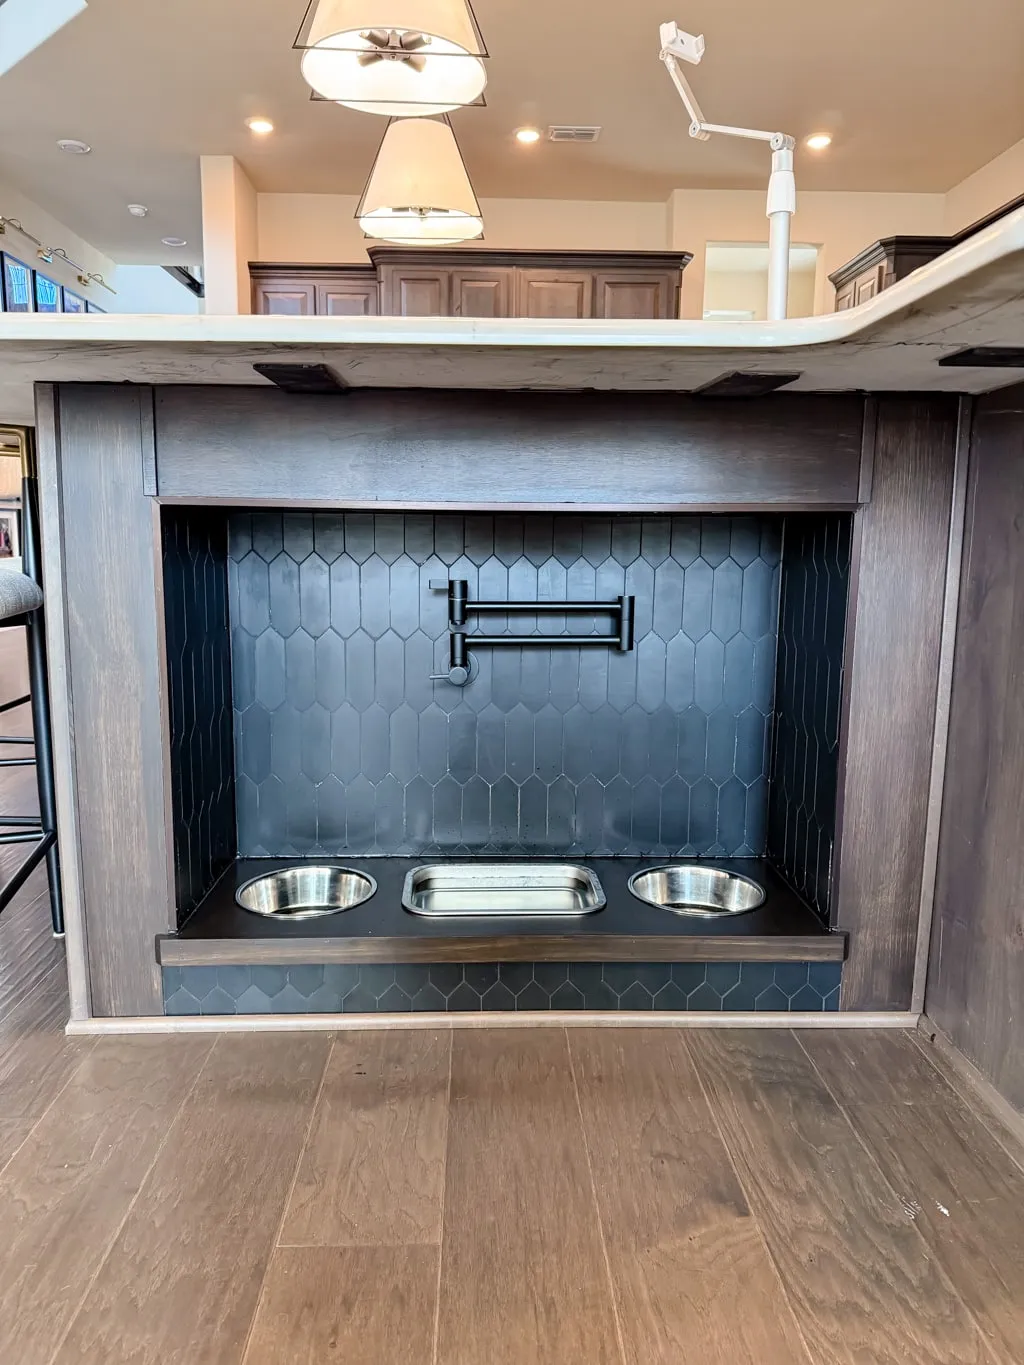 Placing stainless steel dog bowls into a finished built-in dog feeding station with a pot filler
Tips for Success in Your DIY Dog Feeding Station Project
Achieving a professional and durable outcome for your DIY dog feeder relies on careful execution and attention to detail. These tips will help ensure your project is a resounding success, offering both functionality and aesthetic appeal:
- Measure Twice, Cut Once: Precision is paramount. Double-check all measurements for the frame, bowl slots, and overall dimensions before making any cuts. Accurate measurements ensure a seamless fit into your kitchen island and provide optimal comfort for your dog.
- Opt for Durable Materials: Invest in high-quality wood, tile, and waterproof sealants. These materials are crucial for withstanding daily wear and tear, including spills and enthusiastic eating. Stainless steel bowls are an excellent choice for their durability and ease of hygiene.
- Strategic Plumbing Planning: If you’re incorporating a pot filler, meticulously plan the plumbing layout in advance. If you’re uncertain about connecting to your water supply, do not hesitate to consult a professional plumber. This prevents leaks and ensures safe operation.
- Match Your Kitchen’s Aesthetic: Select paint, stain, and tile that harmonizes with your existing kitchen design. This continuity ensures the feeding station appears as a natural, integrated extension of your space rather than an add-on.
- Patience with Drywall and Tile: Take your time when installing drywall and tile. Focus on achieving smooth seams, even grout lines, and promptly clean up any excess grout. These steps contribute significantly to a polished, professional finish.
- Thorough Sealing: Apply a high-quality waterproof sealant to the countertop and any exposed wood. This crucial step protects against moisture damage from spills, extending the life and maintaining the appearance of your feeding station.
- Test the Pot Filler: Before finalizing the installation, thoroughly test the pot filler for correct operation and absence of leaks. Addressing any issues early saves time and effort in the long run.
- Customize for Your Dog: The beauty of a DIY project is customization. Tailor the height of the bowls and their size to suit your dog’s specific needs, ensuring maximum comfort and enjoyment during mealtime.
- Don’t Rush Finishing Touches: Allow adequate drying time for all paint, stain, and sealant layers. Rushing this process can compromise the durability and aesthetic quality of your finished project.
Frequently Asked Questions About Built-In Dog Feeding Stations
Here are answers to common questions about creating your own kitchen island dog feeder:
Do I need plumbing experience to install the pot filler?
While having basic plumbing knowledge can certainly be an asset, it’s not strictly required. Many homeowners opt to hire a professional plumber specifically for the pot filler installation if they are uncomfortable with water connections. This ensures the job is done correctly and safely.
What type of tile should I use for the feeding station?
When selecting tiles, prioritize durability, water resistance, and ease of cleaning. Materials like ceramic or porcelain are excellent choices, as they are robust enough to withstand daily use and are highly resistant to spills, making cleanup straightforward.
How do I determine the right height for the feeding station?
To find the ideal height, measure your dog from the ground to their shoulders. Then, subtract a few inches (typically 2-6 inches, depending on breed and comfort). This measurement helps ensure the bowls are at a comfortable level, preventing your dog from straining its neck or back while eating and drinking.
Can I skip the pot filler and still do this project?
Absolutely! The pot filler is a fantastic convenience feature, but it is not essential for the success of the feeding station itself. Your built-in dog feeding station will still be highly functional and stylish without it. You always have the option to add it at a later date if you decide it’s a desirable upgrade.
How do I make the countertop waterproof?
After applying any stain or paint to your countertop, it is crucial to apply a high-quality waterproof sealant. Ensure you cover all surfaces, including the edges, with multiple coats if recommended by the product. Allow the sealant to dry completely according to the manufacturer’s instructions before using the station to ensure maximum protection against spills and moisture. Considering your dog’s diet, especially if you use a high-quality food, might lead you to wilderness dog food.
The Final Touch: A Reward for You and Your Canine
Transforming the side of your kitchen island into a dedicated dog feeding station is a deeply rewarding DIY project. Not only does it declutter your space and infuse it with style, but it also streamlines mealtime routines for both you and your beloved pet. The integration of practical elements like a pot filler, a custom-built countertop, and elegant tile details genuinely elevates the design, making it a functional yet beautiful feature within your home.
Whether you’re a seasoned DIY enthusiast or just beginning your journey into home improvement, this project offers a perfect blend of creativity and practicality. With careful planning, the selection of appropriate materials, and a healthy dose of patience, you can construct a feeding station that not only integrates flawlessly into your home but also significantly enhances your four-legged family member’s daily routine. We hope this comprehensive guide inspires you to take on your own project and create something truly special for your canine companion.