
A well-groomed cat is a happy and healthy cat. While felines are renowned for their self-grooming prowess, providing regular assistance with their care from nose to tail is essential for their overall well-being. Mastering the art of Cat Grooming At Home can not only keep your beloved companion looking pristine but also strengthen your bond and allow you to detect potential health issues early on. From nail trims to bathing, and checking eyes, ears, and teeth, a little consistent maintenance goes a long way. This comprehensive guide will walk you through everything you need to know to ensure your kitty’s skin, fur, ears, paws, nails, teeth, and eyes remain in top condition. caring canines emphasizes the dedication required for pet well-being, a principle equally vital for our feline friends.
It’s important to note that some cats may not tolerate grooming sessions easily. If your cat strongly resists, leading to potential injury for either of you, consulting a professional groomer or veterinarian for assistance is always recommended. Their expertise ensures a safe and stress-free experience for your pet.
Comprehensive Skin and Fur Care
A cat’s coat and skin are often indicators of their general health. Regular attention to these areas helps maintain their natural beauty and prevents common problems.
Bathing Your Cat
Your fastidious feline is usually well-equipped to handle her own hair care with her built-in grooming tools. However, if she gets particularly dirty or encounters something sticky or smelly, a bath may be necessary. Follow these steps to ensure a smooth, stress-free bathing experience for both of you:
- Timing is Key: Schedule baths when your cat is at her most relaxed. A vigorous play session beforehand with her favorite toy can help tire out even the most energetic felines, making them more amenable to the process.
- Pre-Bath Preparation: For your safety and hers, it’s highly recommended to trim your cat’s claws before bathing. This minimizes the risk of scratches during the process.
- Brush Thoroughly: Give your cat a good brushing to remove any loose hair and mats. This step is crucial as wet mats can tighten and become more difficult to remove later.
- Protect the Ears: Gently place some cotton balls in her ears to prevent water from entering, which can lead to discomfort or infection.
- Set Up the Bathing Area: Place a rubber bath mat in the sink or tub to prevent slipping. Fill it with three to four inches of lukewarm (never hot) water.
- Wetting the Coat: Use a hand-held spray hose to thoroughly wet your cat, being careful not to spray directly into her ears, eyes, or nose. If a spray hose isn’t available, a plastic pitcher or unbreakable cup works just as well.
- Shampoo Application: Gently massage your pet with a solution of one part cat shampoo (human shampoo can dry out her skin) to five parts water. Work from head to tail, following the direction of hair growth. Be extra cautious to avoid the face, ears, and eyes.
- Rinsing: Thoroughly rinse all shampoo off your cat using the spray hose or pitcher, ensuring the water remains lukewarm. It’s vital to remove all shampoo residue, as it can irritate the skin and attract dirt.
- Facial Cleaning: Use a damp washcloth to carefully wipe your cat’s face. Plain water is usually sufficient unless her face is very dirty; in such cases, an extra-diluted shampoo solution can be used with extreme caution around the ears and eyes.
- Drying: Wrap your cat in a large towel and gently dry her in a warm, draft-free area. If your cat tolerates the noise, a blow dryer on the lowest heat setting can be used. For long-haired cats, you may need to carefully untangle her fur with a wide-toothed comb after drying.
- Reward and Praise: Conclude the session with plenty of praise and her favorite treat to create a positive association with bathing.
Brushing Your Cat
Regular brushing is a cornerstone of effective cat grooming at home. It not only removes dirt, grease, and dead hair from her coat but also helps eliminate skin flakes and stimulates blood circulation, enhancing the overall condition of her skin. One or two brushing sessions per week will help your kitty maintain a healthy glow. These sessions are particularly beneficial as your cat ages and becomes less capable of meticulous self-grooming. The careful approach for a cat’s coat is similar to the attention given to poodle hair care, where specific techniques yield the best results.
- Before Brushing: Always check the condition of your cat’s coat. A healthy coat will appear naturally glossy and spring back when touched. Look for any bald patches, signs of fleas or ticks, and ensure her skin is free of wounds or unusual bumps.
- For Short-Haired Cats: Use a metal comb to work through her fur from head to tail, removing dirt and debris. Brush along the lie of her fur, concentrating on one section at a time to remove dead hair and tangles. A rubber brush is highly effective for removing dead hair from short coats.
- For Long-Haired Cats: Indoor long-haired cats shed year-round, requiring grooming sessions every few days to prevent tangles and remove dead hair. Begin with her abdomen and legs, gently combing the fur upward toward her head. Comb the neck fur upward towards her chin. Create a part down the middle of her tail and gently brush the fur on both sides. Talcum powder can be sprinkled over knots to help gently tease them apart with your fingers. If knots persist, a mat-splitter may be necessary.
- Weekly Checks: During your weekly grooming, run your hands along your cat’s body to check for wounds, bumps, and hidden tangles. Look for ticks and “flea dirt” (black specks of dried blood). Peek under her tail for any attached feces that might need careful snipping. Also, check around her anus for tan, rice-sized objects, which could indicate tapeworm presence.
- Hairball Prevention: Neglecting to brush your cat’s coat can lead to painful tangles and an accumulation of hair that results in hairballs. If, despite regular brushing, your cat continues to suffer from hairballs, consult your vet for recommended remedies.
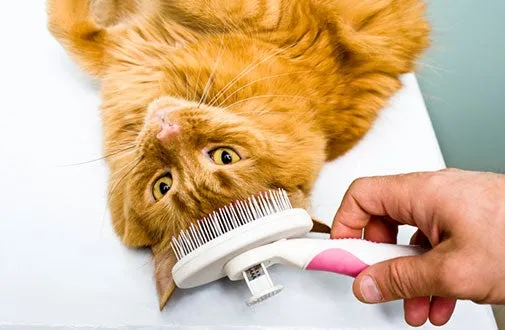 A person gently brushing a short-haired cat's fur to remove loose hair and stimulate blood circulation, part of essential cat grooming at home.
Understanding Cat Skin Problems
The condition of your cat’s skin is a vital indicator of her overall health. If a skin problem arises, your cat may exhibit excessive scratching, chewing, or licking. A wide array of factors, including external parasites, allergies, seasonal changes, and stress—or a combination of these—can affect your cat’s skin and warrant investigation. Skin issues are among the most frequent reasons pet parents seek veterinary care. Recognizing the symptoms early is crucial for effective management.
Symptoms of Skin Problems in Cats:
- Constant scratching, licking, and chewing, especially around the head and neck.
- Scabs or crusts on the skin.
- Redness or inflammation.
- Round, scaly patches, often seen on the face and paws.
- Dry, flaky, or otherwise irritated skin.
- Hair loss or bald patches.
- Increased incidence of hairballs.
- Rashes.
- Swellings, lumps, or skin discoloration.
- Drainage of blood or pus from affected areas.
Several underlying causes can lead to abnormalities in your cat’s skin and should be investigated by a veterinarian:
- Ringworm: This highly contagious fungal infection causes inflammation, scaly patches, and hair loss. Lesions typically appear on the head, ears, and paws, though sometimes no visible signs are present. Prompt veterinary treatment is essential to prevent transmission to other pets and family members.
- Fleas: Beyond irritating the skin, fleas can trigger allergic reactions in cats. Symptoms commonly include excessive scratching, thinning hair above the tail base, crusts, and red, raised skin lesions. Some cats may also be sensitive to certain flea treatment products, such as collars, which can cause localized redness and irritation.
- Other External Parasites: Ear mites cause intense itching and redness around the ears, often accompanied by dark, coffee ground-like debris in the ear canals. Lice can lead to severe itching, while mange mites cause significant flaking and scaling.
- Seasonal Allergies: Persistent scratching might be due to your cat’s sensitivity to common environmental allergens like pollen from trees, mold, and grasses.
- Food Allergies: Many ingredients, such as beef, milk, poultry, and corn, along with fillers and artificial colorings, can be perceived as foreign by your cat’s immune system, leading to itching and rashes.
- Grooming Products: Certain shampoos and grooming products can irritate your cat’s sensitive skin, leading to adverse reactions.
- Seasonal Changes: Like humans, many cats experience dry, flaky skin during colder winter months.
- Environmental Factors: Contact with specific chemicals or fabrics, or exposure to excessive sun or cold, can cause skin irritation.
- Bacterial or Yeast Infections: These infections often develop as a secondary issue following another underlying skin disorder.
- Tumors: A variety of benign and malignant skin growths can develop in cats, requiring veterinary assessment.
- Stress: Anxiety can cause cats to excessively lick and chew, leading to hair loss in affected areas.
You should schedule a veterinary exam as soon as you observe any skin abnormality, such as excessive hair loss, flaking, scaling, redness, bald patches, or if your cat begins to excessively scratch, lick, or bite her fur. After a thorough history and physical examination, your vet may perform diagnostic tests such as skin scrapings, “tape tests,” hair examinations, bacterial cultures, skin biopsies, allergy testing, or blood tests to determine the cause of the symptoms and recommend appropriate treatment.
Which Cats Are Prone to Skin Problems?
Given the wide range of causes, cats of all ages and breeds can develop skin issues. However, young, elderly, immunocompromised cats, and those living in overcrowded or stressful environments, may be more susceptible.
Preventing Skin Problems:
- Use natural, hypoallergenic soaps and shampoos specifically formulated for cats.
- Regularly brush your cat to prevent hair matting and promote healthy skin.
- Feed your cat a healthy, balanced diet free from unnecessary fillers or artificial ingredients.
- Implement a veterinarian-recommended flea-treatment program.
- Thoroughly clean and vacuum your home, ensuring to dispose of the vacuum bag.
- Provide a calm and stable living environment for your cat to minimize stress.
- Your vet may prescribe skin creams or oral medications as preventative measures.
Treating Skin Problems:
Always consult your vet regarding treatments. Options may include:
- Topical products like shampoos, dips, and sprays to prevent and treat parasites.
- A balanced diet to support healthy skin and coat.
- Antibiotic or antifungal medications for infections.
- Dietary supplements containing essential fatty acids.
- Corticosteroids and antihistamines to control itching.
- Hypoallergenic diets for food allergies.
Managing Cat Shedding
Shedding is a natural physiological process where cats lose dead hair. Indoor cats may shed throughout the year. Regular grooming and vacuuming your home will help minimize the inconvenience of shedding. However, if you notice bald patches or a significant, unusual loss of hair, it could indicate an underlying health issue requiring veterinary attention.
Various medical, dietary, and stress-related factors can cause your cat to shed more hair than is typical. If you observe excessive hair loss or bald spots, consult your veterinarian immediately. Your cat may be suffering from one of the following health issues:
- Allergies
- Ringworm
- Bacterial infection
- Fleas
- Hormonal imbalances, such as hyperthyroidism
- Poor diet
- Stress
- Reactions to certain medications
- Pregnancy or lactation
- Sunburn
If your cat obsessively licks, bites, or scratches, or if she’s losing patches of hair or persistently scratching or biting the same few spots, it’s crucial to seek a veterinary exam. There may be a medical, dietary, or stress-related issue that needs immediate attention.
If your cat sheds a lot but your veterinarian has confirmed there’s no underlying medical cause, you can take steps to minimize hair loss:
- Feed her a high-quality, balanced diet.
- Groom her regularly to remove loose hair. This practice is vital, much like maintaining the vitality of brit care champion pets who thrive on consistent well-being routines.
- During grooming sessions, routinely examine your cat’s skin and coat. Checking for hair loss, redness, bumps, cuts, fleas, ticks, or other parasites provides a quick way to determine if a vet visit is needed.
While normal shedding might just result in a hairy wardrobe and home, neglecting regular grooming can lead to hairball problems for your cat. If shedding is due to an underlying medical cause, her health could worsen without veterinary intervention. Additionally, cats not groomed properly, especially long-haired breeds, can develop painful mats that may conceal or cause underlying skin issues.
Essential Ear Care for Cats
Your cat’s ears are incredibly sensitive and capable, but they still benefit from human assistance to stay clean and healthy. Weekly monitoring for wax, debris, and signs of infection will ensure these sensitive “sonar detectors” remain perky and responsive.
Outer Ear Check
A healthy feline ear flap (pinna) should have a consistent layer of hair on its outer surface, with no bald spots. The inner surface should be clean and pale pink. If you observe any discharge, redness, or swelling, your cat’s ears should be promptly examined by a veterinarian.
Inner Ear Exam
Take your cat to a quiet room, free from other pets, to conduct an inner ear exam. Gently fold back each ear and look down into the canal. Healthy inner ears are typically pale pink, free of debris or odor, and have minimal to no earwax. If you find your cat’s ears caked with wax or detect an unpleasant odor, a veterinary exam is warranted.
Ear Cleaning 101
- Prepare the Cleaner: Apply a small amount of liquid ear cleaner (your vet can recommend a suitable product) onto a clean cotton ball or piece of gauze.
- Wipe the Ear: Gently fold your cat’s ear back and wipe away any visible debris or earwax from the underside of her ear.
- Clean, Don’t Rub: Lift away the dirt and wax rather than rubbing it further into the ear. Crucially, never attempt to clean deep into the ear canal, as probing inside your cat’s ear can cause trauma or infection.
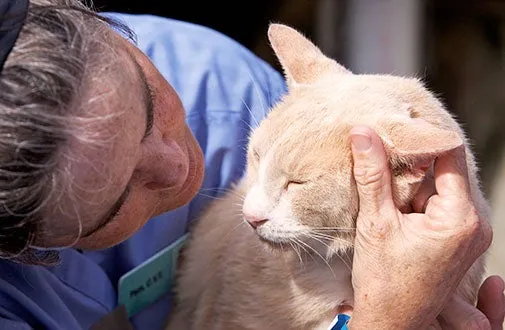 A close-up image showing how to gently clean a cat's outer ear with a cotton ball and ear cleaner, an important part of cat grooming at home.
Signs of Ear Problems
Be vigilant for the following signs, which may indicate that your cat’s ears require veterinary attention:
- Persistent scratching or pawing at the ear area.
- Sensitivity to touch around the ears.
- Head tilting or frequent head shaking.
- Loss of balance or disorientation.
- Redness or swelling of the ear flap or canal.
- An unpleasant odor emanating from the ears.
- Black or yellowish discharge.
- Accumulation of dark brown, coffee ground-like wax.
- Noticeable hearing loss.
- Any signs of bleeding from the ear.
Know Your Ear Disorders
- Ear Mites: These common parasites are highly contagious among pets. Key indicators include excessive ear itching and debris resembling coffee grounds.
- Ear Infections: Usually caused by bacteria, yeast, or foreign objects lodged in the ear canal. Prompt treatment is crucial, as ear infections cause significant discomfort and can signal underlying issues like allergies, hormonal abnormalities, or hereditary diseases.
- Blood Blisters (Hematoma): These are accumulations of blood in the ear flap, often resulting from excessive scratching or head shaking caused by infections, ear mites, fleas, or trapped debris.
Paw and Nail Care for Felines
Cats rely on healthy feet for scratching, climbing, and their renowned acrobatic landings. Regular examination and cleaning of their paws, ensuring they remain wound-free, are therefore vital components of cat grooming at home.
Healthy Paws
- Keep Paws Clean: Your cat’s feet should always be clean. Unhealthy substances stuck to their paws can cause pain and may be ingested during self-grooming. Once daily, gently wipe your cat’s paws with a damp cloth, checking between her toes and around the paw pads. Maintaining clean floors and surfaces free of debris and household chemicals significantly helps keep your cat’s feet clean.
- Check for Injuries: Cats are natural explorers. Regularly check their paws for any cuts, sores, splinters, or swellings. Gently remove splinters or debris with tweezers and clean any small cuts. If you notice blood, pus, or an unusual odor, take your cat to the vet to check for infection.
- Trim Toe Tufts: Long-haired kitties may grow hair between their toes. If this irritates your cat (indicated by obsessive licking), gently trim the excess hair with small, rounded scissors.
- Protect Paw Pads: Be mindful of your kitty’s sensitive paw pads. In hot or cold weather, moisturize them with a vet-recommended product and try to prevent her paws from touching freezing patios, hot sidewalks, or other uncomfortable surfaces.
- Monitor for Discomfort: If you notice your cat obsessively cleaning her paws, limping, or favoring one leg, investigate immediately—she might require veterinary attention. The attention given to canine well-being, such as in goldendoodle care, highlights the importance of detailed care for all pets’ sensitive areas like paws.
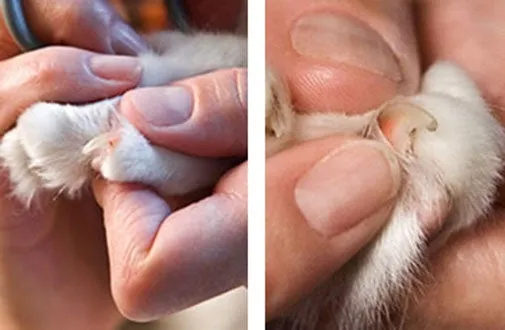 A close-up image of a cat's paw being gently held, demonstrating how to inspect the pads and trim the nails for proper paw and nail care.
Nail Care
Does your cat vanish at the sight of clippers, or do you have to swaddle her in a towel for a “manicure”? Follow these steps to help your cat relax during nail trimming:
- Choose a Calm Setting: Select a quiet room where you can comfortably sit with your cat on your lap. Aim for a time when she’s relaxed or even sleepy, such as after a meal. Ensure there are no distractions like birds outside the window and no other pets nearby.
- Acclimate to Touch: Gently take one of your cat’s paws and massage it for no more than three seconds. If she pulls away, don’t squeeze or pinch; just maintain gentle contact. Once she’s still again, press her paw pad slightly to extend the nail, then release and immediately give her a treat. Repeat this every other day on different toes until she’s comfortable with the process.
- Introduce Clippers: Your cat should be at ease with the sound of the clippers before you attempt a trim. While holding her, put an uncooked piece of spaghetti into the clippers and hold them near her. (If she sniffs them, place a treat on top). Next, while massaging a toe, gently press the pad to extend the nail. Clip the spaghetti, still holding her paw gently. Release her toe and quickly offer a treat.
- Identify the Quick: The pink part of a cat’s nail, called the quick, contains nerves and blood vessels. Do NOT cut this sensitive area. Only snip the white, translucent tip of the claw. It’s always better to cut less of the nail than to risk cutting the quick. If you accidentally cut the quick, styptic powder or a styptic stick can stop any bleeding; keep one nearby during trimming.
- The Trimming Process: With your cat on your lap, facing away from you, take a toe, massage, and press the pad until the nail extends. Trim only the sharp tip of one nail, release her toe, and quickly give her a treat. If she remains calm, clip another nail, but don’t trim more than two claws in one sitting until she is fully comfortable. Reward her with a special treat.
- Frequency: A nail trim every ten days to two weeks is generally recommended. If your cat strongly resists, seek help from your vet or a professional groomer.
- Avoid Force: If your cat resists, never raise your voice or punish her. Avoid trimming when she’s agitated or you’re upset. Do not rush, as this increases the risk of cutting the quick.
- Patience is Key: Do not attempt to trim all of your cat’s claws in one session.
- No Declawing: The ASPCA strongly discourages declawing, which involves amputating the end of a cat’s toes. Instead, focus on regular trimming, provide appropriate scratching posts, and ask your veterinarian about soft plastic nail covers.
Maintaining Your Cat’s Dental Health
Your cat needs strong, clean teeth and healthy gums for overall health. Damage to the tongue, teeth, palate, and gums can lead to various health risks, many of which can be prevented with regular home check-ups and good old-fashioned brushings.
- Check for Odor: An abnormally strong odor from your kitty’s mouth could indicate digestive problems or a gum condition like gingivitis, and warrants a vet examination.
- Examine Gums and Teeth: With your cat facing you, gently push back her lips and inspect. Gums should be firm and pink, not white or red, and show no signs of swelling. Teeth should be clean, free of brownish tartar, and none should be loose or broken.
- Watch for These Signs: Be alert for any of the following, which may signal problems in your cat’s mouth:
- A dark red line along the gums.
- Red and swollen gums.
- Ulcers on gums or tongue.
- Loose teeth.
- Pus.
- Difficulty chewing food.
- Excessive drooling.
- Excessive pawing at the mouth area.
- Seek Vet Care for Inflammation: Any sign of gum inflammation requires a veterinary exam. Untreated gum disease can lead to tooth loss or inability to eat. Inflammation may also point to internal problems such as kidney disease or Feline Immunodeficiency Virus.
- Plaque and Tartar: Bacteria and plaque-forming foods can cause a buildup on a cat’s teeth. This can harden into tartar, potentially leading to gingivitis, receding gums, and tooth loss.
- Brushing Supplies: All you need for brushing your cat’s teeth are cotton swabs, a small toothbrush, and toothpaste formulated specifically for felines. Salt and water can also be used. Ask your vet for recommendations, and never use human toothpaste, as its ingredients can be harmful to cats.
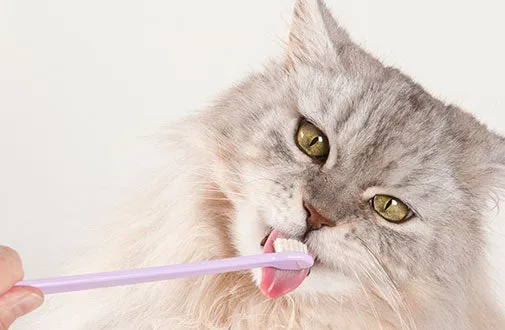 A person gently brushing a cat's teeth with a small, cat-specific toothbrush and toothpaste, an essential part of cat dental care.
Brush Your Cat’s Teeth at Home with These Simple Steps:
- Acclimation: First, help your cat get used to the idea of having her teeth brushed. Start by gently massaging her gums with your fingers or touching them with a cotton swab.
- Taste Test: After a few sessions, put a small amount of cat-formulated toothpaste on her lips so she becomes accustomed to the taste.
- Introduce the Brush: Use a toothbrush designed specifically for cats; these are smaller and have softer bristles than human toothbrushes. Finger toothbrushes are also available and allow for a gentle gum massage.
- Gentle Brushing: Apply the toothpaste to her teeth and brush gently.
Chew toys can satisfy your cat’s natural urge to chomp, helping to strengthen her teeth. Gnawing on a chew toy can also help floss her teeth, massage her gums, and scrape away soft tartar.
If your cat exhibits any of the following symptoms, please see the vet immediately:
- Gingivitis: Inflammation of the gums, often seen in older cats, which may start as a dark red line bordering the teeth. If left untreated, gums can become sore, and ulceration may occur. This can also be a sign of FIV or other infections.
- Periodontitis: If gingivitis progresses and invades the tooth socket, the tooth may loosen, and an abscess can form.
- Stomatitis: This inflammation of the mouth lining can result from a foreign body, viral disease, or dental problems. The cat will have difficulty eating, and the inside of her mouth will appear red.
- Rodent Ulcer: A slowly enlarging sore or swelling, typically found on the upper lip.
- Salivary Cyst: If salivary glands or ducts become blocked, a cyst may form under the tongue.
- Mouth Ulcers: Ulcers on a cat’s tongue and gums can sometimes be caused by feline respiratory or kidney disease. The general principles of ensuring proper health and comfort, similar to what you’d find when researching places for dog stays where every detail of care is considered, apply here for optimal feline dental health.
Keeping Your Cat’s Eyes Bright and Healthy
A good home eye exam, performed just before other grooming tasks, can help you detect any tearing, crust, cloudiness, or inflammation that might signal a health problem. Here are a few simple tips to keep your kitty’s eyes bright and healthy.
- Visual Inspection: Face your cat in a brightly lit area and look into her eyes. They should appear clear and bright, and the area around the eyeball should be white. Her pupils should be equal in size.
- Eyelid Check: Gently roll down your kitty’s eyelid with your thumb and examine the lining. It should be pink, not red or white.
- Cleaning and Trimming: Gently wipe away any crusty discharge from your cat’s eyes with a damp cotton ball. Always wipe away from the corner of the eye, and use a fresh cotton ball for each eye to prevent cross-contamination. Carefully snip away any long hairs that could obstruct her vision or poke her eyes. Avoid using eye washes or drops unless specifically prescribed by your veterinarian.
How can you tell if there is something wrong with one or both of your cat’s eyes? Look out for the following:
- Any discharge from the eyes.
- Excessive watering.
- Red or white eyelid linings.
- Crusty buildup in the corners of the eye.
- Fur around the eyes that is stained with tears.
- Closed eye(s) or excessive squinting.
- Cloudiness or a change in eye color.
- A visible third eyelid (a membrane that usually remains tucked away).
Certain body language can also alert you to possible eye distress. If your cat is constantly squinting or pawing at her eye area, perform a thorough inspection of her eyes. If you find any of the above symptoms, you should immediately contact your veterinarian.
 A detailed image of a person gently wiping the corner of a cat's eye with a damp cotton ball, demonstrating proper eye care as part of cat grooming.
The following eye-related disorders are commonly seen in cats:
- Conjunctivitis: One or both of your cat’s eyes will appear red and swollen, often accompanied by discharge.
- Third Eyelid Protrusion: If the third eyelid becomes visible or crosses your cat’s eye, it could indicate an injury or a systemic issue such as diarrhea, worms, or a viral infection.
- Keratitis: If your cat’s cornea becomes inflamed, the eye will appear cloudy and watery.
- Cataracts: This opacity on the eye is frequently observed in elderly and diabetic cats.
- Glaucoma: The cornea becomes cloudy, and the eye may enlarge due to increased pressure within the eyeball.
- Bulging Eye: A bulging eye can result from an accident, trauma, or an eye tumor.
- Retinal Disease: Partial or total vision loss can occur when the light-sensitive cells at the back of the eye degenerate.
- Watery Eyes: The fur around your cat’s eyes may be stained with tears due to blocked tear ducts or an overproduction of tears.
Many feline eye disorders can be treated with vet-prescribed drops or ointments, and your vet can demonstrate how to apply these at home. The best way to prevent eye conditions is to ensure your cat receives all her vaccinations and undergoes thorough check-ups. Regularly examine her eyes and consult a vet if you discover any abnormalities. Untreated eye conditions can lead to impaired sight or even permanent blindness.
Conclusion
Mastering cat grooming at home is a rewarding endeavor that significantly contributes to your feline companion’s health and happiness. By regularly tending to their skin, fur, ears, paws, nails, teeth, and eyes, you’re not only maintaining their physical well-being but also building a stronger bond and fostering a sense of trust. Remember that consistency and patience are key, especially when introducing new grooming routines. Paying close attention to any changes in your cat’s appearance or behavior during these sessions can also help you detect potential health issues early, allowing for timely veterinary intervention.
While at-home grooming is invaluable, some situations may call for professional assistance, particularly if your cat strongly resists or if you suspect a serious health problem. Always prioritize your cat’s comfort and safety, and don’t hesitate to consult your veterinarian for advice or support. With dedication and the right approach, you can ensure your beloved cat remains healthy, happy, and beautifully groomed for years to come. Explore more tips and guides for comprehensive pet care on our website!