
Checking your dog for ticks is an essential and often daily task, particularly if your canine companion spends time outdoors in grassy fields, wooded areas, or even just your backyard. Ticks, in both their adult and juvenile stages, can be remarkably small and challenging to detect without a thorough, routine inspection of your dog’s entire body. Ignoring this crucial step can lead to serious health implications for your beloved pet, making a consistent and effective tick-checking routine the Best Way To Check A Dog For Ticks and safeguard their well-being. This guide will provide detailed steps and crucial information to help you protect your dog from these prevalent parasites.
Why Daily Tick Checks Are Crucial for Your Dog’s Health
Ticks are more than just a nuisance; they are vectors for a variety of serious bacterial infections that can profoundly impact your dog’s health. Diseases such as Lyme disease, Rocky Mountain spotted fever, ehrlichiosis, and anaplasmosis are commonly transmitted by tick bites. The symptoms of these infections can be varied and debilitating, often including fever, swollen joints, limping, a decreased appetite, and vomiting. Some of these tick-borne illnesses can lead to chronic, lifelong conditions, causing intermittent flare-ups of symptoms that severely diminish your dog’s quality of life. Understanding how these parasites can affect your dog’s health, including issues like can worms cause vomiting and diarrhea in dogs, highlights the broader importance of comprehensive parasite control.
Even if your dog is on a regular flea and tick preventative, daily checks remain incredibly important. Preventatives work by killing or repelling ticks, but a tick can still attach and bite your dog before the medication takes full effect. This brief window is often enough for disease transmission to occur. Furthermore, not all ticks are susceptible to preventatives; natural resistance exists within tick populations, and a heavy tick load on your dog can increase the risk of encountering a resistant tick that can survive and transmit disease.
Beyond disease transmission, tick bites themselves can lead to secondary bacterial or yeast infections at the bite site. These localized infections can be painful and require veterinary attention, even if no blood-borne illness is transmitted. Different preventatives, including various prescription medications, may offer varying levels of protection based on your dog’s lifestyle and health profile. For example, some chewable tablets offer broad-spectrum protection against fleas, ticks, heartworms, roundworms, hookworms, and even tapeworms. Discussing your dog’s specific needs with your veterinarian is the best way to check a dog for ticks and select the most appropriate preventative, ensuring they also receive the best food to feed your dog for overall health.
What Do Ticks Look Like? Identifying Them at Different Stages
The appearance of ticks can vary significantly depending on their species and life stage. Understanding these differences is key to effective identification during your checks. After hatching from their eggs, ticks enter the larval stage. At this point, they are extremely small, often no bigger than a poppy seed, and possess six legs. They are very difficult to spot due to their diminutive size.
Next, ticks progress to the nymph stage. Nymphs are slightly larger than larvae but still quite tiny, resembling a sesame seed, and now have eight legs. Like larvae, they can be easily overlooked. Adult ticks are the largest stage, typically oval-shaped with eight legs, and can range in color from black, brown, to tan. When an adult tick has fed, its body becomes engorged with blood, appearing significantly larger, often paler than its original color, and its legs may be difficult to see as the body swells. Being able to recognize these different forms significantly improves your chances of finding and removing them before they can transmit disease.
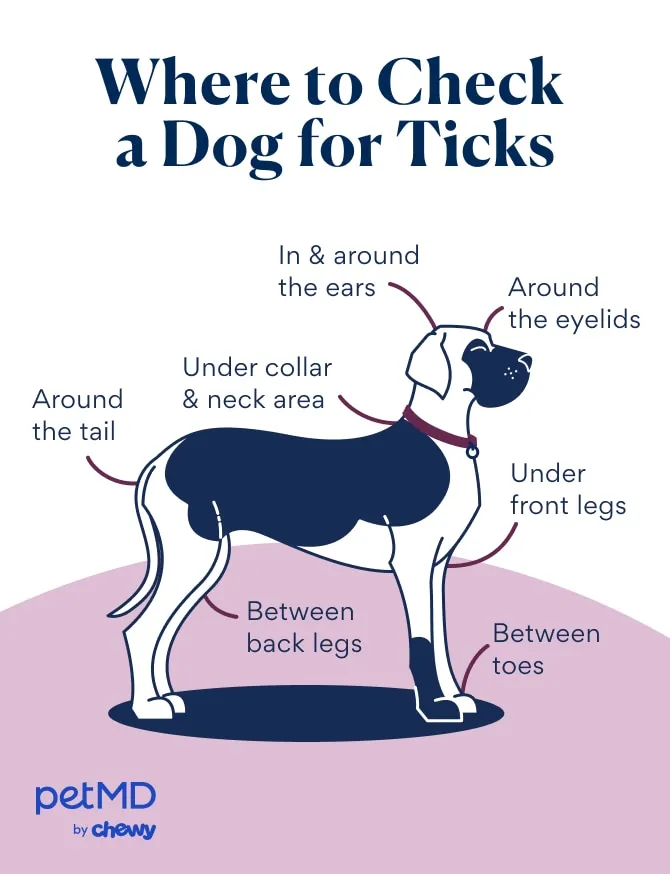 Illustration showing key areas on a dog's body to thoroughly check for ticks, including ears, neck, paws, and under the tail.
Step-by-Step Guide: The Best Way to Check a Dog for Ticks
Performing a thorough tick check requires patience and a systematic approach. Here’s a detailed guide on the best way to check a dog for ticks:
Prepare Your Environment and Tools: Choose a quiet, well-lit area where your dog is comfortable. Have your tools ready: a pair of fine-tipped tweezers or a specialized tick removal tool, rubbing alcohol for disinfection, and a flea comb. A small container with rubbing alcohol to dispose of removed ticks is also useful.
Initial Hands-On Scan: Begin by gently running your hands over your dog’s entire body. Feel for any small bumps, scabs, or irregularities on their skin. Ticks often feel like a small raised bump, sometimes hard like a seed. If you feel anything suspicious, carefully part the fur to get a closer look at the skin underneath.
Utilize a Flea Comb for Precision: Even if your initial scan feels clear, a flea comb can significantly enhance your search, allowing you to reach deeper into your dog’s coat. While flea combs won’t remove ticks, their fine teeth can help you detect small bumps or even dislodge loose debris that might hide a tick. You can also use the comb to neatly part the fur in any suspicious areas for a better visual inspection.
Focus on “Hidden” Hotspots: Ticks are masters of concealment and often gravitate towards areas where skin folds or tight corners offer protection and warmth. Pay extra attention to:
- Inner and outer ear flaps: Ticks love the warm, protected environment of the ears.
- Between the toes and paw pads: A common spot, especially for active dogs.
- Under the tail and around the anal area: Another warm, concealed location.
- Around the eyelids and muzzle: While less common, ticks can attach here.
- Underarm and inguinal (groin) areas: These moist, protected areas are prime tick territory.
- Under your dog’s collar: Ticks often hide beneath collars where they go undisturbed.
What to Do if You Find a Tick: If you locate a tick, it’s crucial to remove it immediately and correctly. Have your tweezers or tick removal tool disinfected with rubbing alcohol before use. Save the removed tick in a sealed container (perhaps with a small amount of alcohol) to show your veterinarian, especially if your dog develops any symptoms of illness. This can aid in diagnosis and treatment. Prompt removal is part of the best way to check a dog for ticks and prevent disease. The risk of tick-borne illness is higher when ticks are attached for longer durations.
Safe and Effective Tick Removal: What to Do If You Find One
Removing a tick correctly is as important as finding it. Improper removal can leave parts of the tick embedded in your dog’s skin, leading to infection or prolonged disease transmission.
Prepare for Removal: Ensure your chosen removal tool (fine-tipped tweezers or a specialized tick remover like a tick tornado) is clean and disinfected with rubbing alcohol. Put on gloves if you prefer, to avoid direct contact with the tick.
Position the Tool: With your dominant hand, grasp the tick as close to your dog’s skin as possible. If using tweezers, aim to grip the tick’s head or mouthparts, not its engorged body. If using a tick tornado, slide the notch underneath the tick.
Pull Steadily and Straight Out: Pull the tick straight upwards in a slow, steady motion. Avoid twisting, jerking, or squeezing the tick’s body. Twisting or squeezing can cause the tick’s mouthparts to break off and remain embedded in the skin, or worse, can force infected fluids from the tick into your dog. The goal is to remove the entire tick, including its head.
If the Head Remains: Don’t panic if a small part of the tick’s head remains embedded. It’s not ideal, but it’s less concerning than leaving the entire tick. Consult your veterinarian for guidance. They may advise you to bring your dog in for professional removal of the remaining mouthparts and potentially prescribe medication to prevent infection and aid skin healing. Ensuring comprehensive care, including proper tick removal, is paramount to prevent complications such as those that might necessitate flea tick and intestinal worm treatment for dogs.
Post-Removal Care: Once the tick is successfully removed, clean the bite area on your dog’s skin with an antiseptic wipe or a pet-safe disinfecting spray, such as Vetericyn Plus Antimicrobial Wound Care Spray. Monitor the area for a few days for any signs of infection (redness, swelling, pus) and your dog for any signs of illness (lethargy, limping, fever). Remember, knowing how can worms be passed from dog to dog also emphasizes the need for broad parasitic awareness.
Consistency is Key: Establishing a Regular Tick Check Routine
The best way to check a dog for ticks is to make it a consistent part of your daily routine. During warmer months or if you live in a high-risk area for ticks, daily checks are highly recommended, especially after any outdoor activity. Ticks tend to become active when temperatures consistently rise above freezing (around 32°F or 0°C) for more than 24 hours. Therefore, after every walk, hike, or playtime near grassy or wooded areas, perform a thorough tick check once your dog is back indoors.
If you reside in a low-risk region or during periods of prolonged freezing temperatures, you might be able to scale back tick checks to once a week. However, it’s always better to err on the side of caution. Tick checks are just one component of a comprehensive tick prevention strategy. It is absolutely vital to keep your dog on a year-round flea and tick preventative, as recommended by your veterinarian. A variety of effective oral and topical options are available, and your vet can help you select the most suitable choice for your dog’s specific needs and lifestyle, supplementing their overall health, including considerations for best healthy dog food for puppies.
Conclusion
Protecting your dog from ticks and the diseases they carry is a critical aspect of responsible pet ownership. By understanding why tick checks are necessary, knowing what ticks look like, and mastering the step-by-step process of checking and removing them, you empower yourself to provide the best possible care for your furry friend. Consistency in your tick-checking routine, combined with appropriate year-round preventative medications recommended by your veterinarian, forms the most robust defense against these pervasive parasites. Stay vigilant, stay informed, and enjoy a healthier, happier life with your dog.
References
- American Veterinary Medical Association (AVMA)
- Companion Animal Parasite Council (CAPC)
- General Veterinary Principles and Best Practices